Toggle Background Color
Hi there friend. Do you wanna know why I'm using certain mods, or Second Wave options? Then I'll tell you. It's no big deal. First off, let's get the Second Wave options out of the way:
Absolutely Critical: This one's a lot of fun that I honestly can't play without. It's very high risk, high reward, but it means we'll get a lot of big numbers pretty often. Flanking has changed from 50% to 100%, while the Hardened ability has gone from 60% to 100%. Since flanking increased by 50% and Hardened by 40%, it's now technically easier to crit Hardened enemies, as well as allies. It also means a few of the MECs abilities will always crit, which is fun, cause more crits is more fun. Do remember this does work the other way around, so we will be crit any time our soldiers are flanked.
Not Created Equally: This one is obvious. Varies the stats soldiers start with, instead of the usual 65 Aim/40 Will/12 Mobility, we can now have a range between 50-80 Aim, 25-59 Will and 11-14 Mobility. Gives more variety to our soldiers and gives even more Rookies the wonderful 55 Aim they deserve!
Hidden Potential: Boosts stats randomly upon promotion, depending on the class. Aim is boosted by either 0-2 for Heavies, 1-5 for Assaults, 2-6 for Supports, 3-9 for Snipers and 1-5 for MECs. Heavies have a 60% chance of boosting their health by 1, while other classes have a 50% chance. Will remains unchanged, boosted by either 2-6, or 4-13 with Iron Will.
Aiming Angles: The closer you get to flanking an enemy, the higher the aim chance. This does work both ways.
The Greater Good: You unlock Psionics by interrogating a psionic enemy. By the time we get around to messing around with psionics, we should have interrogated one of those aliens, so it works out. Hopefully.
Itchy Trigger Tentacle: For enemies that Overwatch when you discover them, they now have a 50% chance to just outright shoot the soldier that discovered them. They wait until you reach cover before they shoot, though, so no using Lightning Reflexes! I wonder how many lucky shots they'll land? Should be fun.
 MOOOOOOOOOOODS

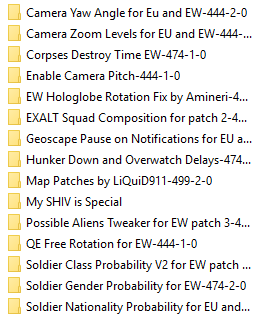
A lot of the mods I'm using are small patches that fix a few things, or tweak a few things here and there. You can't mod XCOM 2012 like you can with XCOM 2, unless you do a huge expansion like Long War and I didn't want to LP that. So there's a fair few camera changes, a couple of EXALT tweaks to vary them up, a Map Patching mod that also randomizes the starting location, which I'm liking quite a lot, though it isn't perfect, slight tweaks to alien deployment, ~naming SHIVs~ and more equal gender, nationality and class rolls for soldiers, to keep things fresh. I have no idea if some of them work, but it'll be fun to find out. I probably won't add anymore mods, unless there's something I really, REALLY need. But I don't want to change the base game too much, I want it varied, but familiar.
 ASIA START
So why did I go for Asia over all the others? Let's have a look at each of the Continent Bonuses:
North America - Air and Space: All aircraft and aircraft weapons cost 50% less to build, purchase and maintain. If you want the greatest fleet XCOM has ever seen in the late game, then this is for you. However, air combat in EU and EW isn't exactly amazing and there's not a huge reason to keep a load of big ships sitting around plinking small Scouts all day. It does make keeping satellites up and running a lot easier, but in the early game, this bonus will do practically nothing for you. If you want to make it work, then go for it, otherwise, there are better options. Since it only requires 3 countries to obtain, it might be worth choosing something else and picking this up along the way when you need it. Panic permitting, of course.
Europe - Expert Knowledge: Laboratories and Workshops cost 50% less to build and maintain. If you're focused on those buildings, then this can let you churn out Engineers very quickly, but like America's bonus, it's only hugely beneficial late game. If you don't build them, then this bonus is useless and it all depends if you can afford the facility space. Laboratories aren't exactly amazing, either, but both buildings have their uses, you just need to focus on them to make it work and then reap the benefits later on.
Asia - Future Combat: All Foundry and Officer Training School projects cost 50% less. This is potentially useful for the entire game, if you pace out the projects. The amount you save over an entire campaign does add up, but it does mean you need to build these facilities quickly to make use of them. It's great on lower difficulties when you have an OTS for free, but that's not where we're at, so we'll have to wait a while. So if you want to rush those excellent tactics quickly, then best get building.
Africa - All In: Monthly XCOM funding is increased by 30%. Very simple and very useful bonus, you don't even have to think about it. But it's not great at the start of the game, where 30% doesn't add up to very much. Late game it lets you get practically anything you want, if you got the satellites up, that is. Also, 30% is a fairly modest increase and not something crazy like 50% or 60%. Since Africa only has 3 countries, it might not be difficult getting this bonus during the normal game, so it might be worth going with something else.
South America - We Have Ways: Autopsies and Interrogations are completed instantly. Very powerful early-to-mid game, where you'll be rolling in all the cool stuff you're getting for no research time. But once the aliens start to dry up and there's nothing really left to catch or kill, then it isn't as useful and practically worthless late game. But you will be rolling in research credits and Chitlin Plating. Since it only has 2 countries, this is the easiest bonus to obtain normally, so putting the base here might not be the best idea.
Finally, you may have seen that I chose Scientists as my first Abduction reward. While I have no idea what you're supposed to do in a ~perfect~ run, it's pretty justifiable by how the game uses Scientists and Engineers.
Every day a Scientist is in the Lab, they produce one research point towards the current research. So the more Scientists you have, the more research points you generate each day. Every research has a set number of points, so for something that took 180 points to research, it would take 36 days. But, add in 4 scientists and it only takes 20 days. Taking Scientists on the first Abduction literally halves your research time. Fantastic.
Engineers still have their use and are the main thing you should be going for. Every item needs a minimum number of Engineers to make and use a fairly simple formula to determine its cost. Cost x 0.5 x (1+(Required Engineers/Total Engineers)), so easy to see that the more you have, the quicker you build things. Simple.
And that should be everything to do with the initial set up. Enough nerd stuff, we've got ayyyyyys to kick!
 MOOOOOOOOOOODS

 ASIA START