Toggle Background Color
Example of play
Bear in mind that this is supposed to primarily illustrate game mechanics. In-thread updates will be a lot shorter - basically one or two phases, in Combat Phase even less due to the need to play some fights in a sequence. Don't worry if you're overwhelmed - in the LP proper I will do my best to keep everything clear and obvious and will remind everyone of the rules as needed.
Turn 1 - June 22-31, 1941
Housekeeping
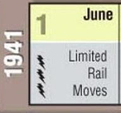
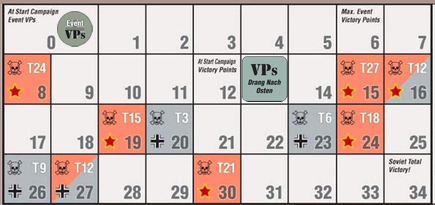
It is Turn 1. The Turn Track informs us that the weather is Clear (yellow background colour), which has no special modifiers, the Turn Event is Limited Rail Moves (only one unit can on each side can be put into their Rail Movement Box - this slightly limits both sides' movements on the strategic level), and the Axis get 3 Blitz tokens (lightning bolts - these are used to give an extra push to an attack). Most turns represent two months, but this is the initial blitz through the unprepared Soviets - the Germans are going to cover a lot of ground, fast!
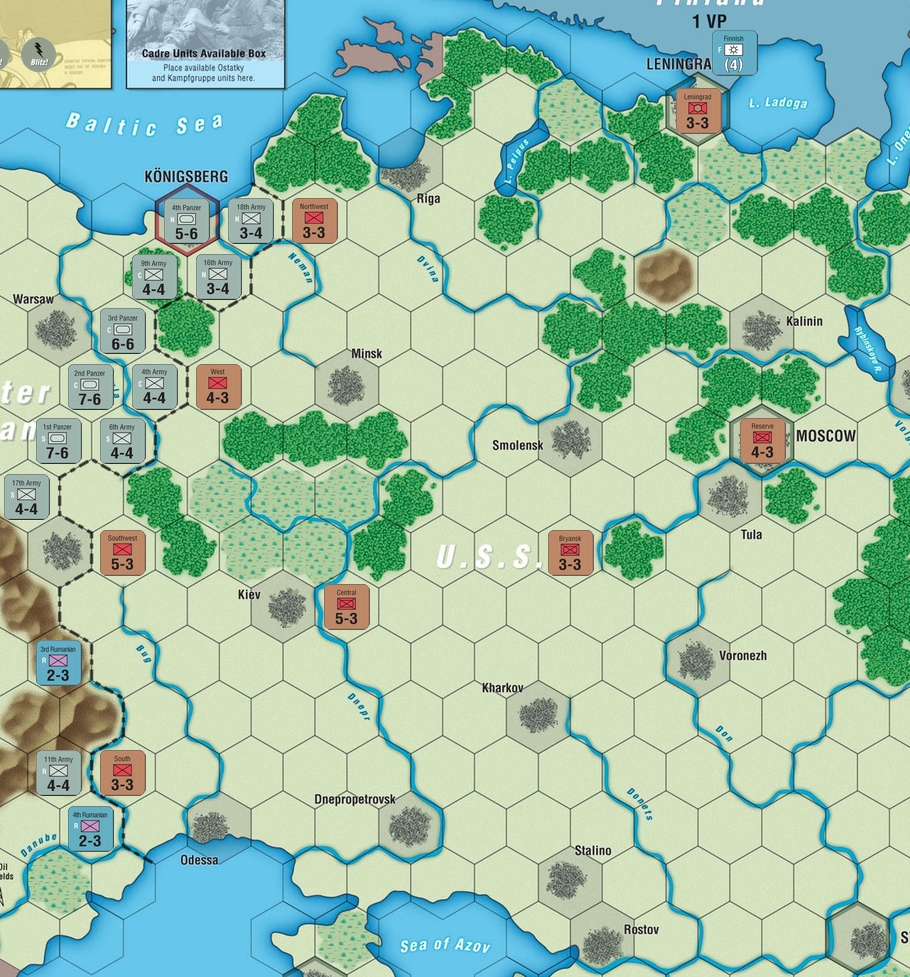
This is the situation at the start of the game. Both sides are still on their sides of the border, but it won't last long. The Germans are ready to pounce on the unprepared Soviets. The first turn has a bunch of special restrictions on their side, however:
- Units marked N are the Army Group North. They can only attack the Soviet Northwest Front.
- Units marked C are the Army Group Centre. They can only attack the Soviet West Front.
- Units marked S are the Army Group South. They can only attack the Soviet Southwest Front.
- Units marked R are the Army Group Romania. They cannot move or Advance After Combat this turn. They can still attack the South Front, though.
The first turn skips the German Card Phase. Instead, the Germans draw 6 cards and discard two of them. Let's see what we get!
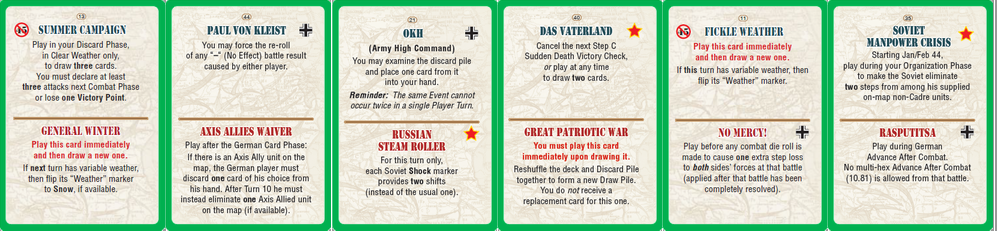
Here's a bunch of cards! The top half of each card lists its Axis Event, the bottom lists its Soviet event. We're primarily concerned with the top ones, then, but knowing what your opponent cannot play is handy sometimes. As you can see, Fickle Weather has text telling us to play it immediately. This turn does not have Variable Weather - it's always Clear - so the card has no effect. As per the red text, we draw a replacement.
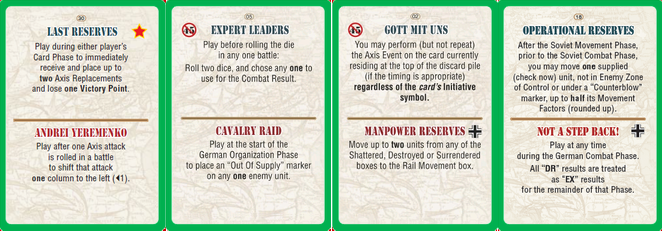
OK, so here's a brief explanation of what the card symbols mean. As you can see, Summer Campaign is marked with a crossed-out 45 - this means that the card will be removed from the deck in January 1945 (turn 23). The Red Star is the initiative symbol - it means that the card cannot be played as an event until much, much later in the game, but can still be used to satisfy a discard requirement for any purpose. The Iron Cross means the opposite - these cards are only playable as long as the Red Star cards are not. This applies for both sides - if the Soviets had any cards, they would also be unable to play the Red Star events right now. Note that the initiative symbols only apply to one side's event - Soviet Manpower Crisis is currently unplayable, but Rasputitsa is perfectly fine.
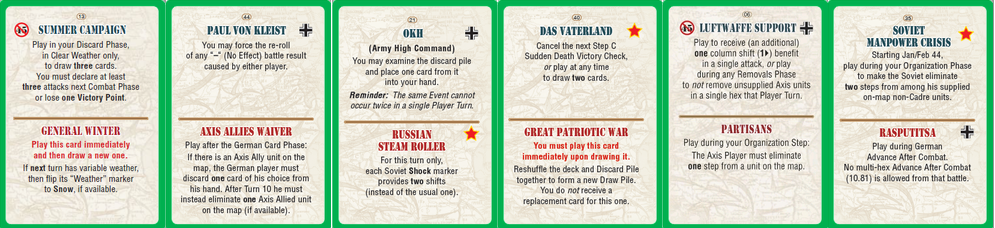
This time the decision what to discard is very simple - we get rid of Soviet Manpower Crisis and Das Vaterland, as they're unplayable as events.
Axis Supply Check Phase
Skipped on turn 1.
Axis Organization Phase
Skipped on turn 1.
Axis Movement Phase
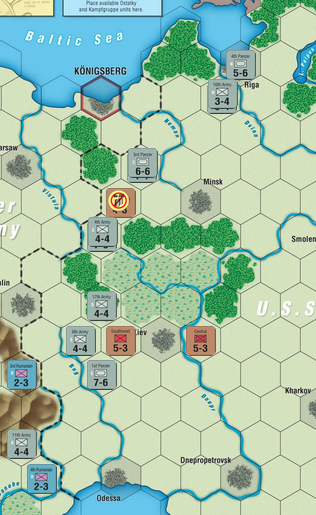
All units move to act against their required targets.
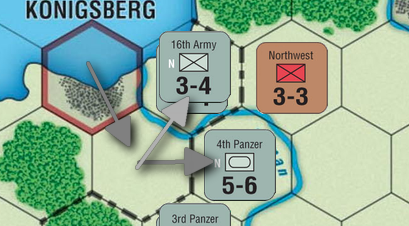
Note that the Axis can stack up to two units in a single hex. The Soviets cannot, as they have a stacking limit of 1.
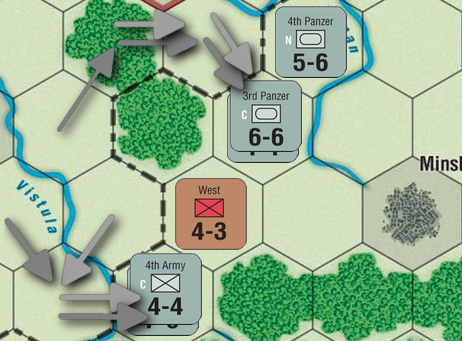
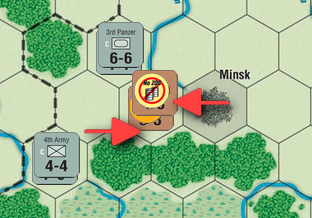
Note that the 3rd Panzer had to pay 4 Movement Points total - Armoured units pay 2 MPs when entering a Forest hex, as per the Terrain Effects Chart. The 4th Army had to pay 3 MPs - leaving the Zone of Control of the West Front cost them an extra 1 MP. Also note how their ZOC now completely envelops the West Front, preventing it from moving (you can't move from a hex in EZOC directly into another hex in EZOC) or receiving supply.

The AGS moves ahead slowly.
Axis Combat Phase
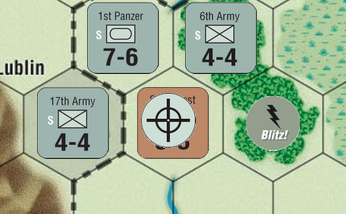
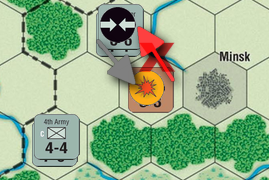
The turn begins with the Voluntary Attacks Step: The Axis command places target markers. You can place a target marker on any hex with an enemy unit adjacent to your own units capable of attacking (ie. not Disorganized or white-strength). These are the hexes you will commit to attacking on your own volition. Placing a Target marker is free, but you only have five of these.
Note that each unit may only fight once per friendly Combat Phase. It can, however, fan out and hit enemies in several adjacent hexes at once - their strength will be tallied up and the defender will pick which hex terrain will provide defensive bonuses for the battle. Note also that in order for units to cooperate in an attack they must all be adjacent to all target hexes, otherwise you have to break it up into several smaller fights.
Here's a quick question: why isn't there a target marker on the West Front? The answer: because the West Front has been surrounded and will soon be without supply. Units without supply go to the Surrendered Unit Box when they're killed in combat or remain unsupplied until the end of turn - and sending an enemy unit there nets us 1 VP and makes replacing that unit cost twice as much! There is a downside, however - it costs us a bit of our tempo, which is very important for the Germans in the early war. To salvage this, we're going to use Counterblows - more on that in the Soviet turn.
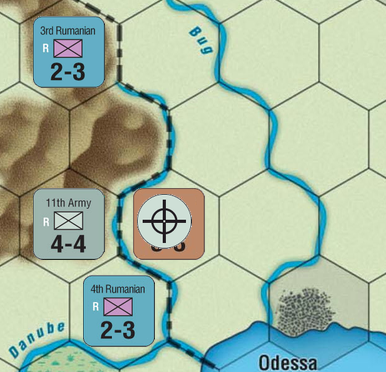
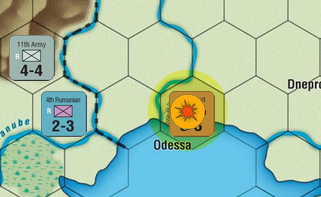
The AGR attacks the South Front, even though it won't be able to hit them all that hard. It's mostly for demonstration purposes.
In the Involuntary Attacks Step, the Soviets would be able to place Counterblow markers on their units, if they had any cards. This could really be a nuisance - they could for example force us to attack and destroy the West Front while it still doesn't have an Out-of-supply (OOS) marker on it.
Combat Resolution Step
Each battle is resolved following the same procedure:
First we have to total the combat strengths of all units taking part in the battle on each side. In this case, it's 15 (7+4+4) vs 5. Then the attacker may commit his Blitz markers - we do so in all our attacks this turn. Finally, the attacker and then the defender may each commit one card to modify the battle results before the die is rolled. If you have any cards that allow you to re-roll or otherwise alter events after the die roll, there is no limit on the number of cards played.
Once all this is resolved, divide the attacker's strength by the defender's strength, round down and thus establish the combat odds. In this case, it's 15/5 - exactly 3:1 odds.
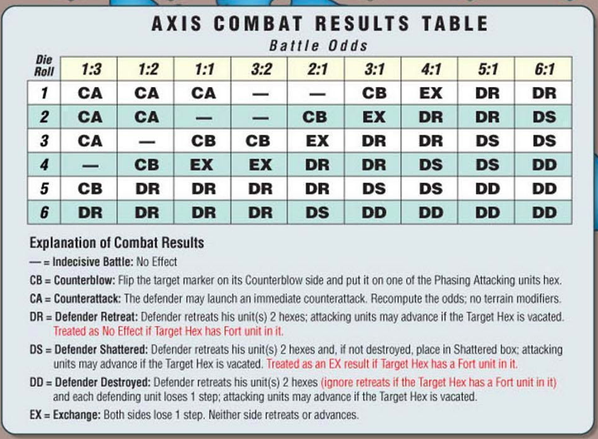
Cross-referencing this with the Combat Results Table nets us the correct column. Then we have to apply any combat shifts - modifiers that change the CRT column we will use. A Blitz marker shifts the combat one column to the right. If the attackers have at least one Armour unit, and the defenders have no Armour or Mechanized units, and the terrain does not restrict it (see here), the attackers get the Armour Bonus - another shift to the right. Some effects may shift the combats to the left - usually terrain. In this case, it's Open - no defensive bonuses and unrestricted Armour Bonus against the Infantry in the Southwest Front!
The final odds are 5:1. The attacker rolls a die. The result is a 2 - in the CRT this is a "DR" (Defender Retreats) result. The Soviets have to retreat 2 hexes towards a friendly Supply Source, if able. If they would be forced to retreat across EZOC, each hex of such a retreat would mean a step loss. That is not the case this time, however.
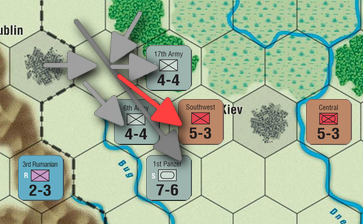
This allows the Axis forces to Advance After Combat. When a unit is forced to retreat, attackers may follow it into the hex it vacated. The infantry may then move one more hex and the armour yet another one. Some types of terrain may force the attackers to halt their advance upon entry.
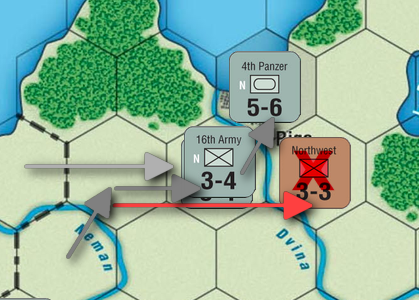
The AGN has a 11/3 = 3:1 strength ratio, adjusted by 2 shifts to the right (+1 for a Blitz marker, +1 for Armour Bonus) - a total of 5:1. Note that the river does not protect the defenders in this case, since not all of the attacking units have to strike across it. The roll is a 6 - "DD", Defender Destroyed. The Northwest Front has to retreat two hexes and then lose a step - since it is a one-step unit, it is destroyed and goes to the Destroyed Units Box. The Germans pursue them and enter Riga.
Capturing the city nets them 1 VP.
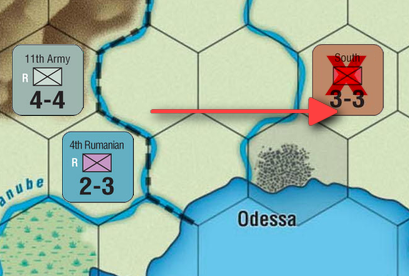
AGR vs South Front
Combat odds: 6/3 = 2:1 - shifted +1 for Blitz, -1 for River - total of 2:1.
Roll: 6 - DS
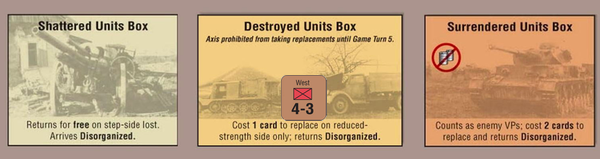
This is what a regular battle result in the LP will look like. Of course, it will be followed by a bit of flavour - we don't want it to be too dry. "DS" means Defender Shattered - they have to retreat two hexes and then go to the Shattered Units Box. I really should have used the Luftwaffe Support card here - an extra shift would give us a chance to destroy them and force the enemy to pay for having them brought back. Hindsight is 20/20, though.
Axis Marker Removal Phase
No markers or units to remove.
Axis Detraining Phase
No units in the Axis Rail Movement Box.
Soviet Turn 1 - 22-31 June 1941
Card Phase
The Card Phase is made up of two steps. First, you have the Discard Phase, when you discard down to 2 cards. Then you draw four new ones. The Soviets have no cards to discard, so they simply draw a new hand:
Soviet Supply Check Phase
All units are checked for supply, starting with the Phasing Side (Soviets in this case). The West Front has no access to supply from Minsk due to EZOCs - it is marked as OOS. This means that its Movement Allowance is reduced to 3 MPs (from 3, so not much of a loss), it cannot be flipped during the Org Phase (irrelevant at this point), it cannot entrain, has no Zone of Control, awards attackers two shifts in combat and if eliminated in combat goes to the Surrendered Units Box. If it were an armour unit, it would be ineligible for Armour Bonus. It can attack normally (with no penalties), but can only Advance into the hex vacated by the defender, not any further. If it stays this way until the Marker Removal Phase, it surrenders.

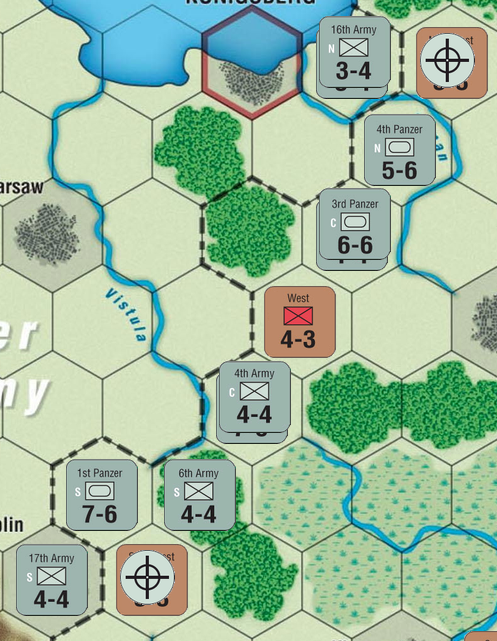
This is what the front line looks like before the Organization Phase:
Soviet Org Phase
The Org Phase is made up of three steps: Flip, Placement and Reorganization. In the Flip step, the Phasing Side may flip their unit counters after paying the appropriate cost - it is currently irrelevant for the Soviets, as their units are all 1-step. In the Placement Step, units that arrive as reinforcements, recover from being Shattered or are reconstituted after destruction/surrender are placed on the map. Shattered units arrive for free, Destroyed cost one card, Surrendered cost two.
Shattered units of either side may arrive in any friendly city on the map that can trace a Supply Path and is not in an EZOC. German ones can also show up on western map edge hexes in Greater Germany (still not in EZOCs). Other units are placed in any friendly city on the appropriate side of the border that can trace a Supply Path. However, in the case of Axis units those cities must not be in EZOCs, while the Soviets have no issue reenacting Enemy at the Gates and can pop up even in cities in EZOCs.
We discard Andrei Yeremenko to retrieve Northwest Front and put it in Odessa to protect it against Axis advance. The South Front goes to Minsk - there's a plan to it. Note that they both have Disorganized markers on them - that means that they cannot attack voluntarily (but they can take part in Counterblows). These markers disappear in the Removal Phase, but if we really need to, we can remove them now at the cost of 1 card each.
Soviet Movement Phase
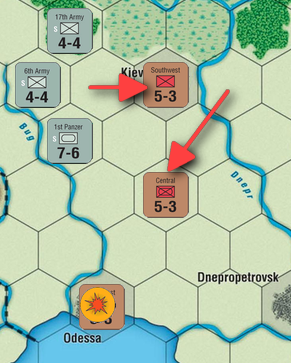
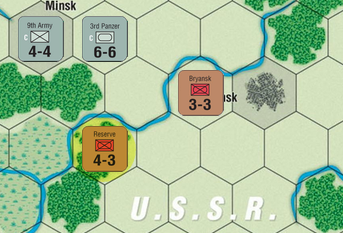
In the south, the Southwest Front takes up defensive positions in Kiev. The mechanized Central Front sets up between Kiev and Odessa to try and hold back any attempts at encircling other units. We can't really hold here for long, but we might at least keep a retreat path open. Note that Infantry units are placed in terrain that prevents Armour Bonus from working and the units that stand in the Open terrain are Mechanized and therefore immune to it.
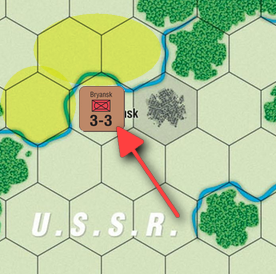
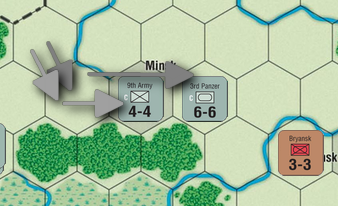
Near Smolensk, the Bryansk front moves in to protect the city and block the Germans from crossing. Note that it exerts ZOC across the river and would therefore force the Germans to stop and attack. If it holds, it will let us hold Smolensk for an extra turn.
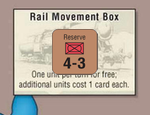
The Reserve Front from Moscow would be no use where it is, so it goes to the Rail Movement Box. That way, we can move it to where it's needed at the end of the turn.
The South Front moves west. Now here's the thing: a unit in EZOC can move into another hex in EZOC if and only if there is a friendly unit there. If this results in overstacking, it has to be resolved immediately. In this case, we have to remove one unit - they don't mind, they're all heroes. If we remove the supplied unit, it becomes Shattered and returns for free next turn. If we choose the OOS unit, it is Destroyed - which is still a lot better than Surrendered!
We opt to remove the West Front. It is destroyed, leaving the South Front as sitting ducks down there. The reason we did not opt for the South Front to shatter will become clear in a minute.
Soviet Combat Phase
We place no targets - we don't have the strength to fight the Germans right now. However, in the Involuntary Attacks Step, the Germans angrily discard Paul von Kleist/Axis Allies Waiver and place a Counterblow marker on their stack next to the South Front.
Counterblows placed by cards are diversionary attacks that are supposed to aid another defending unit by distracting the enemy (by distracting an attacking unit and forcing it to fight the CB-ing unit instead) or force the opponents to push their hand and expose themselves to a counterattack. You can put a Counterblow marker on your stack in any single hex adjacent to enemy units. White-strength units (such as the Finns) cannot participate in Counterblows as the defenders, but if they are in a hex with black-strength units that participate in the Counterblow they will retreat along with them, if necessary. Disorganized and white-strength units may attack forces under the CB marker, however. Remember that units in a Counterblow do not receive defensive terrain bonuses - they have to expose themselves during their limited offensive.
In this case, this Counterblow is supposed to give the Axis a chance at counter-attacking and destroying the South Front during the Soviet turn. We have no choice but to attack.
West Front vs 3rd Panzer, 9th Army
Combat odds: 3/10 = <1:3 - automatic CA!
If you cannot muster even 1:3 odds in a combat, the result is an automatic CA - Counter-attack. CA means that the defender can (but doesn't have to) immediately start a new battle with the same units, but with the roles reversed - and the new defender does not get any terrain shifts! The Germans oblige, of course.
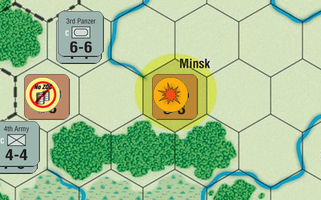
3rd Panzer, 9th Army vs West Front
Combat odds: 10:3 = 3:1 +1 (armour)
Axis plays Luftwaffe Support to get an additional combat shift.
Final odds: 3:1 +1 (armour) +1 (Luftwaffe Support) = 5:1
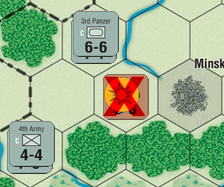
Die roll: 5 - DD
The West Front is destroyed and the Germans advance, capturing Minsk and bumping their VP count to 14.
So, why move in to save the West Front if you will probably lose two cards' worth of units anyway in the process? Well, it prevents you from losing a VP to a surrender. Of course, if you're unlucky, you might not get an option to put a unit into Minsk - and it would probably be quite easy for the Axis to surround and starve that unit instead. But it forces them to hold back some troops that would otherwise push for Moscow and they may not be willing to take such a hit to their momentum. It's a calculated risk - be wary that it doesn't turn against you. In this case, we luckily have Manpower Reserves on hand, which will allow us to restore lost units on the cheap next turn, so the risk is significantly smaller.
Soviet Removal Phase
Disorganized marker removed from the Northwest Front.
Soviet Detraining Phase
In this phase, you may place any number of your units from the Rail Movement Box back on the board (but you don't have to, they can remain there indefinitely). They do not arrive Disorganized. They must be placed in any friendly City hex NOT captured this player turn that can trace an Overland Supply Path (even in EZOC) OR any Overland Supplied hex that is not an enemy-controlled City or adjacent to one that is not more than three hexes from a friendly Supplied City or a friendly map edge.
We place the Reserve Front here in the face of the Minsk fiasco. It is a very defensible position and it helps us protect the Bryansk Front from being encircled - but it means that our defences between Smolensk and Leningrad are virtually non-existent. Luckily, the terrain there should prevent the Axis from advancing too far before we can send some reinforcements that way.
That's it for Turn 1, hope you have a grasp of the rules now!