Toggle Background Color
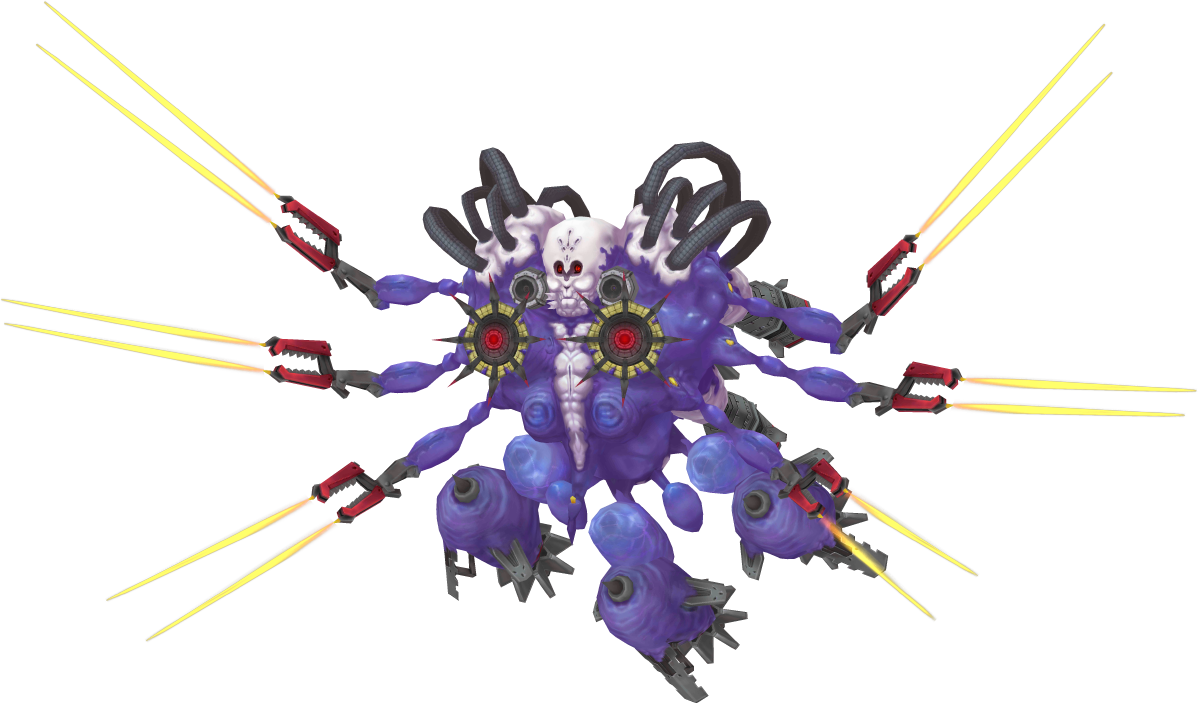
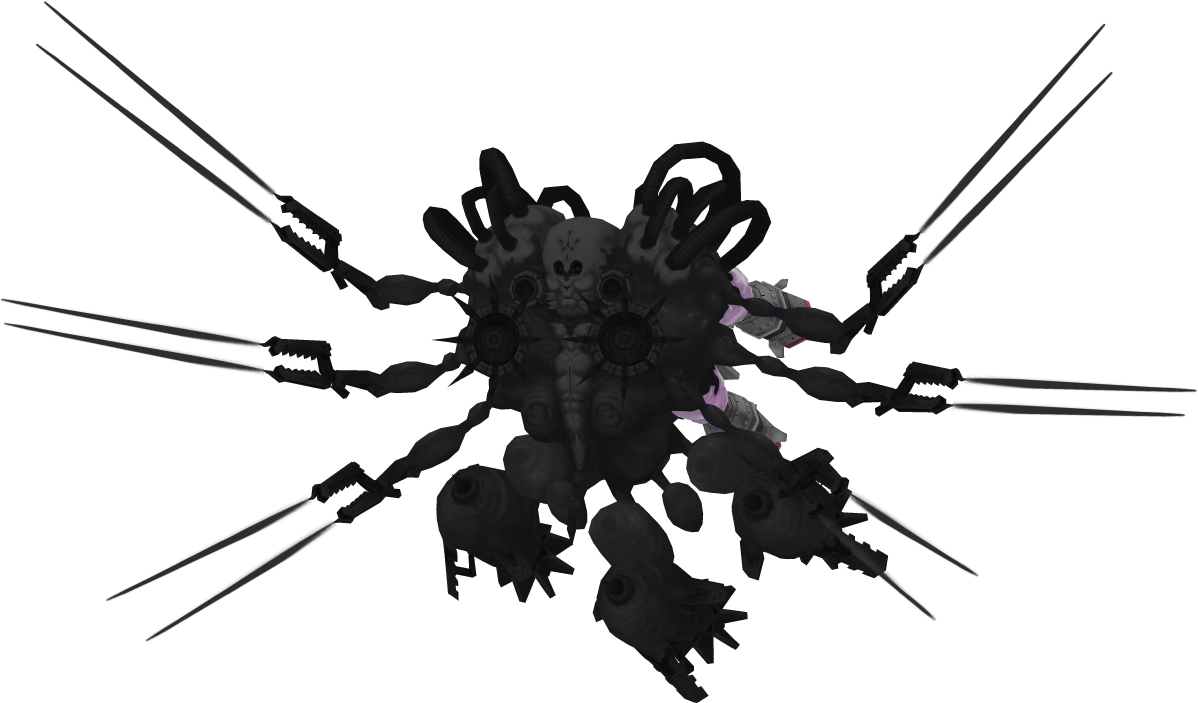
Star Devourer
HP: 96452
STR: 243
INT: 227
VIT: 231
WIS: 238
AGI: 204
LUC: 170
Row: Front
Skills:
- Full Burst: Used when all parts are alive, and are not paralyzed, asleep, petrified, or have their needed body part bound. Destroys all parts. Deals 15 instances of 1000% ranged INT-based almighty damage to random party members. Can hit the same target multiple times. Attempts to first instantly kill, then inflict panic on, hit targets, with a 100% base chance. Has a 50% speed modifier and a base accuracy of 999%.
- Regenerate:
- Used both as a normal action and a free action.
- If used normally, summons a part in this order: Agile Sword, Sound Cannon, Rocket Engine, Towering Sword, Energy Tube, Bomb Chamber.
- From 100% to 90% HP, if the next part to be summoned is already out, it is skipped.
- From 90% HP to 30% HP, if the next part to be summoned is already out, the next part in the pattern is summoned instead.
- From 30% HP to death, random parts are summoned.
- Used as a free action at the end of a turn each time Star Devourer loses 10% of its max HP. When used this way, it restores a random part.
- Regenerate uses body parts--which parts specifically depends on the part regenerated. Sound Cannon and Energy Tube require the head, Agile Sword and Towering Sword require the arms, Rocket Engine and Bomb Chamber require the legs. If the body part required by the next part in the Regeneration pattern is bound, it will be skipped over. Has a 10% speed modifier.
Note:
- If Star Devourer is petrified, none of the parts will perform any actions until it is unpetrified.
Drops:
- Normal:
 Worldeater Core. 100% chance. Sells for 300000 en.
- 1 needed to make
 Ameno-habakiri (+228 ATK, +200 MATK, Sonic Mirage, Gold x6). Costs 720000 en, sells for 288000 en.
Damage Resistances:
 125%
125%  125%
125%  125%
125%
 125%
125%  125%
125%  125%
125%
Disable Resistances:
 50%
50%  50%
50%  25%
25%  0%
0%  25%
25%  50%
50%  10%
10%
 0%
0%  10%
10%
 25%
25%  25%
25%  25%
25%
Say hello to the superboss. Star Devourer is a pretty interesting superboss as far as EO games go--it takes some cues from Warped Savior from EO4, in that it relies quite a bit on summons, but in this case, the summons are literally all of Star Devourer's power. The main body itself does not do anything except resummon parts and act as the catalyst for punishing the player if the parts get out of control. In addition, Star Devourer's parts are far more fragile than Warped Savior's were--they're designed to be killed pretty easily and then come back quickly, making the fight a revolving door of threats that you need to constantly pay attention to.
I don't have much to say about the main body, except: don't let the HP number fool you. In reality, Star Devourer has closer to 77k effective HP, because it takes 1.25x damgae from everything.
Sound Cannon
HP: 4283
STR: 243
INT: 227
VIT: 231
WIS: 238
AGI: 204
LUC: 170
Row: Front
Skills:
- Eerie Siren: Uses the head. Attempts to inflict panic on and bind the heads of all party members, with a 7% base chance. Has a 150% speed modifier.
- Relief Echo: Uses the head. Attempts to inflict sleep and bind the legs of all party members, with a 9% base chance. Has a 70% speed modifier.
- Clear Noise: Uses the head. Purges all buffs from all party members. Attempts to inflict paralysis on all party members, with an 11% base chance. Has a 30% speed modifier.
Damage Resistances:
100% 100% 100%
100% 100% 100%
Disable Resistances:
25% 10% 75% 0% 0% 25% 0%
50% 75%
50% 25% 25%
As far as the parts go, the Sound Cannon isn't a terribly big threat, mostly because those low base chances combined with Star Devourer having pretty low LUC equals even lower effective chances, but Clear Noise is a pain in the ass to deal with, especially if you're relying on buffs for defensive support.
Energy Tube
HP: 4283
STR: 243
INT: 227
VIT: 231
WIS: 238
AGI: 204
LUC: 170
Row: Front
Skills:
- Tonic Injection: Uses the head. Increases all enemies' attack by 20% for 4 turns. Has a 70% speed modifier.
- Stiffener Injection: Uses the head. Increases all enemies' defense by 20% for 4 turns. Has a 120% speed modifier.
- Energy Fill: Uses the head. Restores Star Devourer's HP, with 7500% healing power (about 9070 HP). Has a 50% speed modifier.
Damage Resistances:
100% 100% 100%
100% 100% 100%
Disable Resistances:
25% 10% 75% 0% 0% 25% 0%
50% 75%
50% 25% 25%
Tonic Injection isn't much to worry about, since the injections only apply to whatever parts are alive at cast time. Stiffener Injection's more of a cause for concern, since the main body getting any reduction to damage means the fight's gonna get dragged on for longer. Both of those are fucking nothing, though, compared to fucking Energy Fill. That thing restores 10% of Star Devourer's max HP every time it's cast, and as the fight goes on, it can be casted randomly. It is solely because of Energy Fill that I strongly advocate for either paralyzing the Energy Tube, immediately binding its head as soon as it comes out, or focusing it down if you don't have that much true multi-target damage.

Agile Sword
HP: 4567
STR: 243
INT: 227
VIT: 231
WIS: 238
AGI: 204
LUC: 170
Row: Front
Skills:
- Parry: Uses the arms. Nullifies all cut, stab, and bash attacks to all enemies for one turn. Has a 1000% speed modifier.
- Swipe: Uses the arms. Deals 90% melee STR-based cut damage to one row of party members. Has no speed modifier and a base accuracy of 99%.
- Sonic Thrust: Uses the arms. Deals 65% melee STR-based stab damage to one party member, with line-piercing effect. Has a 1000% speed modifier and a base accuracy of 99%.
Damage Resistances:
75% 75% 75%
125% 125% 125%
Disable Resistances:
50% 25% 10% 0% 25% 75% 0%
25% 75%
25% 50% 25%
The Agile Sword can go right to hell. Not only does it have extremely quick attack skills (even Swipe's pretty likely to outspeed most of your party), it also has Parry. Parry is, along with Energy Fill and Elemental Decoy, one of three skills that has the potential to drag out the fight annoyingly long, and can turn an otherwise-fine run into a game over.
Towering Sword
HP: 4567
STR: 243
INT: 227
VIT: 231
WIS: 238
AGI: 204
LUC: 170
Row: Front
Skills:
- Slam: Uses the arms. Deals 3 instances of 70% melee STR-based bash damage to random party members. Can hit the same party member multiple times. Attempts to stun hit targets, with a 30% base chance. Has a 200% speed modifier and a base accuracy of 99%.
- Storm Edge: Uses the arms. Deals 3-5 instances of 60% melee STR-based cut damage to random party members. Can hit the same party member multiple times. Has no speed modifier and a base accuracy of 80%.
- Blade Break: Uses the arms. Deals 75% melee STR-based cut damage to all party members. Reduces hit targets' defense by 20% for 4 turns. Has an 80% speed modifier and a base accuracy of 99%.
Damage Resistances:
75% 75% 75%
125% 125% 125%
Disable Resistances:
50% 25% 10% 0% 25% 75% 0%
25% 75%
25% 50% 25%
Slam's annoying, but otherwise I don't consider the Towering Sword that much of a threat.
Bomb Chamber
HP: 3821
STR: 243
INT: 227
VIT: 231
WIS: 238
AGI: 204
LUC: 170
Row: Back
Skills:
- Explosive Shot: Uses the legs. Deals 90% ranged INT-based fire damage to one party member, with splash damage. Has a 150% speed modifier and a base accuracy of 99%.
- Electric Bullet: Uses the legs. Deals 70% ranged INT-based volt damage to one party member, with line-piercing effect. Has an 80% speed modifier and a base accuracy of 80%.
- Elemental Decoy: Uses the legs. Nullifies all elemental attacks to all enemies for one turn. Has a 1000% speed modifier.
Damage Resistances:
125% 125% 125%
75% 75% 75%
Disable Resistances:
25% 75% 25% 0% 50% 10% 0%
25% 75%
25% 25% 50%
Fuck Elemental Decoy. See my note about Parry above for more info on it. Explosive Shot and Electric Bullet can deal pretty serious damage to Earthlain and Therian characters (which, let's be honest, probably make up the entirety of your front row), but that's nothing you can't mostly mitigate by giving them equipment that prioritizes MDF boosts.
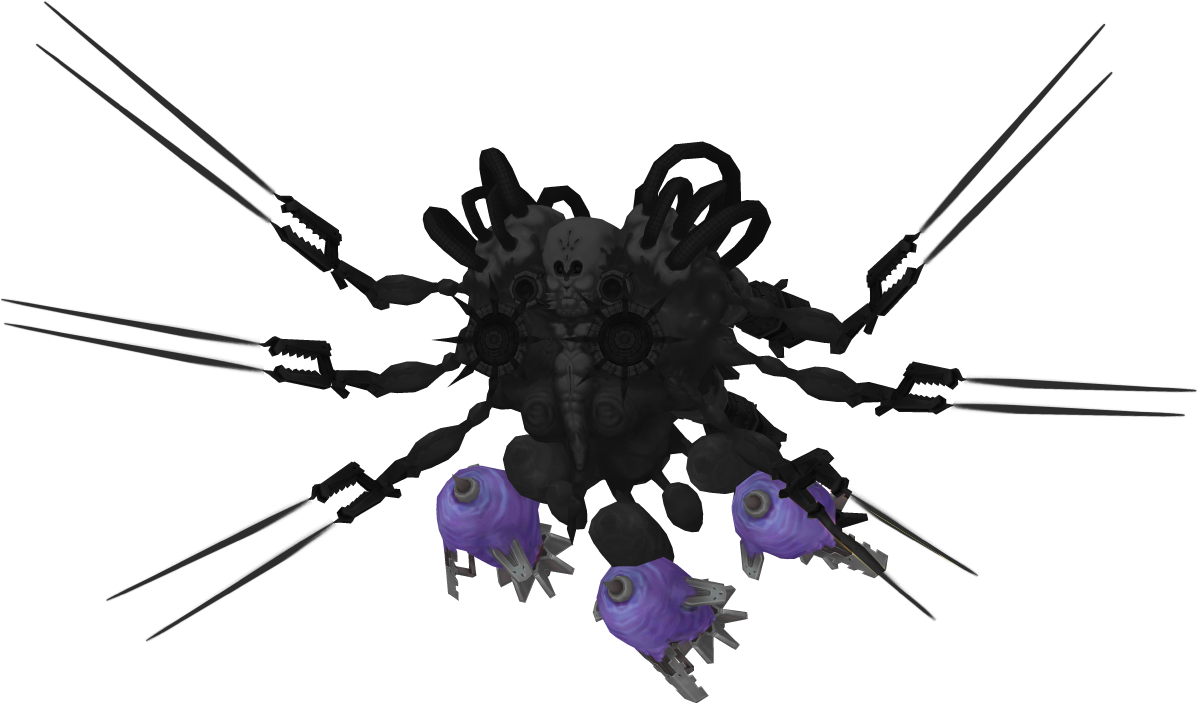
Rocket Engine
HP: 3821
STR: 243
INT: 227
VIT: 231
WIS: 238
AGI: 204
LUC: 170
Row: Back
Skills:
- Sonic Mirage: Uses the legs. Increases all enemies' evasion by 20% for 4 turns. Has a 200% speed modifier.
- Exhaust: Uses the legs. Deals 60% ranged INT-based fire damage to all party members. Reduces all party members' accuracy by 20% for 4 turns. Has an 80% speed modifier and a base accuracy of 99%.
- Heat Field: Uses the legs. Cures all enemies of any ailments and binds. Purges all debuffs from all enemies. Has a 30% speed modifier.
Damage Resistances:
125% 125% 125%
75% 75% 75%
Disable Resistances:
25% 75% 25% 0% 50% 10% 0%
25% 75%
25% 25% 50%
The Rocket Engine's annoying, but not much more than that. Sonic Mirage and Exhaust fall under the same category as Parry, Elemental Decoy, and Energy Fill (that of "drags the fight out"), but they're nowhere near as bad, and considerably easier to deal with. Heat Field's just kind of something you have to live with, and it's probably worth prioritizing the Rocket Engine if you're relying a lot on disables.
Let's give the part AI a look, shall we?
<div class="quote basic">Part Patterns:
- Extremely huge thanks to Dr. Fetus for doing the tedious work of documenting this nonsense.
- Actions are listed in order of priority.
- If Star Devourer is asleep or petrified, all parts will do nothing.
- Note: HP percentages refer to Star Devourer's HP, not the part's HP.
- Sound Cannon:
- 100% to 60% HP:
- Eerie Siren
- Relief Echo
- Clear Noise
- Loops until the next stage.
- 60% to 30% HP:
- Upon summoning:
- 40% chance to use Clear Noise
- 30% chance to use Relief Echo
- If both rolls above failed, use Eerie Siren
- After using a skill: 50% chance of using either remaining skill
- 30% HP to death:
- If Clear Noise has not been used in 3 turns, use Clear Noise
- If no party members have head binds, 70% chance to use Eerie Siren
- If no party members are asleep, 70% chance to use Relief Echo
- If no party members are paralyzed, 70% chance to use Clear Noise
- Otherwise: 33.3% chance of using Clear Noise or Eerie Siren. Relief Echo is used if both previous rolls fail
- Will not use the same skill twice in a row
- Energy Tube:
- 100% to 60% HP:
- Tonic Injection
- Stiffener Injection
- Energy Fill
- Loop until the next stage.
- 60% HP to 30% HP:
- Upon summoning:
- 33% chance to use Energy Refill
- 33% chance to use Stiffener Injection
- If both rolls above failed, use Tonic Injection
- After using a skill: 50% chance of using either remaining skill
- 30% HP to death:
- If Energy Fill has not been used in 3 turns, 80% chance to use Energy Fill
- If the Energy Tube does not have the Stiffener Injection buff, 60% chance to use Stiffener Injection
- Otherwise:
- 60% chance to use Tonic Injection
- Use Energy Fill if the above roll failed
- Will not use the same skill twice in a row
- Agile Sword:
- 100% to 60% HP:
- Loop until the next stage.
- 60% HP to 30% HP:
- Upon summoning:
- 33% chance to use Sonic Thrust
- 33% chance to use Parry
- If both rolls above failed, use Swipe
- After using a skill: 50% chance of using either remaining skill
- 30% HP to death:
- If Sonic Thrust has not been used in 3 turns, 30% chance to use Sonic Thrust
- If Sonic Thrust was not used, 50% chance to use Parry
- Otherwise:
- 60% chance to use Sonic Thrust
- Use Swipe if the above roll failed
- Will not use the same skill twice in a row
- Towering Sword:
- 100% to 60% HP:
- Slam
- Storm Edge
- Blade Break
- Loop until the next stage.
- 60% HP to 30% HP:
- Upon summoning:
- 30% chance to use Blade Break
- 40% chance to use Slam
- If both rolls above failed, use Storm Edge
- After using a skill: 50% chance of using either remaining skill
- 30% HP to death:
- If the Bomb Chamber did not use Elemental Decoy, 60% chance to use Slam
- If Blade Break has not been used in 3 turns, 80% chance to use Blade Break
- Otherwise:
- 60% chance to use Storm Edge
- 20% chance to use Slam
- Use Blade Break if both rolls above failed
- Will not use the same skill twice in a row
- Bomb Chamber:
- 100% to 60% HP:
- Explosive Shot
- Electric Bullet
- Elemental Decoy
- Loop until the next stage.
- 60% HP to 30% HP:
- Upon summoning:
- 40% chance to use Elemental Decoy
- 30% chance to use Electric Bullet
- If both rolls above failed, use Explosive Shot
- After using a skill: 50% chance of using either remaining skill
- 30% HP to death:
- If the Agile Sword did not use Parry, 70% chance to use Elemental Decoy
- If Elemental Decoy is not used, 80% chnace to use Explosive Shot
- Otherwise:
- 60% chance to use Electric Bullet
- Use Explosive Shot if the above roll failed
- Will not use the same skill twice in a row
- Rocket Engine:
- 100% to 60% HP:
- Sonic Mirage
- Exhaust
- Heat Field
- Loop until the next stage.
- 60% HP to 30% HP:
- Upon summoning:
- 33% chance to use Heat Field
- 33% chance to use Exhaust
- If both rolls above failed, use Sonic Mirage
- After using a skill: 50% chance of using either remaining skill
- 30% HP to death:
- If Heat Field has not been cast in 3 turns, use Heat Field
- If Exhaust has not been used in 2 turns, 40% chance to use Exhaust
- If Sonic Mirage was not used last turn, 30% chance to use Sonic Mirage
- If Sonic Mirage was not used on this turn, 70% chance to use Heat Field
- If Heat Field was not used on this turn, 30% chance to use Heat Field
- Otherwise:
- 33% chance to use Exhaust
- 33% chance to use Sonic Mirage
- Use Heat Field if both above rolls failed
- Will not use the same skill twice in a row
Does that giant list intimidate you? Me too. The gist of it is: when Star Devourer is at 100% to 60% HP, skills are used on a set rotation. When Star Devourer is at 60% to 30% HP, skills are used mostly-randomly, excluding the check for not using skills twice in a row. From 30% HP to death, however, the parts start getting nasty, and check for specific conditions. These conditions are designed to make your life hell, especially the Energy Fill one!
With all that in mind, let me explain the party I will be using for Star Devourer. I opted to choose my own party for the first and last time in the LP, as far as bosses go.
 Raven (Deathbringer): It is incredibly easy to get the maximum 3 stacks of Black Blade in the Star Devourer fight, and paralysis is fairly useful as it's the closest thing to a fully-debilitating ailment you can inflict on Star Devourer or the parts that isn't petrification. This spec also just does a lot of damage anyway, and it's extra-nice that it hits multiple targets at once.
 Jana (Blade Master): Petal Scatter. That is all I will say.
 Kaelin (Elemancer): Kaelin can unconditionally deal loads of damage to Star Devourer and any alive parts every turn, which is very, very nice. He also has considerable TP sustain thanks to Cutting Costs.
 Lanzon (Spirit Broker): Lanzon's role in the fight can best be described as "use Sacrifice, then use Banefire Breath." Not only does this deal a metric fuckton of damage to the front row, but it also reduces Star Devourer and any hit parts' elemental defense by 50%.
 Mio (Divine Herald): Mio brings Ruinous Prayer and Vitality Prayer, buffing our offense and survivability. Other than that, she also has Aegis Shield (which I need so that I'm guaranteed to survive Full Burst on the first turn), and is fairly quick, so she's a decent item bot.