Toggle Background Color
So we will be playing as a bunch of filthy rebels! I have a lot of thoughts about this and I'm actually kind of excited to get started.

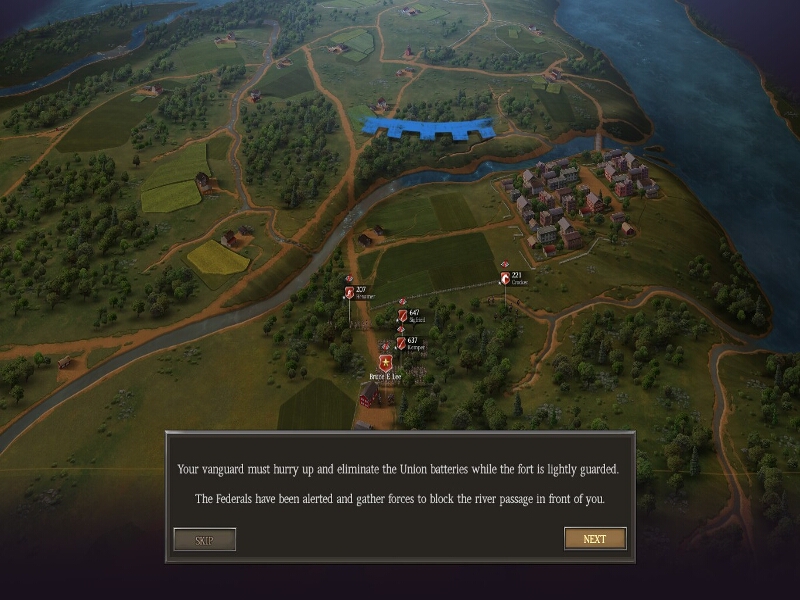
Battle: Potomac Fort
Upon inputting our character information, we are immediately thrust into a tutorial battle. Our objective is to take a small fort along the Potomac river containing 2 artillery batteries, destroy or capture the guns, and route the garrison.
Historical context: There really isn't much. I guess this battle is to represent the dozens of small skirmishes that took place along the Potomac river (which borders Washington DC) in the lead up to Bull Run, or First Manassas, but it exists more as a tutorial than anything. Those flare ups between the oposing armies were mostly small scale meetings, scout companies running into each other or attempting supply raids.
It makes sense that they had to go a bit bigger than history in order to make this playable. Historically none of the skirmishes leading up to the first major battle of the war really involved a significant casualty count. While this is happy for the soldiers involved, it would make for a boring video game.
Anyway, it's still a pretty fun little scenario and we'll get a good look at some key mechanics without having to worry much about losses. I do prefer the northern tutorial because it involves fighting over a small city, but eventually we will get to that (I hope).

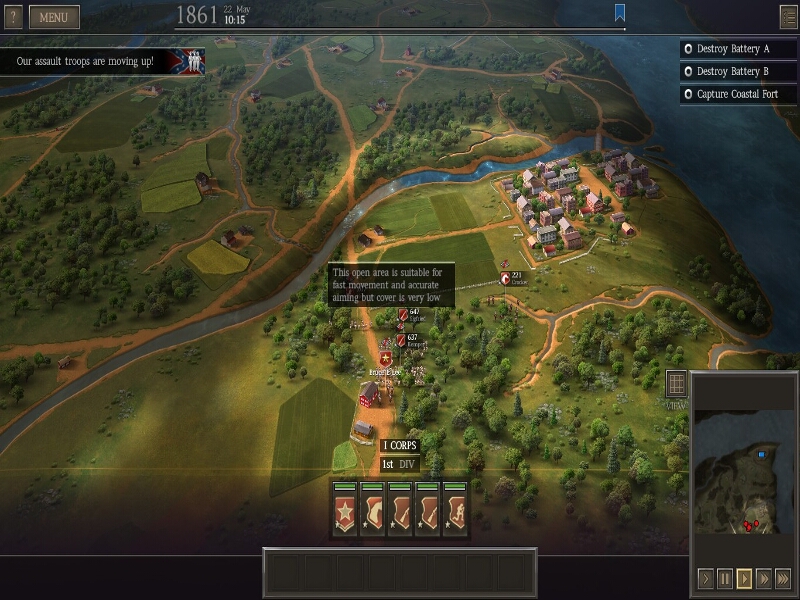
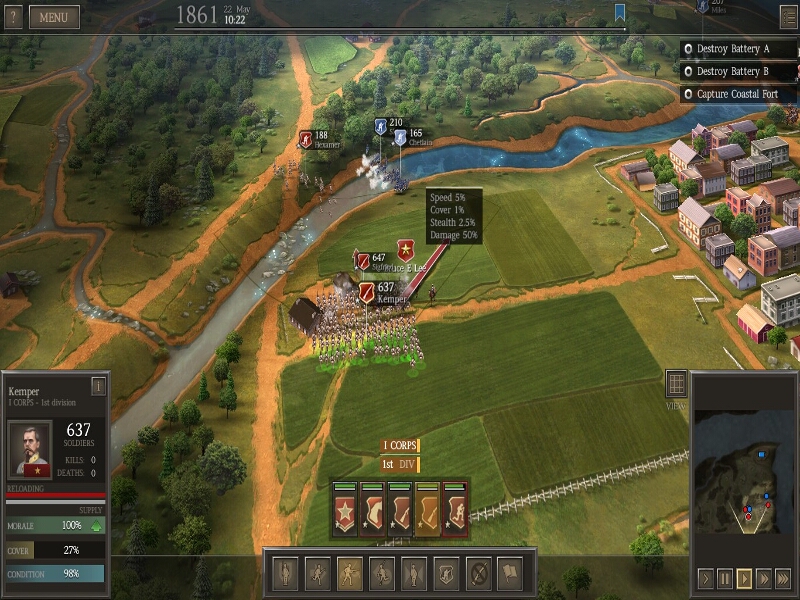
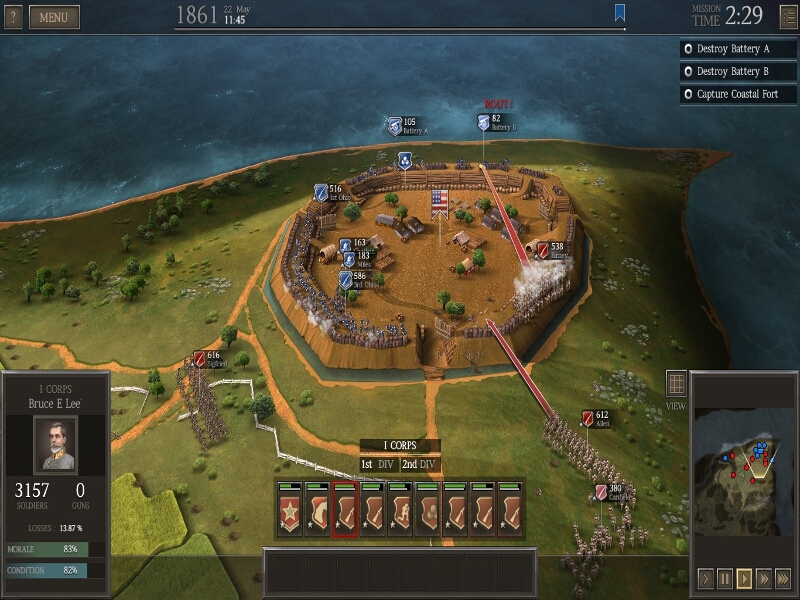
So you can see our target rests along a bend in the Potomac
The blue line at the top is the reported Union defensive line. You can also see our starting forces in this shot. We have a couple regiments of infantry, some skirmishers, and some cavalry.

I was kind of dumb in the early battle and made the mistake of listening to the tutorial text, opting to beeline for the plain west of the fort in order to face the garrison on open ground. To be honest I fight this entire battle pretty over aggressively and I will pay for that in casualties. Part of the reason for this is I want this to be entertaining to watch and to play, as well as containing some degree of realism rather than gamesmanship (the reason I am playing on normal instead of hard is that it's basically impossible to win on hard unless you turtle and inflict maximum casualties, which becomes tedious really quick). The other part of it is that I'm not good at these games. We may see a lot of questionable decisions.
So our starting position isn't great. There's a town to the east of us and our main force is on a north south road that requires we cross a forested creek to reach the open ground that I am currently trying to catch them in. Rivers are very difficult to cross under fire, so if they have cavalry or worse, a regiment of infantry posted there, we'll have to waste time looking for a ford.
The treeline along that creek also prevents us from seeing what's there as well as what's beyond. I want my cavalry to secure the town and sweep north through it in case we need to find a secondary crossing point so the rest of my brigade will try to take that crossing before they can establish a strong line there. We'll push our skirmishers in first then follow up with both regiments of infantry. In retrospect I should have probed the ford with my cavalry first to get a better picture of what was there.
The good news is they've only seen fit to defend with skirmish lines. The bad news is that crossings like this are so defensible that this could still be a problem. I've rushed my own skirmishers across in the hopes of keeping them tied down while the larger regiments make their crossings. If we can get on the same side of the water as them then this should be over quickly.

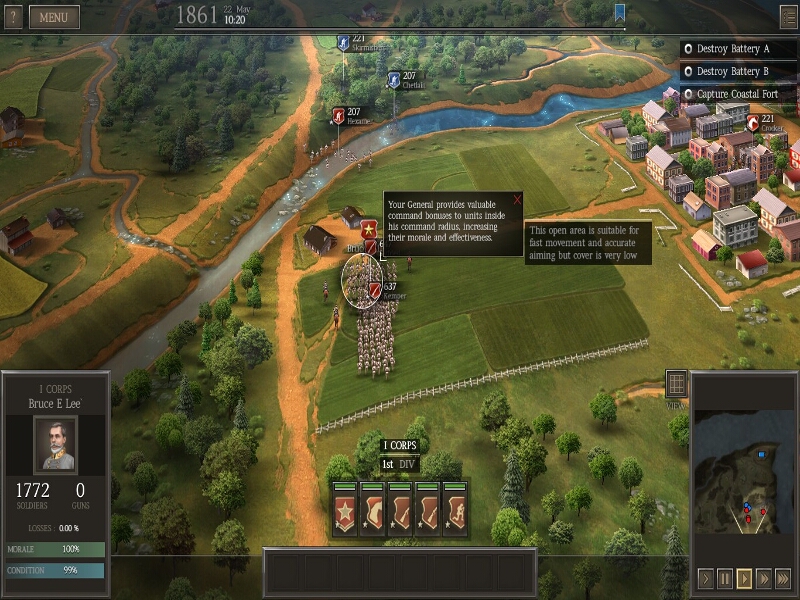
We actually manage to maneuver them out of position but at the cost of way more skirmishers than I'd like. By getting on their flank we force them to turn to face us. What they should have done was turn one company while the other maintained its facing and position, a maneuver called refusing the line. Because they failed to do this, we are able to catch them in a cross fire and drive off one company quickly. You can also see our cavalry dismounted and fortified in a building to cover the bridge north of town, which it looks like they've covered with a third company of skirmishers.
Once the unit we routed reforms itself, they will outnumber our cavalry and we aren't going to spare the men to hold this road here. We'll pull them back a bit onto better ground until I need them again.

We cross without further incident, although I've lost nearly a quarter of my skirmishers already. We can see a Union regiment marching across the open ground towards the fort. There's no way we'll catch them before they're inside.
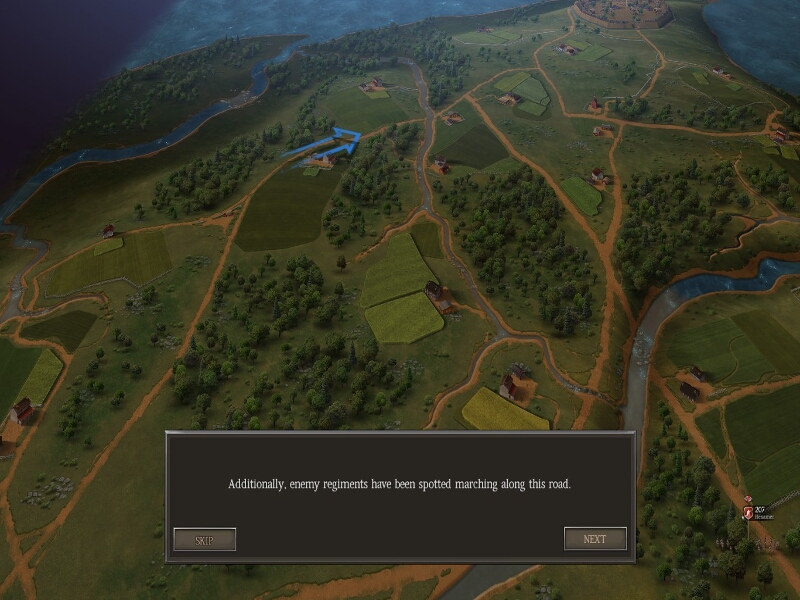
There may be more though, so I advance with caution. While we weren't able to engage them in the open field, if I can establish control over that north-south road we're on we can still control the local battlefield and prevent further reinforcements from reaching them.

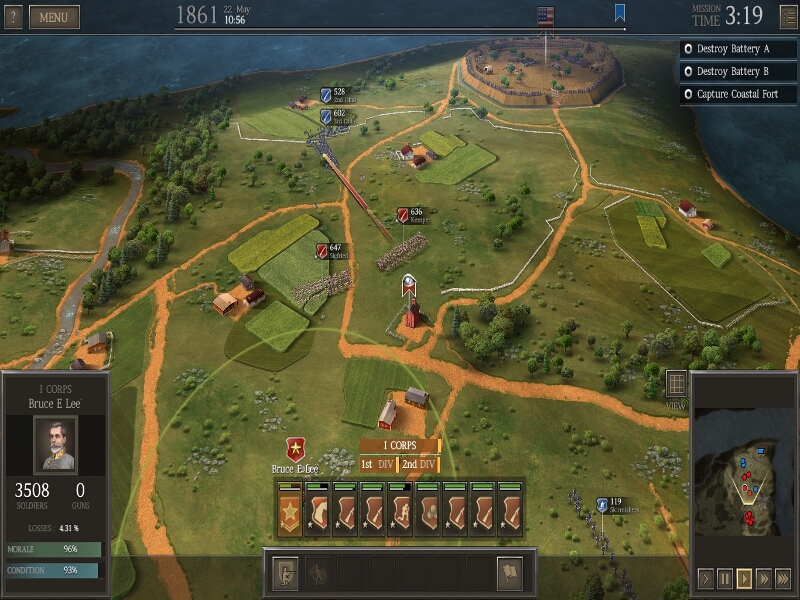
Speaking of reinforcements, it looks like we just got some more infantry to the tune of about 1500 men. We also got a supply train, which can be used to replenish ammunition. In this game running out of ammunition causes all sorts of penalties to damage and reload times.
While it may seem absurd that units can still fire without ammunition, there are plenty of historical cases of this. The 20th Maine at Gettysburg was reduced to scavenging bullets from their fallen comrades cartridge boxes. Stonewall Jackson's corps at Second Manassas were throwing rocks at the charging Union forces (who, though they had ammunition, were so caught up in the hysteria that they started throwing rocks back). The supply system in this game is pretty basic but I think it works. I do wish artillery had different ammunition types though, and actually did stop firing when they ran out.

We'll deploy our skirmishers to keep the right flank clear, as there's still a known enemy presence in that town. In the meantime, Sigfread and Kemper, our starting regimental commanders, will attempt to catch that yankee regiment before it reaches the relative safety of the fort.
Unfortunately as soon as they have line of sight on us, so do the fort's batteries (artillery). One of the nice things about this game is that artillery doesn't need a direct line of sight in order to fire on a target, so long as they are within range and someone else can see them.
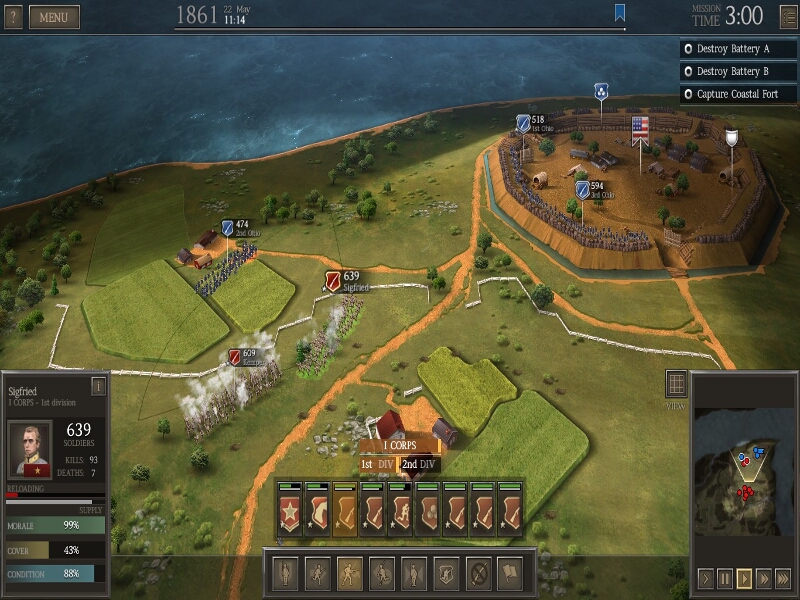
We manage to catch the 2nd Ohio in the flank and route them, though they should reform pretty quickly. Kemper continues to press them while Sigfreid is going to try to swing around behind. In retrospect I probably should have tried to box them both toward the west but they were already pretty close to the fort and I didn't want to risk being flanked myself. Also, you can see the Union infantry manning the ramparts in this shot.
I think they did a pretty good job with fortifications in this game even though there are still some issues. I like the way they look and they are generally worth taking and holding for the cover bonus. The biggest problem is that there's no dig in command. This is a feature curiously missing in a lot of current civil war games.
By the way, the red arrow signifies an attack move. If there are two arrows in sequence, the first shows how far the unit has to move in order to be in range of their target. One arrow means they are in range and will begin firing.


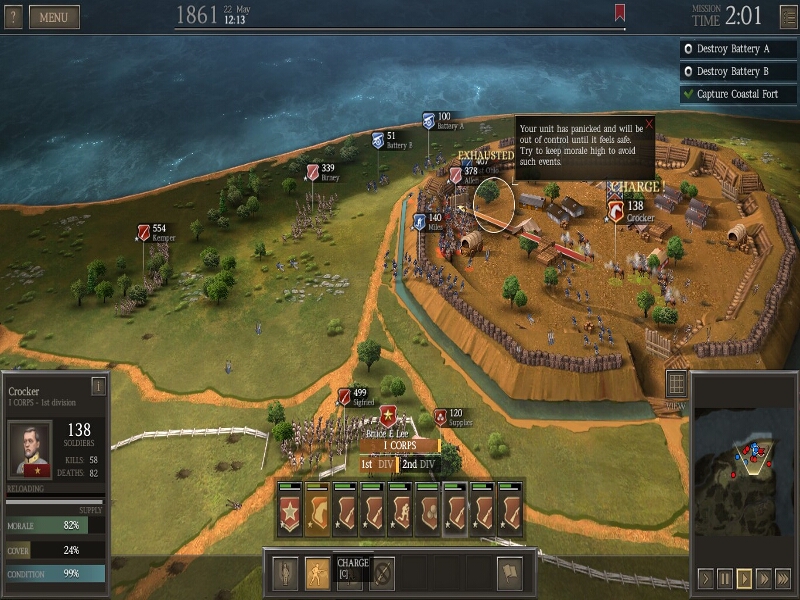
We manage to drive the 3rd Ohio into the fort and corner the 2nd outside it. I suppose it's a victory in some sense although every extra man inside the fort is going to cost us. I'm absolutely going to wait for our reinforcements before we actually attack, currently there are almost as many yanks in there as us and they have 2 heavy batteries of guns, while we have none.
If you notice the stacked artillery shells in blue in the corner of the fort, that denotes a supply point. Whoever holds it gets basically unlimited ammunition for units within a pretty good radius of that point. That means those guns can keep firing at whatever they want pretty much as long as they want to with full effectiveness.
There is also very little covered ground to attack from. This could get ugly. Our best bet is to pick a single point and try to overload it with our full force, but even then the entire garrison can turn and rip our tightly packed ranks to shreds (unit density does seem to effect casualty rates).
Well, shit.
Our reinforcements are almost here, so my focus is on wiping out the 2nd Ohio before we turn on the fort. Every man we kill or rout outside is one who won't be shooting at us from inside.


So I really like the visual feedback this game gives. When a unit runs out of ammo, it will say so on screen. When a unit gets into melee (sometimes 2 units will kind of wander into each other) it will give an alert. The UI is pretty simple and I find it very effective.
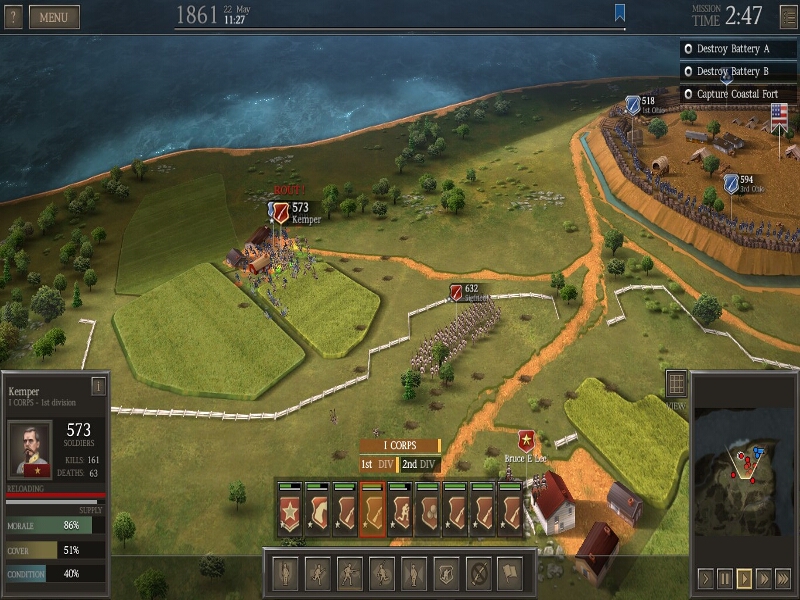
In any case, our reserves are up and I see a bit of an opportunity, but the way I pursue it, in retrospect, is kinda dumb. You see, the yankees only have 2 regiments in the fort since I managed to intercept their reinforcements, but they have 3 sections of wall to defend. Now what I should have done was turn everyone and try to funnel as many men as possible into that opening. What I did was have Kemper continue pursuing the 2nd Ohio while the rest of my brigade formed a broad line and I only attempt to funnel 2 regiments into that gap.
This means that rather than having 2000 men in the fort firing into the rear of its defenders and bayoneting the artillery batteries, I have about 1000 men exchanging fire with defenders behind heavy walls, 500 men chasing a routed unit, and only about a thousand to break through the gap, charge the cannons, and drive the rest of the defenders off. I think my thought was to hold the defenders in place by demonstrating to their front while my flankers took the fort but I severely underestimated the power of canister on assault columns.
It works, but it's very costly and nearly loses me the battle.

This is embarrassing. Canfield and Birney are getting shredded while Allen gets distracted by some skirmishers. My own are currently positioned to the rear holding that river crossing, but even so I should have turned everyone towards the fort. I currently have over a thousand men distracted chasing inconsequential units at this point.
Canfield loses almost half his regiment in about 10 in game minutes from double canister and rifles ripping apart his charge. Birney takes a more cautious approach, covering on the walls and using rifle fire to drive the cannon off. I finally get Allen turned north towards the fort but the attack is far more piecemeal than it should have been.
Sigfried continues to hold the attention of the federals defending the walls, which is good. They should have left the 3rd in place and turned the 1st Ohio towards Birney. Along with the remaining artillery and skirmishers, they would have been able to drive him off easily before Allen was even able to arrive.

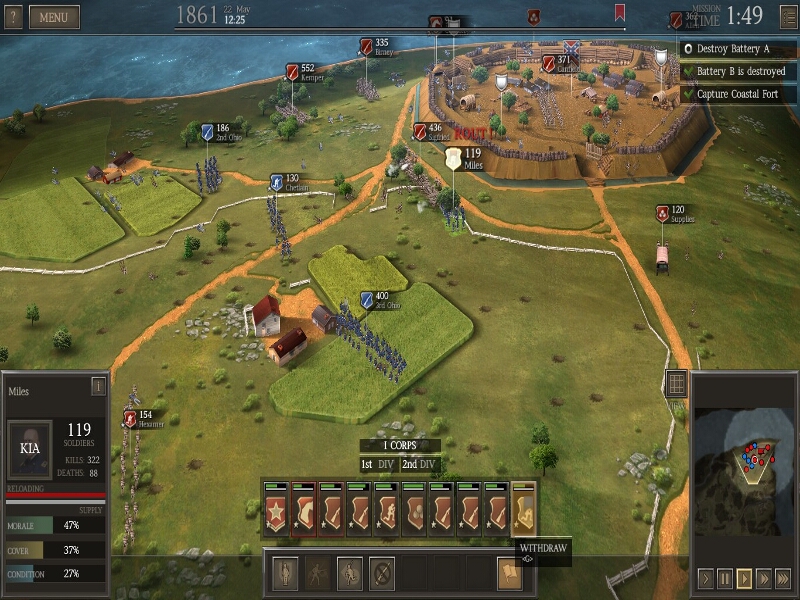
Birney and Allen's combined forces are now able to cautiously advance into the parade ground so that we hold the eastern half of the fort. The Union forces are taking fire from 2 directions and as long as our morale holds out, it's only a matter of time before they break. We are taking way more losses than we needed to though.

The plan finally starts to work. After taking a victory point, it will show up as contested with a timer next to the objective, meaning it has to be held a certain amount of time in order to count. This prevents a lone unit taking a major objective and winning the battle while the main force was off fighting somewhere else.
Also, it's off screen but Kemper is moving to seal off the garrison's escape.
Well now I get really impatient and dumb. Birney charges the 1st Ohio in order to get at the artillery, so Allen follows. Both are quickly repulsed and run away from any effective ground. I then push the cavalry into the fort to have them follow up in the hopes that the situation can still be salvaged.
Following history, charges in this game are very taxing on morale and casualty rates and they rarely work unless done with care and skill. While there are times a failed bayonet charge is preferable to exchanging fire with an entrenched enemy, this was not one of them. I should have kept my regiments in cover and continued to wittle down the defenders.
On the other hand, all of the men involved in this fight are pretty much new to war other than the stories of relatives who may have fought in the revolution, 1812, or the Mexican War. This is still early enough that hiding behind cover was considered "unmanly" and when General Lee ordered the army to dig in around Richmond prior to the peninsula campaign, he was given very unflattering nicknames such as "old granny Lee" and "the queen of spades".
They learned quickly, but I kind of like that this battle turned into a clusterfuck of bad choices. While it's not based on a real battle, it still reflects the historical attitude towards tactics among the mid level officers and rank and file soldiers of that period of the war.

Amazingly we are able to salvage the situation and the cavalry is able to destroy the artillery batteries, but at the cost of almost half their number. The historic casualty rate at this point in the war was remarkably lower than it would become, so I'm imagining that most of the losses on both sides in this fight are guys throwing down their guns and running.
Canfield also makes a triumphant return and succeeds in securing the fort. Meanwhile the remnant of the 2nd Ohio attempts to return and relieve the pressure on the fort, but they are about 20 minutes late in game time. Earlier they could have caught Sigfried in a cross fire while the rest of my men were fleeing in dissaray. As it was, Sigfried and Kemper are able to safely turn and deal with them.
I'm still impressed with their pluck though.
The 3rd Ohio also stages a comeback and attempts to retake the fort. Rather than fight in the open, I pull everyone towards the safety of the walls and, finally remembering those skirmishers I left at the wall, bring them up to harrass and pluck away at the assault.
Also, that unit named Miles is another example of a decently done mechanic. They were a skirmisher company that routed too close to one of my units. As they saw no clear way out, they surrendered. In this I believe prisoners can be freed, so the best thing to do with them is withdraw them off the battlefield as soon as they are taken.
After battles, prisoners can be exchanged for extra manpower during camp mode.
So this is where the first phase of the battle ends. We have taken and now hold a major artillery emplacement along a river that supplies Washington, I'm sure nobody in the Lincoln administration will care.
Next time, phase two of Potomac Fort: Where we attempt to defend our ill gotten gain.