Toggle Background Color
Game Mechanics: Limit Skills
Limit skills are a new mechanic that was introduced in this game. Well, not entirely new. All the Etrian Odyssey games in the series had some sort of super move mechanic in them.
The first Etrian Odyssey game had the Boost system, where once a character’s Boost gauge was filled, you could power up a skill to make use of on their turn. It wasn’t really that widely used, as all it actually did was increase the skill’s level by 5, and due to how some skills scaled, it didn’t have that much of an effect most of the time.
The second Etrian Odyssey game had the Force system replace Boost. Instead of simply being able to power up your skills ever so slightly once the Force gauge was filled, it let you make use of a powerful skill that was unique to each class. And said powerful is not an understatement. The skills had effects ranging from dealing a large amount of damage to enemies to nullifying all damage and disables for the turn, or having a 10000% chance of inflicting Stun or Head bind, Arm bind, and Leg binds all at once (Not an exaggeration!) The effects were quite frankly, overpowered. However, the tradeoff was that the Force Gauge built up extremely slowly. Which just led to people grinding up Force to make use of them against FOEs and bosses, so that didn’t really balance out the overpowered effects. And there were ways to accelerate Force gain to a ridiculous degree, nullifying that “balancing factor” entirely.
Now we come to the third Etrian Odyssey game, where Limit skills replaced the Force system. The core concept of making use of powerful moves once in a while was kept, however some adjustments to the system was made. Overall, the effects of the skills in question aren’t as powerful as the Force skills in EO2, but they’re able to be used a lot more often, as the Limit gauge charges up much faster than the Force gauge did. Classes no longer have unique super moves like they did in EO2. Instead, the skills in question could be equipped to various party members. But these skills weren’t handed to you from the start. You had to acquire them yourself through various means. And, several of these skills required multiple people to equip them to make use of, making it so that you couldn’t launch 5 powerful skills at once. But it also limited what combinations of said skills could be used, which was something else players had to keep in mind when equipping these on their party.
Limit skills have some properties to be aware of. If an offensive Limit skill (or Regroup Tactic) is used, the attacking stat of all the participants are averaged out and used in the calculations. So who exactly has the Limit skills equipped is important as well. However, they only take the caster’s passives and buffs into account when calculating factors like that.
Anyways, let’s go over just how to affect your Limit gauges.
quote:
Limit is gained through:
Taking an action such as attacking, defending, switching places with someone else, or using an item. If the action is stopped through the use of an ailment or bind, Limit does not increase.
An ally dying. Summoned units dying (sending them away through the use of a skill does not count) counts for this.
Winning a battle.
Limit is lost through:
Resting at the inn will halve the Limit gauges of everyone who slept there. Going back to town has no effect on the party's Limit gauges.
The character that dies will have their Limit gauge halved.
Escaping from a battle halves every living party member’s Limit gauges.
These are the only ways to affect your party’s Limit gauges. There was an item type in the first two games known as the Axcela, which filled up your gauges in those games by a certain amount. Yeah, those are gone now, so taking actions in battle is the only way to increase it now. Do note that Limit increases every time you take an action, and Second Sword and Swashbuckling procs count as separate actions.
And when you take an action that increases your Limit gauge, the amount of Limit you gain is determined through this formula:
Limit Gain Formula: posted:
A = 5 + a random number from 0 to 10 + Skill Level + Number of Limit Forges + Limit Boost
Then these checks are performed.
If A is greater than 15, then A = 15
Limit Gain = A + Number of Limit Forges
You can gain 5 to 15 points of Limit per turn. When you reach 100 points of Limit, you’ll be able to use a Limit skill. So the Limit gauge can be filled up in 7 to 20 turns. Only the caster needs a full Limit gauge in order to make use of it, though after casting, everyone who participated in the Limit will have their gauges emptied out. Having a max level Limit Boost or making constant usage of level 10 skills will guarantee that you gain the maximum amount of Limit in that turn. Limit forges also have a huge effect on Limit gain, as not only do they raise the minimum amount of Limit you gain, they also raise the possible maximum amount as well, making it so that you can build up your Limit gauges even faster.
And now let’s go over the Limit skills themselves. Do note that all attacking Limits (aside from Lucky Hammer) do not have an accuracy check, and will never miss.

Cross Slash
Stats Used: STR
Party Members Required: 2
Target Type: Single
Action Speed: Start of the turn, +23000
Obtained By: Received from the Guildmaster at the start of the game.
Deals 230% Slash damage to one enemy.
A very basic offensive Limit that should serve you well in the early game. At that point, you don’t have too many options, and extra damage is always nice. It will get outclassed by better Limits and the fact that most good offensive skills outclass this Limit easily.

Indomitable
Stats Used: N/A
Party Members Required: 1
Target Type: Self
Action Speed: Start of the turn, +23000
Obtained By: Received from the Guildmaster at the start of the game.
Grants the user the Endure state, allowing them to survive a killing blow and leaves them with 1 HP afterwards.
Notes:
- Has absolutely no effect on instant death or petrification.
- Lasts indefinitely until dispelled.
Out of all the starting Limits, this is the one that sees the most use, and is useful throughout the entire game. Being able to set up a safety net for key party members is absolutely huge since you can keep a support alive, or take a lot of risk out of a damage dealer using say, Berserker Vow. Just be warned that multi-hit attacks can pierce through it since this only protects you from one hit.
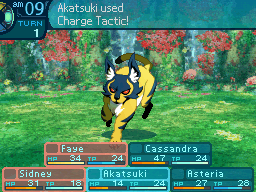
Charge Tactic
Stats Used: N/A
Party Members Required: 2
Target Type: AOE
Action Speed: Start of the turn, +23000
Obtained By: Received from the Guildmaster at the start of the game.
Places a buff on the entire party that increases their damage output by 25% for 6 turns.
Notes:
- Affects all damage types, including Almighty.
Charge Tactic can be a nice utility Limit, but it falls off after a while, unless you have no ways to buff your party. 25% isn’t really that great of a damage boost, and other buffing skills give out way more with regards to physical damage, which becomes your best way of dealing damage later on in the game. And you should be getting far better Limit skills to make use of during that time. With that said, it’s one of the few ways to boost elemental and Almighty damage, so it’s useful in that regard.

Mumyouken
Stats Used: STR
Party Members Required: 3
Target Type: Random
Action Speed: Start of the turn, +23000
Obtained By: Defeating Meregho Saeno for the first time.
Randomly attacks all enemies 3 times, and deals 140% Pierce damage per hit.
A slightly stronger offensive Limit than Cross Slash. Though while it is stronger, it does take more people to pull off. Might tide you over for a bit longer, but eventually better Limits will come along that you can get more use out of.

Guard Tactic
Stats Used: N/A
Party Members Required: 2
Target Type: AOE
Action Speed: Start of the turn, +23000
Obtained By: Found on B3F, section E3.
Places a buff on the entire party that decreases the amount of damage they take by 25% for 6 turns.
Notes:
- Affects all damage types, including Almighty.
Not exactly one of the better utility Limit skills out there. The Aegis Limits you can get later on are far more useful despite the higher party member cost. I suppose it might be able to tide you over until then in the meantime, but the defensive buff isn’t really that significant. Especially if you have a Hoplite in your party.
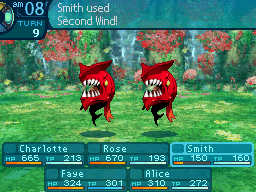
Second Wind
Stats Used: N/A
Party Members Required: 1
Target Type: Self
Action Speed: End of the turn, -10000
Obtained By: Defeating Cruel Roamer for the first time.
Fully restores the user’s HP.
Considering that this comes into effect at the end of the turn, you’ll have to time this right to be able to use it at all. On the plus side, that means your party member will most likely be in tip top shape at the start of the next turn. One of the best ways to make use of this skill is to use it when you’re sure you can provide enough of a safety net for the Second Wind user so that this skill can activate, or use it when you know they’re going to take a lot of damage but survive (Like say, a Hoplite Bodyguarding someone.)

Lethal Tactic
Stats Used: N/A
Party Members Required: 2
Target Type: AOE
Action Speed: Start of the turn, +23000
Obtained By: Found on B6F, section C1.
Places a buff on the entire party that forces all regular attacks to be critical hits for 6 turns.
This is what I consider to be the worst Limit skill in the entire game. Why in the world would you ever use this!? Critical hits only affect regular attacks, and they’re just a 50% damage boost in those cases. Not to mention that you get access to Charge Tactic at the very beginning of the game, and while that’s only a 25% damage boost, it affects everything instead of just regular attacks.
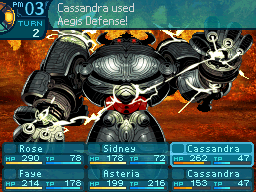
Aegis Defense
Stats Used: N/A
Party Members Required: 3
Target Type: AOE
Action Speed: Start of the turn, +23000
Obtained By: Defeating Ghost Ship for the first time.
Nullifies any damage taken from Slash, Strike, and Pierce attacks and any additional effects attached to them for the current turn.
Notes:
- Has absolutely no effect on skills that solely inflict debuffs, ailments, and binds.
Say hello to one the best utility Limit skills in the game. Being able to nullify damage for an entire turn is such a fantastic effect, especially if you employ risky strategies, such as heavy usage of Berserker Vow.

Hellfire
Stats Used: TEC
Party Members Required: 2
Target Type: Random
Action Speed: End of the turn, -10000
Obtained By: Defeating Hammerhead for the first time.
Randomly attacks all enemies 3 to 5 times, and deals 65% Fire damage per hit.
If you don’t have a Zodiac in your party, this Limit probably isn’t worth your time, and you’re better off using something else. Now if you do have a Zodiac in the party, say hello to the “I win” button for the early game and a good portion of the mid-game. Hellfire by itself isn’t too special. But Hellfire combined with Singularity and Etheric Charge is extremely powerful, and remains as such throughout the entire game. (Though it’s considerably weaker during the post-game compared to when you can first make use of it.) Singularity gives a damage boost if the attack hits an enemy’s weakness, and Etheric Charge can triple the damage output of the next attack. Since Hellfire has negative priority and Etheric Charge doesn’t, this means that on the very first turn of the fight, a Zodiac can cast Etheric Charge and then Hellfire and launch a very strong attack right off the bat. It’s also a huge help against the boss of the 2nd Stratum since it’s weak to Fire attacks. Considering how early this Limit skill can be obtained, this makes a Zodiac’s strong earlygame even stronger.

Wind Tactic
Stats Used: N/A
Party Members Required: 2
Target Type: AOE
Action Speed: Start of the turn, +23000
Obtained By: Found on B11F, section C1.
Places a buff on the entire party that increases their evasion by 30 for 6 turns.
Not a great Limit skill. The Aegis Limit skills are a far more reliable way of protecting your party.

Absolute Zero
Stats Used: TEC
Party Members Required: 2
Target Type: Random
Action Speed: End of the turn, -10000
Obtained By: Defeating Corotrangul for the first time.
Randomly attacks all enemies 3 to 5 times, and deals 65% Ice damage per hit.
The Ice version of Hellfire. If you manage to obtain this by the time you reach the 3rd Stratum, your Zodiac will have an even easier time contributing to fights since quite a bunch of enemies are weak to Ice at that point. And it’s another option to add to their arsenal.
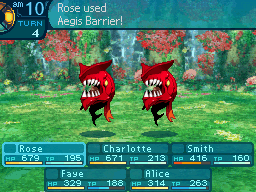
Aegis Barrier
Stats Used: N/A
Party Members Required: 3
Target Type: AOE
Action Speed: Start of the turn, +23000
Obtained By: Defeating Golem for the first time.
Nullifies any damage taken from Fire, Ice, and Volt attacks and any additional effects attached to them for the current turn.
Notes:
- Has absolutely no effect on skills that solely inflict debuffs, ailments, and binds.
The elemental version of Aegis Defense. Most of what I said about Aegis Defense applies here as well. Though while elemental attacks are more common in this game compared to the first two games, they aren’t quite as common as physical attacks in this game. Still, it’s a useful Limit Skill to make use of when the situation calls for it. Something important to keep in mind is that Aegis Defense and Aegis Barrier cannot protect you against Almighty damage, so be aware of that.
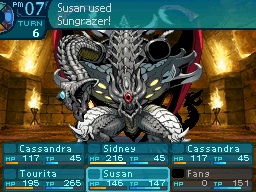
Sungrazer
Stats Used: TEC
Party Members Required: 4
Target Type: Single
Action Speed: Start of the turn, +23000
Obtained By: Defeating Ruin Caller for the first time.
Deals 500% Almighty damage to one enemy.
That damage output may seem high, especially considering that it’s TEC damage, but it’s really not a great offensive Limit Skill. A whopping 4 party members are required to make use of this Limit skill, meaning that this locks you out of using more useful Limit skills. And a big weakness of offensive Limit skills that require a large amount of party members is that the stats of everyone involved are factored into calculations. Meaning that if you have a diverse party composition, the damage output skills like this will deal will likely be brought down because more than likely, you’re going to have party members that have STR or TEC stats that are below average. And since this skill deals Almighty damage, there aren’t too many ways to boost its damage output. Still, it’s one of the few reliable sources of Almighty damage, so it can have some use if you want to make use of that damage type.

Regroup Tactic
Stats Used: TEC
Party Members Required: 3
Target Type: AOE
Action Speed: Start of the turn, +23000
Obtained By: Found on B6F, section C1.
Places a buff on the entire party that heals the party and dispels all ailments at the end for 6 turns. (Actually 5 turns due to a bug. See bugs for details.) The healing component has a healing power of 30%.
Notes:
- Does not affect dead party members and binds.
- The effect activates before Poison or Plague damage is applied, and before the spreading of Plague can take effect, essentially nullifying those ailments entirely.
- The moment the entire party is dead, petrified, or a combination of both, a game over is declared. This means that Regroup Tactic cannot prevent a game over if all living party members gets petrified as the game ends instantly before the effect can activate.
Bugs:
- The turn count decreases before the skill applies its effect at the end of the turn. Meaning that on the last turn the buff is in effect, the skill will not get to apply its effect to the party.
- This skill completely overwrites the effects of Protect Order and vice versa, despite the two being counted as completely separate buffs.
- This means that Protect Order will prevent Regroup Tactic from dispelling ailments.
- If the person who casted Regroup Tactic swaps places with another party member, that party member’s TEC stat and passives are taken into account when the game calculates the amount that the party should be healed for.
- If the caster uses Switch Stab to move to the other row, the skill will stop working entirely until it is recast.
- If the caster is a Bunshin clone and dies, the skill will stop working entirely until it is recast.
Regroup Tactic is a very powerful Limit skill. The healing itself is inconsequential and not really that great. But the ailment dispels at the end of each turn can help keep your party out of sticky situations. A fun little combo you can make use of is if you have a Wildling with access to Call Lion, you can make use of this skill to ensure that the Lion stays awake for 5 turns in a row.

Typhoon Bolt
Stats Used: TEC
Party Members Required: 2
Target Type: Random
Action Speed: End of the turn, -10000
Obtained By: Found on B16F, section 5D.
Randomly attacks all enemies 3 to 5 times, and deals 65% Volt damage per hit.
The final elemental Limit that can be obtained. If you’re on the Armoroad path, refrain from using this on the 4th Stratum boss, as it pretty much takes no damage from Volt attacks. And at the point you get this Limit in the game, there aren’t too many enemies left in the main game that have a crippling weakness to Volt. At the very least, it’s another option to add to a Zodiac’s arsenal, and it can be used in the post-game. But as I said with Hellfire, the elemental Limits’ damage outputs aren’t as impressive there compared to when you first get Hellfire. Though at that point, they’re one of the few viable options for elemental damage left at that point.
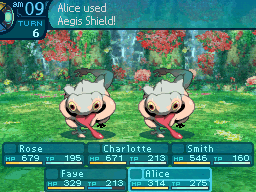
Aegis Shield
Stats Used: N/A
Party Members Required: 4
Target Type: AOE
Action Speed: Start of the turn, +23000
Obtained By: Defeating King Penguin for the first time.
Nullifies any damage taken from attacks for the current turn.
Notes:
- Has absolutely no effect on skills that solely inflict debuffs, ailments, and binds.
Being able to nullify any instance of damage is certainly a powerful effect. However, this skill doesn’t automatically outclass Aegis Defense or Aegis Barrier. Those skills only require 3 people to make use of, while this skill requires 4 people. So this skill can lock you out of using some other Limit skills. It all depends on what you value if you want to make use of this skill or not. Though if the enemy you’re trying to fight only has access to physical or elemental attacks, but not both, you’re better off just using the respective 3-man Aegis Limit instead.
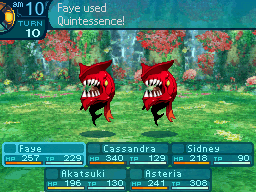
Quintessence
Stats Used: TEC
Party Members Required: 5
Target Type: AOE
Action Speed: End of the turn, -10000
Obtained By: Defeating Scylla for the first time.
Deals 320% Almighty damage to all enemies.
So, remember all the issues I said that Sungrazer had? Yeah, this skill is even worse. It deals less damage, and it requires the entire party to use. The only interesting thing about this Limit skill is that it’s the only AOE damaging Limit skill in the game.
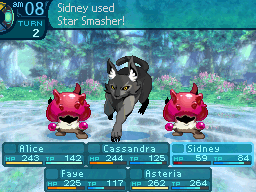
Star Smasher
Stats Used: STR
Party Members Required: 5
Target Type: AOE
Action Speed: Start of the turn, +23000
Obtained By: Found on B20F, section 1C.
Deals 800% Strike damage to one enemy.
At least this skill deals physical damage, so its damage output can be boosted a lot more easily. Even then, it’s really not worth locking yourself out of all the other Limit skills in the game, as this Limit provides pretty much no utility, and is just a damaging nuke.

Lucky Hammer
Stats Used: STR
Party Members Required: 1
Target Type: Single
Action Speed: End of the turn, -10000
Obtained By: Defeating Leviathan for the first time.
Deals 130% Strike damage to one enemy. Has an accuracy of 98. If the target is killed with this skill, they are forced to drop all their items, even conditional drops the party did not qualify for.
One of the best Limit skills in the entire game. It’s essentially a reusable Formaldehyde, and can be used to bypass so many annoying conditional drops. This is pretty much the best way to farm for books from FOEs since you don’t have to spend time farming for Formaldehyde with this in your arsenal. That said, it can be hard to snag kills with it, but since Lucky Hammer is a physical attack, you can boost its damage output to make things easier. It’s also a popular Limit skill to make use of in Warrior Might parties, as it comes out at the end of the turn, and only 1 person is needed to make use of this Limit skill.

Uroboros Guard
Stats Used: N/A
Party Members Required: 4
Target Type: AOE
Action Speed: Start of the turn, +23000
Obtained By: Found on B23F, section 2A.
Nullifies any damage taken from attacks for the current turn. Half of the damage the target would have taken is then converted into healing.
Notes:
- Has absolutely no effect on skills that solely inflict debuffs, ailments, and binds.
This is basically just a straight upgrade from Aegis Shield, so everything I said about Aegis Shield can apply here as well. Though this skill will likely be acquired a good while after obtaining Aegis Shield, so Aegis Shield isn’t necessarily completely outclassed. However, once you acquire this skill, there is pretty much no reason to ever use Aegis Shield again.

Immortal
Stats Used: N/A
Party Members Required: 3
Target Type: AOE
Action Speed: End of the turn, -10000
Obtained By: Defeating Elder Dragon for the first time.
Fully restores the party’s HP and TP, revives any dead party members, and dispels all ailments and binds on the party.
A very powerful utility skill, as this can function as a very effective panic button. However, since this Limit skill activates at the end of the turn, it means that all the participants need to be able to act in order for this to activate. So if something happens to them in the middle of a turn, this skill won’t be able to go off. Just something to be aware of. It can also help extend Labyrinth explorations since it also restores TP as well. Though this is pretty much a reactionary Limit skill. If you prefer to prevent things from happening to your party in the first place, you may want to make use of the Aegis Limit skills instead.
Overall, Limit skills can be very powerful tools to make use of. Using them well can help you gain the upper hand in traversing the Labyrinth.