Toggle Background Color
Update 3: Preparations: The Other Five Classes
Actually, we won't be heading into the Labyrinth just yet. Instead, I'll talk about the other 5 classes I didn't go into detail about in the last update, and discuss on how to build them for the early-game.

 I accept your gracious gifts!
Okay, so the Princess' Class Skill, Royal Lineage, recovers the Princess' TP every time she gets a buff. Any buff, not just her own. The skill starts out recovering 1 TP at level 1, and 10 TP at level 10. Never ever touch this skill. Princesses do not need this at all. This skill is a terrible TP recovery passive, on a class that doesn't even have TP problems in the first place! While buffs are useful, chances are that you're not casting them in every single fight, and in the important ones, they have big enough TP pools to support the party during that time. Also, this skill only applies when they get a new buff, not when they get hit with a buff skill, so renewing buffs does nothing. And this Class Skill being so bad actually brings down the Princess' usefulness as a whole. Okay, you can skip it, but believe me when I say that Royal Lineage not being a good skill is a much bigger deal than it seems at the moment.

My dear servants shall appreciate my very presence!
As for how to spend your skill points, there are 2 ways to do so. Starting off as a buffer, or starting with a passive healing build. If you're going with the latter (like I am), stick every one of them in Royal Veil. The reasoning behind this build is that while their buffs are very good skills, they're not gonna be useful at the very beginning of the game, and they don't have big enough TP pools to cast them many times. Sure, sticking all 3 skill points into this passive leaves them with no skills, but at this point in the game, Princesses are decent damage dealers and tanks, so they can still contribute a bit while in the Labyrinth. As for Royal Veil, it's a passive that heals the party at the end of a turn, as long as their HP is full. At levels 1, 2, and 3, it heals for 4, 7, and 10 HP per turn, capping out at 48 HP healed per turn at level 10. Yeah it doesn't sound like much, but the skill can do a lot as long as you can keep the Princess' HP full. Still, the real reason to take this skill is because putting 5 points into it unlocks this skill.

What this passive does is restore the party's HP if the Princess is alive at the end of battle. Easier to accomplish, but this skill falls off eventually. No, once again, you want to invest 5 points in Triumphant Cry in order to unlock this skill.

Contrary to the other two abilities, Monarch March does not fall off, and is relevant throughout the whole game, including the post-game. Every time you take a step within the Labyrinth, your party gets healed for a certain amount, depending on how many levels are in this skill. This cuts down on your active healing, such as items or skills, by a lot since Monarch March can top off your party between battles. You do want the buffs eventually, maybe by the end of the first Stratum, but they won't help too much at the very beginning of the game when your damage numbers are too small to gain enough of an effect from them.
Though if you do want to put some buffs in their starting toolkit, stick 1 point into Attack Order, and maybe 1 point into Guard Order. Attack Order applies a 4 turn buff to one row that increases the damage any physical attack from them deals by 20%, while Guard Order reduces the damage one row takes from physical attacks by 20% for 4 turns.
For those that have played the previous games, you probably noticed a few things that are off. Yes, the buff and debuff system got a massive overhaul in this game. In the first two games, buffs either lasted for 5 turns, or lasted indefinitely until the battle ended. (The latter was exclusive to the Troubadour class, the dedicated buffing class for the first two games.) In this game, indefinite buffs no longer exist. Not only that, the way buff turn counts are handled is much different in EO3. In EO1 and 2, refreshing a buff by casting the buffing skill again only reset the duration back to 5 turns. Meaning that to get the most out of your buffer's turn economy, it was best to wait until buff only had 1 turn left before refreshing the buff. Now, you can recast the buffing skill at any time, which will add its duration onto the existing timer instead. Allowing you to cast buffs for multiple turns in a row and then do something else, though buffs and debuffs can only last for 10 turns at most.
Something I also want to point out is that the skill descriptions for buff or debuff skills will say that a buff will last for a specified number of turns. In actuality, the buff will last for 1 turn longer than the stated amount in most cases, as the description isn't counting the intial casting turn. For clarity, this LP will be referring to the actual number of turns a buff lasts for when referring to their turn counts.

 Bring it on! I can take any of you!
Now onto the Gladiator. Endless Battle is their Class Skill, and boosts all physical damage (Slash, Strike, and Pierce attacks) by 3% at level 1, and 25% at level 10. Take this whenever, maybe max it out first if you want. As for why I'm saying this when I said that Zodiacs don't want their Class Skill right away, is because that Gladiators don't really have any must have skills they want early. Level up their skills however you want early. Well, there is one thing you should be aware of, since there is a trap you can fall into while leveling them up.

Just the edge I need.
The Gladiator's weapon mastery skill. Contrary to what the description says, this affects swords, not katanas. This skill is one you're gonna wanna max out eventually since it's a prerequisite for their strongest sword skill.
Now as for the trap I mentioned, don't level up anything related to Clubs. The skills in the Club skill tree aren't that great, and the “ultimate” damage skill in there is awful. Where as the sword skill tree has a much better ultimate damage skill to make use of. It's a trap that a lot of people fall into, and end up making their Gladiators really hard to use well, when they're normally a pretty straightforward class.

Putting one point into Sword Mastery unlocks this skill.

To battle!
Which I accidentally put a point into, because I thought this skill was required for a much better one. Whoops! Oh well, she's still level 1, a little rest can fix that easily. Break is just a single target attack that deals more damage than a regular attack, nothing special.

But if there were any skills I would make a beeline for, it would be this one. Charge, well, charges up any physical move's attack power by a whopping 260% at max level, effectively increasing the Gladiator's damage output per turn by 30%. And it works with physical limits. It's a very strong skill, and one I would recommend taking eventually.
 Hope I still remember some of my old tricks.
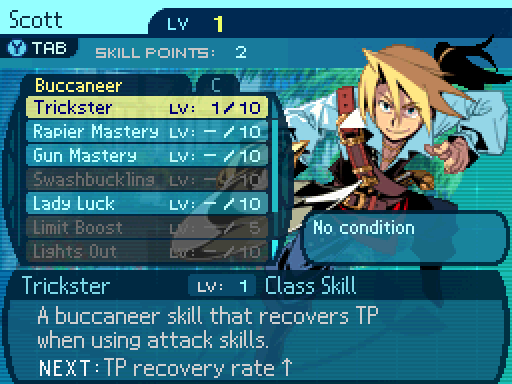
Trickster is the Buccaneer's Class Skill. Every time the Buccaneer uses an attack skill, they recover a certain amount of TP. 1 TP at level 1, and 10 at level 10. It's not essential, but it's very nice to have, and can help the Buccaneer last longer in Labyrinth trips. Something to keep in mind is that the TP restore will proc for attack limits, even though those don't cost any TP whatsoever, and if the TP cost of the skill being used is lower than the TP restore, than the Buccaneer can use cheap attacks in order to restore TP. Handy!

Still got it!
Now there are two skill branches they can go for: rapiers, or guns. I personally prefer rapiers, because they deal more damage, and the skills they unlock have more utility. Guns can be used from the back row, but the guns themselves deal less damage than rapiers, and rapiers give a speed boost to the Buccaneer, while guns slow them down.

Putting a point into Rapier Mastery unlocks this skill.

They won't see what hit em!
The Buccaneer is kind of a late bloomer, and is a fairly weak class in the early-game. Later on, their damage output can get crazy, but they have little use early. This skill is why I prefer the rapier tree. What it does is deal 110% Pierce damage to a single target, but it has a 42% chance to inflict Blind, which heavily lowers the victim's accuracy. Enemies missing their attacks can lengthen your party's lifespan while in the Labyrinth. But if you're specifically taking this skill to deal with a certain problem you can run into early on, I'm gonna warn you right now, it's not gonna help much.
As for traps to avoid falling into, they have skills called chasers, which attack the enemy every time they get hit with a specific element. The have 6 different chaser skills, each one corresponding to a different element. Yeah, you want to avoid these. One, the game doesn't consider these to be attack skills, since you can technically never attack at all with them, so they don't activate Trickster. Another reason is that you have to build a team around the Buccaneer if you're using chaser skills. And if an enemy happens to be resistant to the elements you've built your team around, yeah there are gonna be problems. And if you really want to use chaser skills, there's no reason to use the Buccaneer's versions because... okay I'm getting a bit ahead of myself there. You'll find out later.

 You know what I love? Everything!
Beast Soul is the Wildling's Class Skill. What it does is increase the stats of summoned beasts by a certain amount. At level 1 it increases their HP by 10%, their attack by 20%, and their defense by 5%. At level 10, Beast Soul increases the animal's HP and defense by 50%, and increases their attack by 75%. While it is a good class skill that makes your beasts hit harder and last longer, don't get this just yet. You need the ability to summon animals to make use of this!

I hope I make tons of new friends in the Labyrinth!
Okay, so the Wildling isn't exactly an intuitive class, so it can take a little while to understand how they work. Basically, they're the class that specializes in status ailments and binds, both of which are disables you can use on enemies to hinder their attacking capabilities, stop them from casting certain skills, or stop them from doing anything altogether. If you've played the first two games, these guys are comparable to Hexers, although they are nowhere near as powerful as the 2nd game's version. How the Wildling works is that they'll summon an animal, which can attack a single target, random targets, or everything on the field, depending on which animal is summoned. Upon attacking, the beast has a chance to inflict a certain ailment or bind upon its targets, depending on which animal is summoned. While you can tell the beast which enemy to attack on the initial cast, after the first turn, the beast will simply attack randomly, trying to reapply the ailment on targets if needed. They will never stop attacking until they get dismissed by the Wildling, or get killed.
Anyways, I dump all my skill points into Wild Mastery. Wild Mastery is the Wildling's Mastery Skill, and enables them to summon animals. It also provides a 5%, 6%, or a 7% boost to the beast's chances of inflicting an ailment at levels 1, 2, and 3. The boost chance gets capped out at 15% at level 10. There's more to this skill that makes it a lot better than it seems. Let's say the Wildling summons an animal that has a 50% chance of inflicting Paralysis. But the target has a 10% resistance to it, which will lower the Paralysis chance to a measly 5%. Now here's where Wild Mastery comes in. The bonus chance is added after the ailment is run through resistances. And if the Wilding's Wild Mastery skill is maxed out, the 15% bonus chance is added to the 5% chance, making it so that the Wildling actually has a 20% chance to inflict said target with Paralysis. That said, you don't have to worry about resistances just yet, level this up as much as you need to in order to get the animals you want, then max it out later.


Putting a single point into Wild Mastery unlocks all these skills. These animals are capable of inflicting binds on a single target.


Anyways, the reason I dumped all my points into Wild Mastery was to unlock this skill, which summons a butterfly to Poison a single target. I don't really find Poison to be that useful in this game, but there is a reason you want this skill early.

Mainly to unlock this skill. Call Elephant summons an Elephant to attack every single enemy upon the initial cast, and it has a chance to inflict Confusion, which is the most powerful ailment in the entire game. You definitely want this as soon as possible. Although if you want your Wildling to contribute more early, I suggest investing in Call Snake. Call Snake summons a snake to inflict arm bind on a single target, which reduces the power of any physical attacks by a ton, which is really helpful early on. Not too many enemies can cast elementals at this point in the game.

 Oh, that's a big harvest!
Why. Why would you put this class into your main party? The game explicitly stated that they're not good in combat. But if you insist on using them, I recommend sticking one point into Earth's Bounty, which increases the exp gain by 10% at level 1 if the Farmer is alive at the end of battle, and caps out at a 30% increase at level 10. At that point, a 5 man party's exp gain would increase from 20% to 26%, which is 1% more than what a normal 4 man party would get from battles. You're essentially fighting with a 4 man party anyway if you're using a Farmer.

Rock-a-bye... Mmmmm...
Lullaby is probably the only real contribution they can make in battle. If you're gonna be using a Farmer, you may as well have them do something important. What this skill does is that it attempts to put all enemies to sleep, with a 15% chance of doing so at level 1. However, upon casting this skill, the Farmer will always fall asleep, even if none of the enemies do. There are ways to get around this penalty, but that's not something that's possible to do at the moment.

Taking a point in Lullaby unlocks this skill. I don't know if I'll get this.

I hope we get a good harvest this time.
Now, here's another trap that any class can fall into. Now see, within the Labyrinth, there are these spots called Item Points, where you can either Take, Chop, or Mine materials from in order to sell to the store to unlock new equipment and items. Take, Chop, and Mine are different gathering skills that all classes can take. In the first two games, those three skills were distributed among different classes, but now everyone has access to all of them. You should never even think about putting a point into any of those.

Because putting a single point into a Farmer's Harvestry skill increases all the gathering method attempts by one. You're essentially spending 1 skill point to get 3 different skills at once. Harvestry is a very efficient skill, and you may as well take this since that's what this class was designed for. Which is farming materials from gathering points.
Next time, we'll explore the Labyrinth for real.