Toggle Background Color
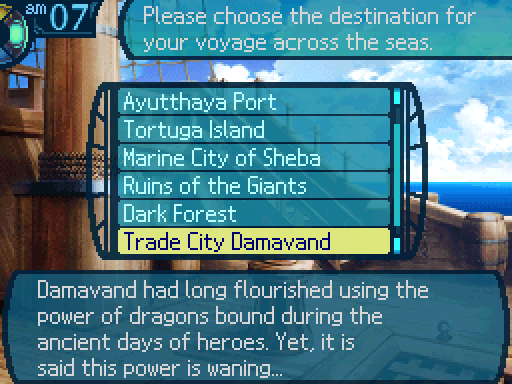
Update 60: Preparing for Trade City Damavand's Sea Quests


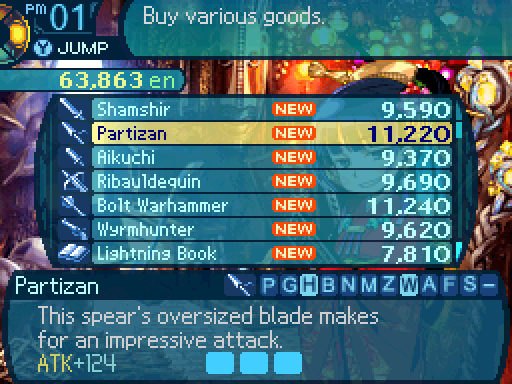
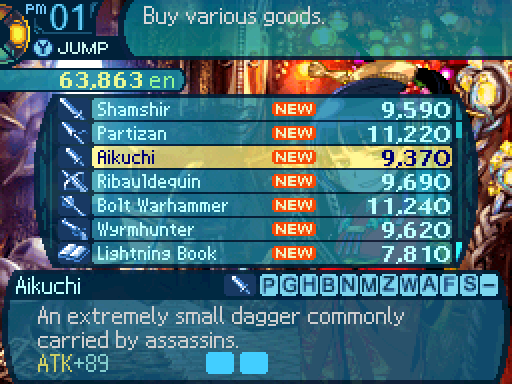
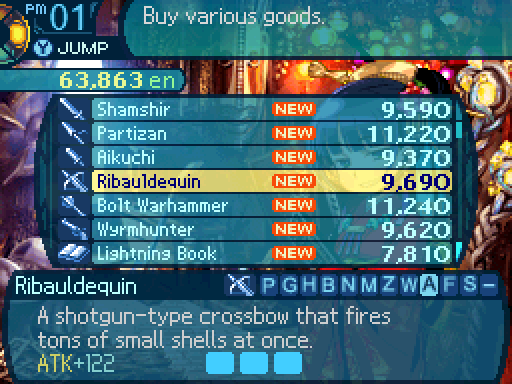
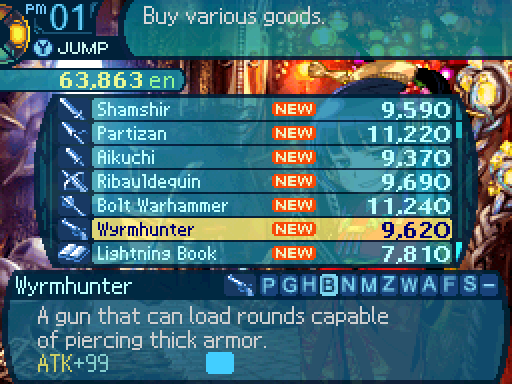
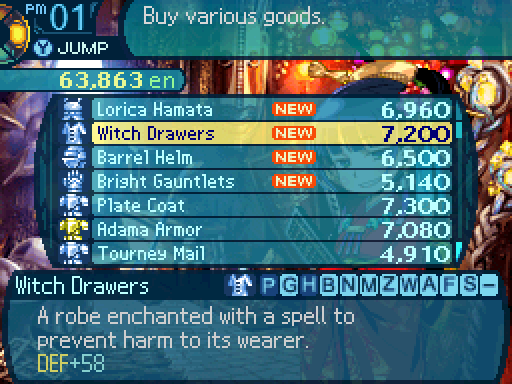
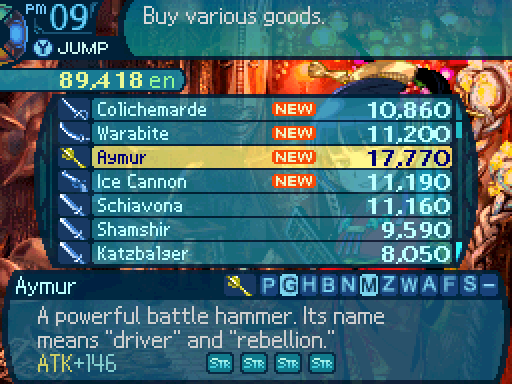
I've unlocked a bunch of equipment while grinding up my characters for the next Sea Quest. Let's take a look.
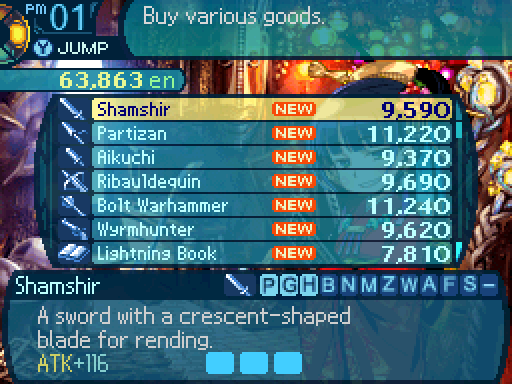
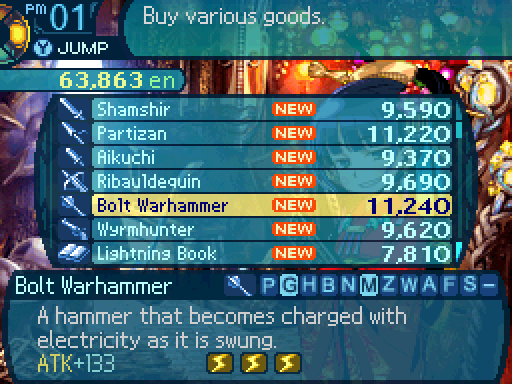
This club is imbued with Volt forges, and gives a 30% damage boost if you use a regular attack. Could be handy for Gladiators or Monks.
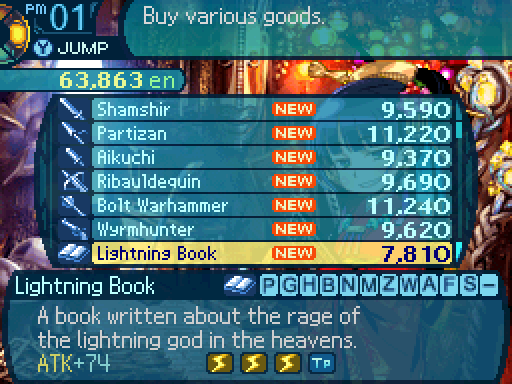
The Lightning Book is a questionable investment, as while it does give a 30% damage boost when using regular attacks, why would you have a Zodiac use regular attacks?


Provides the wearer a 10% resistance to Strike attacks. Not exactly something special.
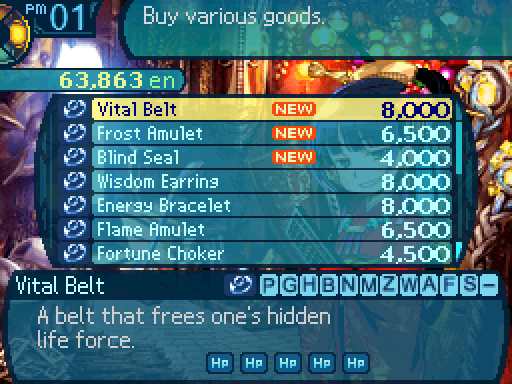
Increases the wearer's max HP by 25%. I find that there's better pieces of defensive equipment.

Increases the wearer's resistance to Ice attacks by 50%. Stack 2 of these babies and you'll be immune to Ice attacks.

And this provides the wearer a 50% resistance to Blind. Blind isn't so bad an ailment that I find that it's worth using an equipment slot to defend against. Besides, Prevent Order exists.
 Hi, I'd like a refund on this please.


You know, it's probably for the best.
Yes. This doesn't exactly seem to be working out between us.
We can still be friends, right?
 Oh don't be so dramatic. It's just a weapon.
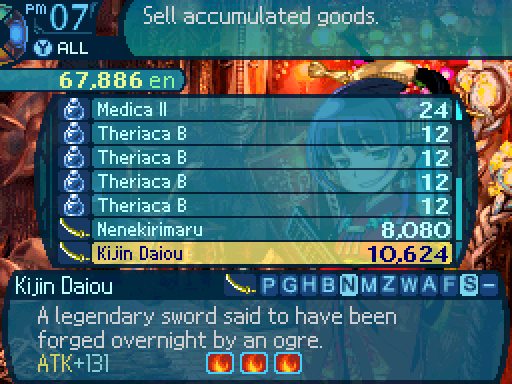
If you paid for any forges on a weapon, that actually factors in slightly on its sell cost, so forging isn't a complete loss if you do decide to make use of it.
I suppose we should head to the Celestial Palace again.
Man, I can't believe they keep letting us go there. Hm? Hey Charlotte, you dropped your book! ...Journal! ...Whatever this is. ...Huh, I always wondered what she wrote in here. ...Hee hee hee. ...Oooh! ...Whoa. ...HEY!


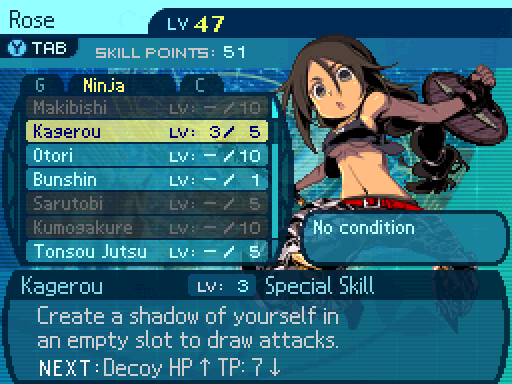
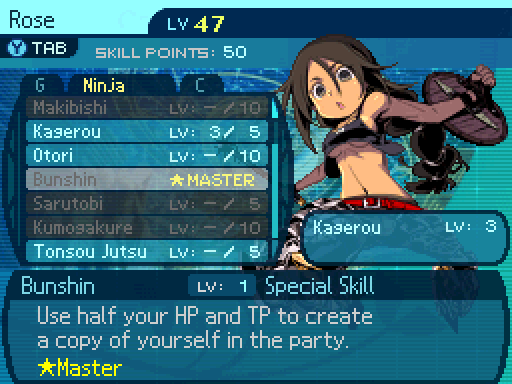
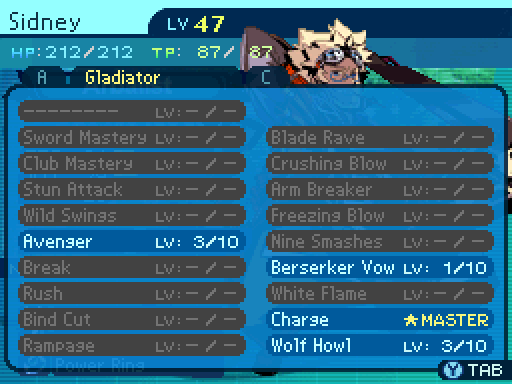
I'm not gonna make use of Warrior Might anymore, so I'm gonna rework some skillsets.

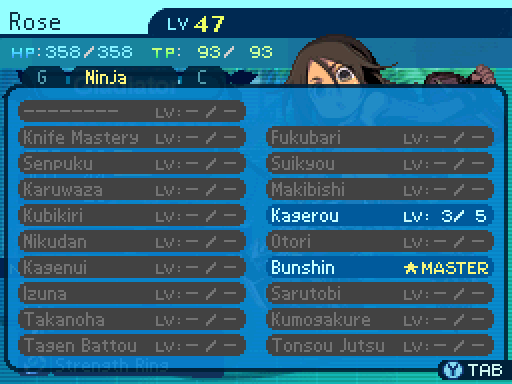
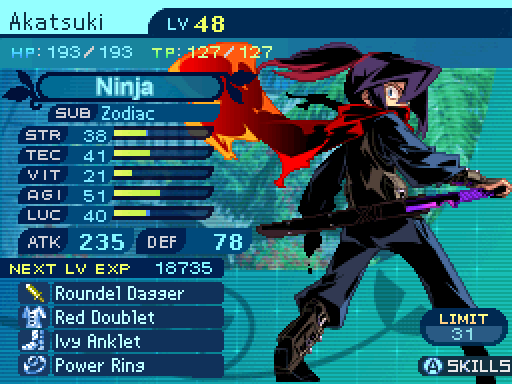
Heeeey, Akatsuki! You mind teaching me about the ways of the Ninja or whatever?
 ...Do you actually wish to learn the techniques of the Ninja, or do you just want to clone yourself?
The cloning thing.
...Fine, whatever.
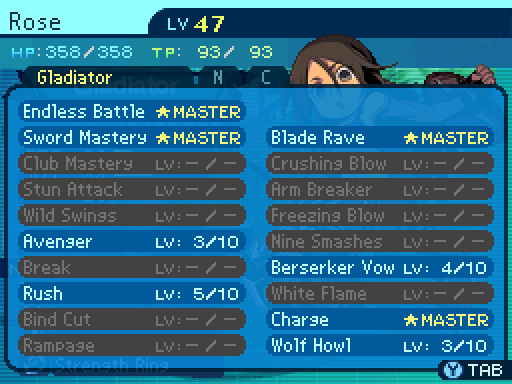
Ninja is pretty much one of the better subclasses for a Gladiator if you want to boost their damage.
C'mon, Akatsuki! Just get to the good stuff already!
If you wish to get to the “good stuff”, you must learn the basics first!
Hey Rose!
What's up, Rose?
Rose number 3, reporting in!
Please do not abuse the ways of the Ninja,
Mainly cause Bunshin gives use access to 2 Roses, which boosts her damage even further. As for the rest of her skillset, I reverted it back to the Blade Rave build.
As for Charlotte...
Um, Rose?
Yeah?
I would actually be interested in learning about your style of fighting. Would you mind teaching me? Despite what happened when it was the other way around.
Sure! It'll be fun! C'mon!
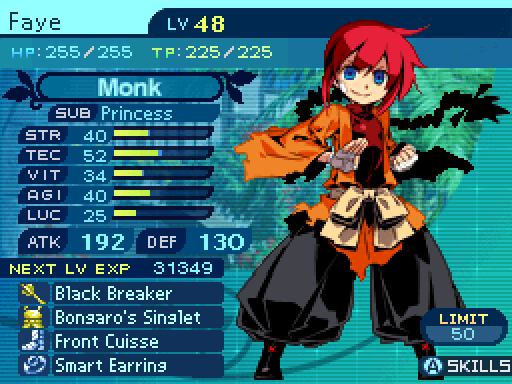
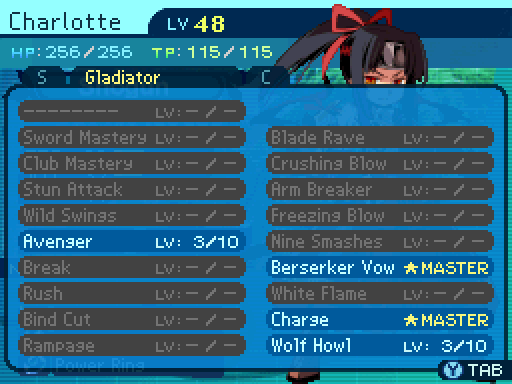
I'm turning Charlotte into an actual offensive character instead of a Limit building support. Should make her a little less redundant with MEGAQUEEN.
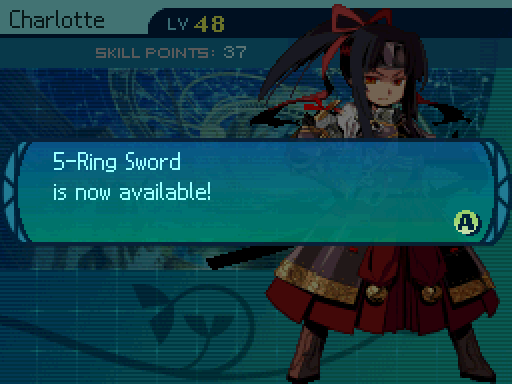
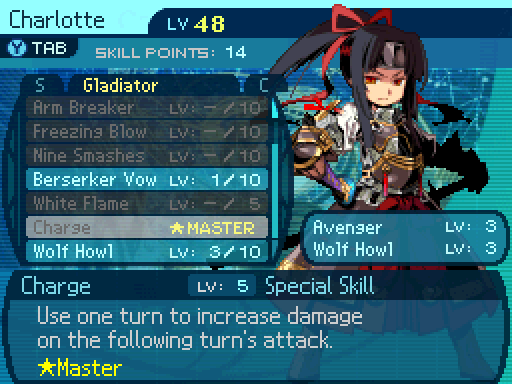
I mainly took this skill to unlock Charlotte's best damage skill.
None can compare with me.
Be careful who you say that to. You're likely to aggravate more than a few people in the process.
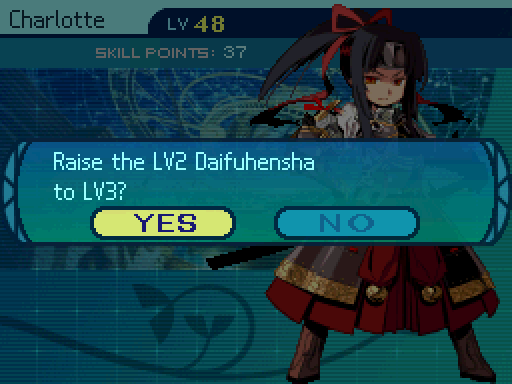
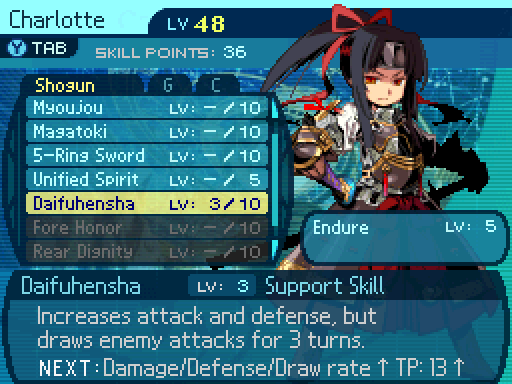
Daifuhensha (Great Militarist) increases Charlotte's attack power by 21% and her defense by 19% for 4 turns at level 3. However, it also functions as a Provoke skill, and places up to a maximum aggro value of 7 on her for the buff duration. It's a pretty risky skill to use in some cases.
Our enemies will be nothing but ribbons fluttering in the battlefield!
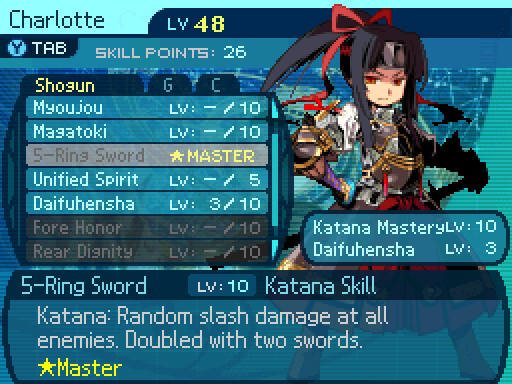
5-Ring Sword is Charlotte's best damage skill. At level 10, it randomly hits all enemies with 90% Slash damage 2 to 5 times. However, if Charlotte is dual wielding, it hits all enemies 2 to 10 times instead, possibly dealing a total of 900% damage if she's lucky. This does mean that Shoguns are the only ones who can get the most out of this skill, as Second Sword is needed to increase the number of hits.
My friends, you will be avenged.
This seems... undignified.
You gotta do whatever it takes to win a battle!
Patience is a virtue.
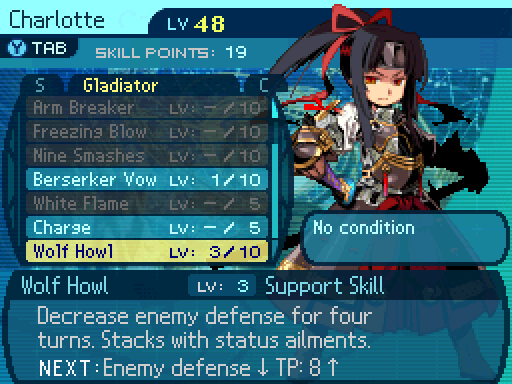
Just gonna grab Charge for Charlotte to increase her damage even further.
I IMMEDIATELY REGRET MY DECISION!
C'mon, Charlotte! Pain is weakness leaving the body!
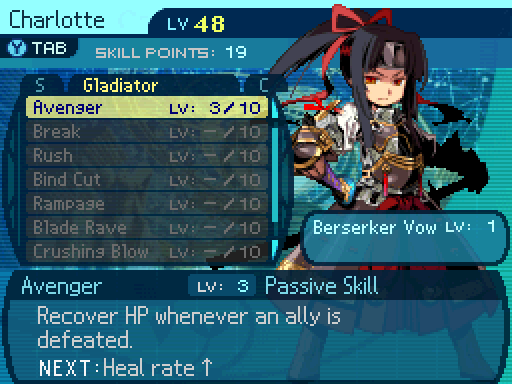
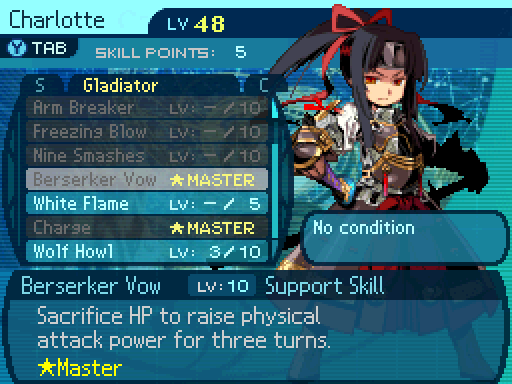
And Berserker Vow to increase her damage to even more ridiculous levels.
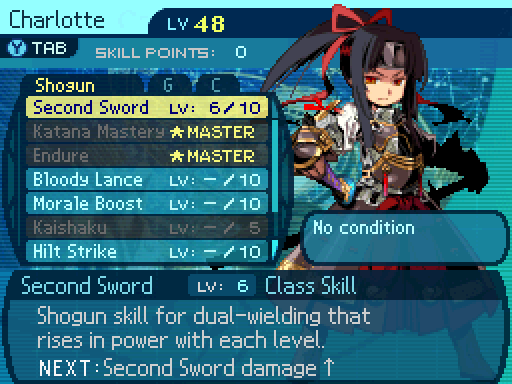
I also decided to grab some more levels in Second Sword to increase her damage for random encounters. At level 6, the offhand attack deals 35% damage.
Now there's a few other things I'd like to take care of. There's one conditional drop that's kind of a pain to get. It involves the Curse ailment. The only member in our guild that has access to Curse is...
I've come to put an end to hope!
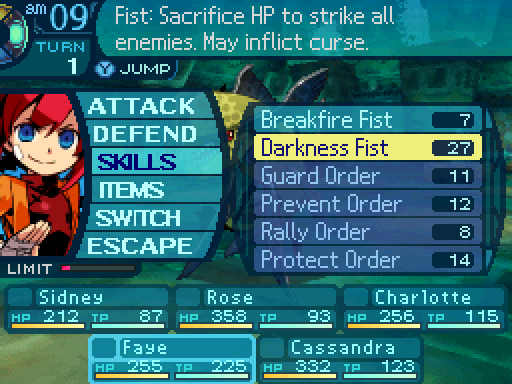
Miss Faye, there's a reason why your teachers forbade the use of that technique!
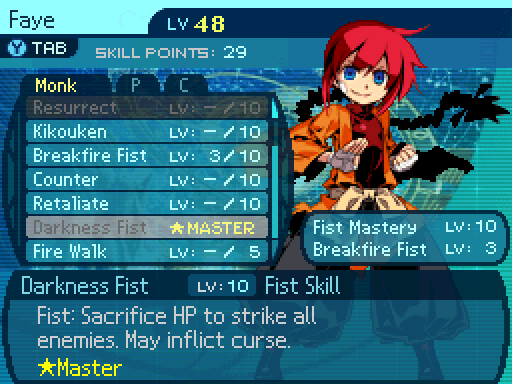
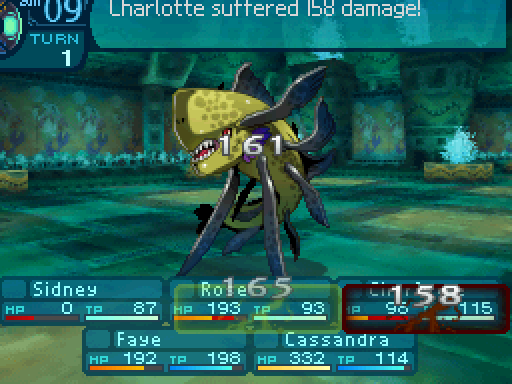
Darkness Fist is a pretty awful skill. It's an AOE that causes Faye to sacrifice 25% of her current HP to deal 210% Strike damage to all enemies at level 10. It also has a 60% chance to inflict Curse, which is what I'll need for this conditional drop.
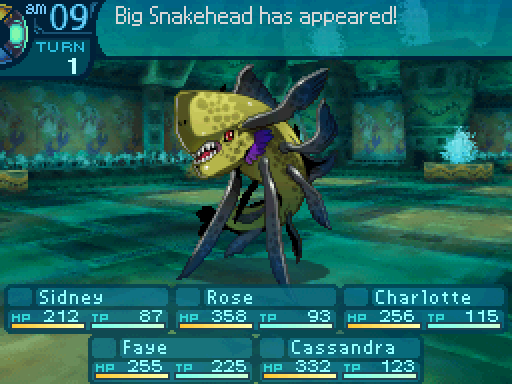
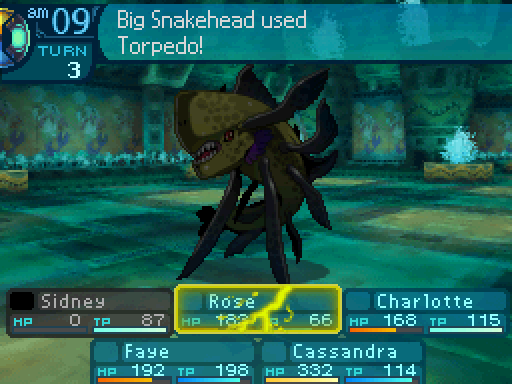
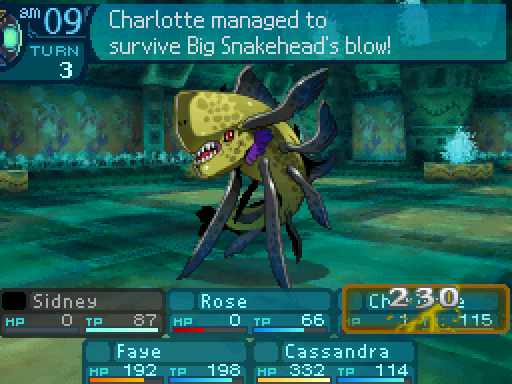
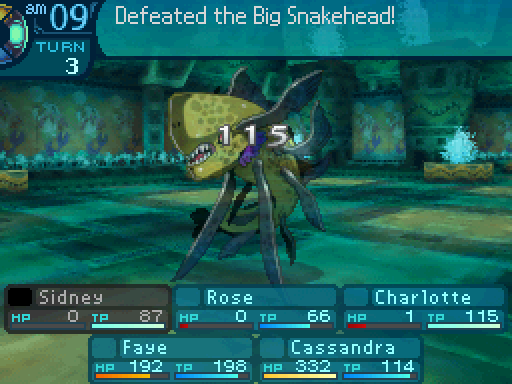
So. Here's the Big Snakehead. It's conditional drop requires killing it with Curse damage. That's NOT killing it while Cursed. No, that would be too easy. Essentially, the Big Snakehead has to kill itself through the Curse ailment. This kind of conditional drop tends to be one of the most hated in the series due to many factors that make them irritating to pull off.
You have to apply the ailment when the target is close to dying, since no point to applying Curse early, and Accumulative Resistance limits the number of times you can attempt to inflict it. The conditional drop gets harder to snag as your characters get stronger, as they will be taking less damage overall, decreasing the amount of leeway you have to fulfill the condition. Oh and you can't just make a bunch of weak party members for the target to kill, as Curse damage does not apply from killed victims, they have to survive the attack.

I'll strangle you with your own hatred!
Well, I landed the ailment, off to a good start.

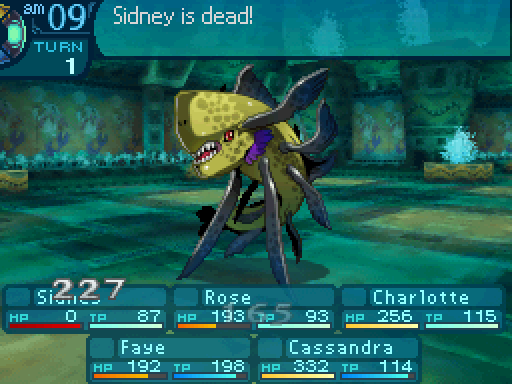
 Bury me with my crossbow...
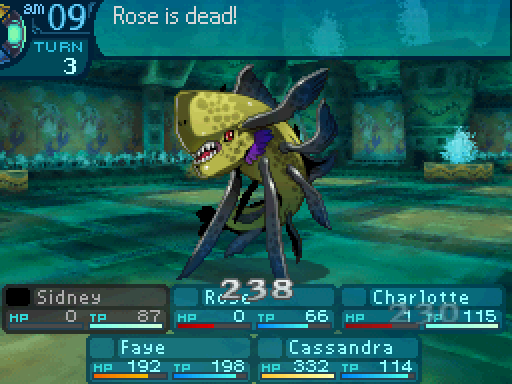
Sidney! Rrrgh. You miserable little creature...
And the damage that Sidney took doesn't get factored into the Curse damage because he died.

YOU'LL PAY FOR THAT!
The Avenger activations should hopefully help keep the other two alive.
You think you're tough...?
Or not.
I won't fall that easily!
Consumed by the power of hate!
Faye, why don't you take a little nap at the guild? I'm sure you're very tired after all this.
You have no power over me, crone!
Naptime. Now.

Well there's the conditional drop. Probably didn't seem too bad. For random encounters, that conditional drop is a bit irritating. The problem is, bosses have this kind of conditional drops as well. Unsurprisingly, most people decide not to do those legitimately, and just used a Formaldehyde to spare themselves the pain. However, I'll be nice and show how to get those the proper way.
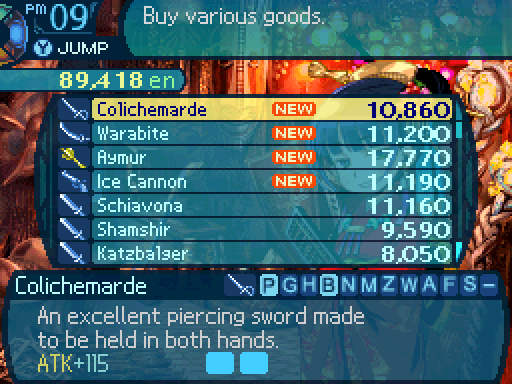
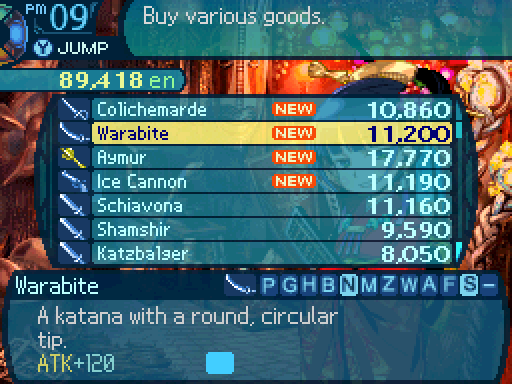
But I went ahead and unlocked all the pieces of equipment we can get right now, so let's go take a look at those.

The Ice Cannon provides a 30% damage boost to regular attacks and come imbued with Ice. Could be okay for Swashbuckling Buccaneers.

The Strength Ring increases the wearer's STR by 5, and if you want to make your physical attackers deal as much damage as possible, this is the best accessory for them. There aren't any accessories that come with ATK forges in this game.
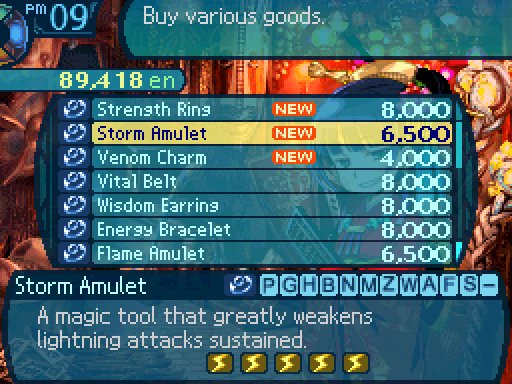
The Storm Amulet increases the wearer's Volt resistance by 50%. Stack 2 of them to get immunity to Volt attacks, but I find it redundant with Antivolt. If you don't have that skill though, feel free to make use of these.
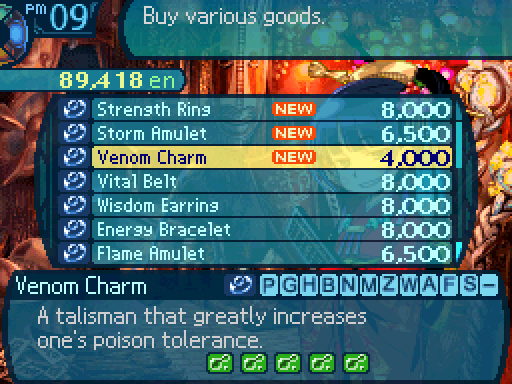
The Venom Charm gives a 50% resistance to Poison. Like the other resistance accessories, stack 2 of them to gain total immunity to Poison. Though honestly, I don't know what situations this would be handy in.
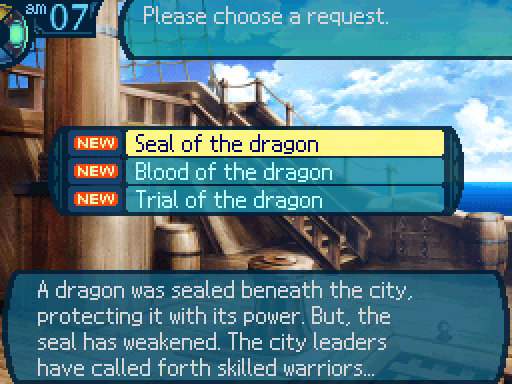
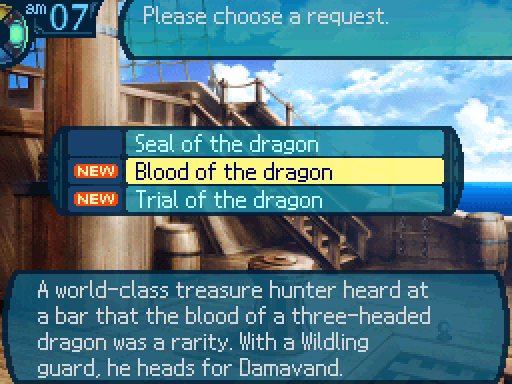
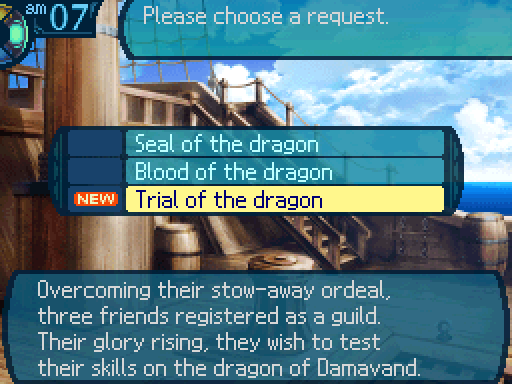
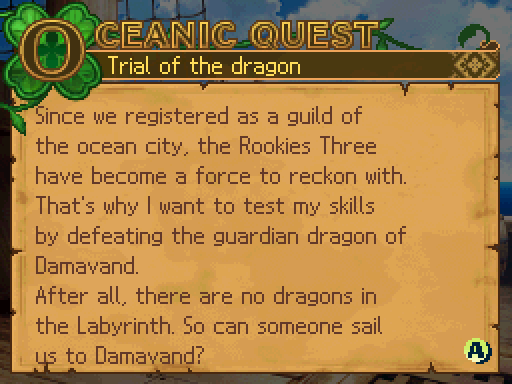
Since all that has been taken care of, let's go ahead and do the next set of Sea Quests. It's been a while since we did those.

Ooh, I actually really like this set of Sea Quests. I find the fights to be really fun.
Tourita
Class: Zodiac
Stats:
- HP: 255
- TP: 345
- STR: 26
- VIT: 33
- AGI: 40
- LUC: 37
- TEC: 67
Equipment:
- Firm Book - Book, 88 Attack, +2 VIT, +1 TEC.
- Spirit Cape - Clothes, 62 Defense, +5% HP, +5% TP.
- Wizard Cap - Helm, 45 Defense, +10% Fire RES, +10% Ice RES.
- Kilt Tassels - Boots, 15 Defense, +10% TP.
Skillset:
- HP Up: Level 1 - Increases max HP by 10%.
- TP Up: Level 2 - Increases max TP by 13%.
- Ether Mastery: Level 6 - Increases elemental damage by 13%.
- Fire Mastery: Level 7 - Increases Fire damage by 8%.
- Ice Mastery: Level 7 - Increases Ice damage by 8%.
- Volt Mastery: Level 7 - Increases Volt damage by 8%.
- Singularity: Level 4 - Upon striking a weakness, the attack deals 40% more damage.
- Fire Star: Level 7 - 16 TP. Deals 64% Fire damage to one enemy.
Binary Fire: Level 5 - 24 TP. Deals 38% Fire damage to all enemies.
- Fire Prophecy: Level 3 - 17 TP. Nullifies one enemy's Fire attacks and deals 75% Fire damage upon nullification.
- Ice Star: Level 7 - 16 TP. Deals 64% Ice damage to one enemy.
Binary Ice: Level 5 - 24 TP. Deals 38% Ice damage to all enemies.
- Ice Prophecy: Level 3 - 17 TP. Nullifies one enemy's Ice attacks and deals 75% Ice damage upon nullification.
- Volt Star: Level 7 - 16 TP. Deals 64% Volt damage to one enemy.
Binary Thunder: Level 5 - 24 TP. Deals 38% Volt damage to all enemies.
- Volt Prophecy: Level 3 - 17 TP. Nullifies one enemy's Volt attacks and deals 75% Volt damage upon nullification.
- Meteor: Level 4 - 37 TP. Deals 41% Strike damage to random enemies. Hits 3 to 5 times.
Etheric Charge: Level 4 - 11 TP. Increases the power of the next elemental attack by 280%.
Supplies:
- 3 Amrita IIs. Restores 100 TP to a single target.
Oh man, look at all those skills a level 52 Zodiac wishes they could have. Anyways, despite the seemingly diverse skillset, don't expect Tourita to make use of the Binary and Prophecy skills, as I've never seen him use them for some reason. Anyways, he has access to elemental skills, which aren't too good against the boss itself, but the boss in question has a bunch of minions that hit really hard, and they all have elemental weaknesses. He'll bust out Meteor against the boss in special conditions. This Sea Quest isn't too tough, Tourita can really pull his weight here. Bring whoever you want, though you really want to bring another elemental attacker to help him out.
Toma
Class: Farmer
Stats:
- HP: 254
- TP: 163
- STR: 21
- VIT: 32
- AGI: 34
- LUC: 55
- TEC: 23
Equipment:
- Baselard - Knife, 105 Attack.
- Nothing.
- Exorcism Gloves - Gloves, 30 Defense, +20% Curse RES.
- Kilt Tassels - Boots, 15 Defense, +10% TP.
Skillset:
- HP Up: Level 1 - Increases max HP by 10%.
- TP Up: Level 1 - Increases max TP by 10%.
- Earth's Bounty: Level 5 - Increases exp gain by 18% as long as the user is alive at the end of the battle.
- Brave Heart: Level 3 – Recovers 3 TP at the end of each turn as long as the user is in the front row.
- Persistence: Level 3 - Gives a 20% chance for the user to automatically revive if dead once per battle.
- Waste Not: Level 3 - Increases the drop rate by 3%.
Lullaby: Level 5 - 6 TP. Has a 35% chance to put all enemies to sleep. Puts the user to sleep as well.
- Play Possum: Level 5 - 5 TP. Reduce the user's aggro value by a value of up to 9 for 4 turns.
- Strange Seeds: Level 5 - 5 TP. Has a 36% chance to apply random binds to all enemies.
- Rotten Egg: Level 5 - 7 TP. Lowers all enemies' physical attack by 6% (32% if they have an ailment) for 5 turns.
- Sympathy Pain: Level 5 - 5 TP. Has a 74% chance to transfer an ailment the user has to the target.
Supplies:
- 9 Medicas. Restores 50 HP to a single target.
- 5 Medica IIs. Restores 160 HP to a single target.
- 3 Medica IIIs. Restores 300 HP to a single target.
- 5 Amritas. Restores 50 TP to a single target.
- 10 Theriaca As. Dispels all binds on a single target.
- 10 Theriaca Bs. Dispels an ailment on a single target.
Toma's back and is kind of weaker than he was in the Ghost Ship fight. See all those active skills He has? Yeah he'll never use them, because his AI is bugged. The only thing you'll see in this fight is his passives. Also he's pretty fragile since he's not wearing any armor for some reason. Despite that, Toma is a nice support due to his massive supply of items. He can heal our party and dispel any ailments and binds, because the boss and all it's helpers make heavy use of them. When he's not using items, all he will do is defend. Kind of a shame, Rotten Egg would synergize nicely with our next guest.
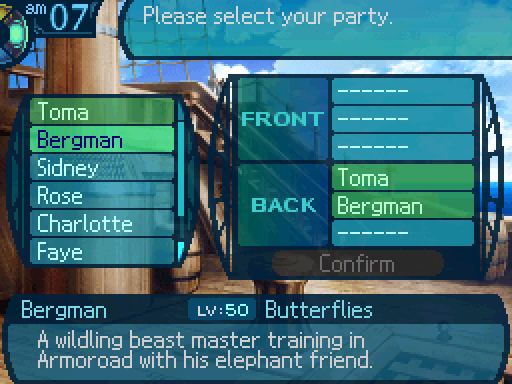
Bergman
Class: Wildling
Stats:
- HP: 315
- TP: 231
- STR: 37
- VIT: 35
- AGI: 38
- LUC: 47
- TEC: 46
Equipment:
- Partizan - Spear, 124 Attack.
- Spirit Cape - Clothes, 62 Defense, +5% HP, +5% TP.
- Wizard Cap - Helm, 45 Defense, +10% Fire RES, +10% Ice RES.
- Strength Ring - Accessory, +5 STR.
Skillset:
- HP Up: Level 1 - Increases max HP by 10%.
- TP Up: Level 3 - Increases max TP by 16%.
- Beast Soul: Level 6 - Increases an animal's HP by 30%, their ATK by 50%, and their DEF by 30%.
- Wild Mastery: Level 8 - Increases the chance of an animal's ailments landing by 12%.
- Nature Pact: Level 3 - Animals have an 18% chance of taking a mortal blow in the Wildling's place and heals them for 30 HP.
- Sacrifice 1: Level 5 - Animals have an 18% chance of taking a physical attack in an ally's place within their row.
- Sacrifice 2: Level 5 - Animals have an 18% chance of taking an elemental attack in an ally's place within their row.
- Dismiss Beast: Level 5 - 1 TP. Send an animal away and refunds the amount of TP used to summon them.
- Call Elephant: Level 10 - 33 TP. Summons an elephant that has a 50% chance to inflict Confusion with its attacks. Attacks deal 120% or 190% damage.
- Beast Roar: Level 4 - 14 TP. Lowers all enemies' physical attack by 14% for 4 turns.
- Primal Drums: Level 4 - 14 TP. Lowers all enemies' physical defense by 25% for 4 turns.
Supplies:
- 3 Medica IIs. Restores 160 HP to a single target.
- 2 Amrita IIs. Restores 100 TP to a single target.
Bergman is back from the Batavia, and he's still pretty useful. Due to how the fight works, the Elephant is fantastic at dealing damage and locking down the bosses minions, who are the real threat in this fight. He's a very nice support, and his elephant serves as a nice meat shield. This Sea Quest isn't too bad either, but make sure to bring damage dealers since Toma and Bergman have the support roles covered.
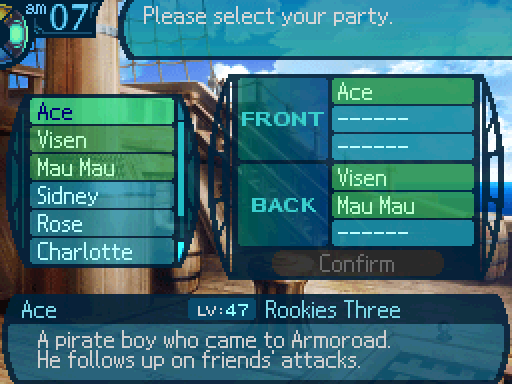
Ace
Class: Buccaneer
Stats:
- HP: 290
- TP: 174
- STR: 36
- VIT: 32
- AGI: 43
- LUC: 29
- TEC: 34
Equipment:
- Thunder Cannon - Gun, 121 Attack, +30% Volt Power.
- Nothing.
- Exorcism Gloves - Gloves, 30 Defense, +20% Curse RES.
- Kilt Tassels - Boots, 15 Defense, +10% TP.
Skillset:
- HP Up: Level 1 - Increases max HP by 10%.
- TP Up: Level 3 - Increases max TP by 16%.
- Trickster: Level 7 - User recovers 7 TP for every offensive skill they cast.
- Gun Mastery: Level 7 - Increases normal attack damage by 8% when using a Gun.
- Swashbuckling: Level 3 - The user has a 16% chance to attack twice when using normal attacks.
- Lady Luck: Level 4 - Increases the user's critical hit rate by 8%.
Quick Draw: Level 6 - 9 TP. Randomly hits enemies 2 to 4 times, dealing 74% Pierce damage per hit.
- Chase Fire: Level 8 - 11 TP. Follows up Fire attacks with attacks that deal 150% Pierce damage. Can chase up to 6 times.
- Chase Ice: Level 8 - 11 TP. Follows up Ice attacks with attacks that deal 150% Pierce damage. Can chase up to 6 times.
- Chase Volt: Level 8 - 11 TP. Follows up Volt attacks with attacks that deal 150% Pierce damage. Can chase up to 6 times.
Rapid Fire: Level 6 - 12 TP. Hits one enemy 3 times, dealing 75% Pierce damage per hit.
- Pincushion: Level 1 - 19 TP. Randomly hits enemies 1 to 2 times, dealing Pierce damage equal to 110% + 3 * User's AGI per hit.
- Eagle Eye: Level 3 - 7 TP. Lowers one enemy's physical defense by 20% for 4 turns.
Supplies:
Ace and his friends are back, and Ace is a pretty strong attacker. He mainly chases elemental attacks, so you may want to bring an elemental attacker so he can chase those and dish out lots of damage. For some reason, he doesn't make use of his physical skills even though there's a point in the fight where they would really come in handy. However, he's a glass cannon, as he is wearing no armor, so he can get taken out without proper support.
Visen
Class: Zodiac
Stats:
- HP: 231
- TP: 312
- STR: 23
- VIT: 39
- AGI: 35
- LUC: 32
- TEC: 50
Equipment:
- Firm Book - Book, 88 Attack, +2 VIT, +1 TEC.
- Spirit Cape - Clothes, 62 Defense, +5% HP, +5% TP.
- Wizard Cap - Helm, 45 Defense, +10% Fire RES, +10% Ice RES.
- Kilt Tassels - Boots, 15 Defense, +10% TP.
Skillset:
- HP Up: Level 2 - Increases max HP by 13%.
- TP Up: Level 3 - Increases max TP by 16%.
- Ether Mastery: Level 4 - Increases elemental damage by 8%.
- Fire Mastery: Level 5 - Increases Fire damage by 6%.
- Ice Mastery: Level 5 - Increases Ice damage by 6%.
- Volt Mastery: Level 5 - Increases Volt damage by 6%.
- Singularity: Level 3 - Upon striking a weakness, the attack deals 30% more damage.
Fire Star: Level 5 - 12 TP. Deals 56% Fire damage to one enemy.
- Binary Fire: Level 1 - 16 TP. Deals 30% Fire damage to all enemies.
Fire Prophecy: Level 1 - 15 TP. Nullifies one enemy's Fire attacks and deals 50% Fire damage upon nullification.
- Ice Star: Level 5 - 12 TP. Deals 56% Ice damage to one enemy.
- Binary Ice: Level 1 - 16 TP. Deals 30% Ice damage to all enemies.
Ice Prophecy: Level 1 - 15 TP. Nullifies one enemy's Ice attacks and deals 50% Ice damage upon nullification.
- Volt Star: Level 5 - 12 TP. Deals 56% Volt damage to one enemy.
- Binary Thunder: Level 1 - 16 TP. Deals 30% Volt damage to all enemies.
Volt Prophecy: Level 1 - 15 TP. Nullifies one enemy's Volt attacks and deals 50% Volt damage upon nullification.
- Etheric Charge: Level 3 - 10 TP. Increases the power of the next elemental attack by 260%.
Supplies:
- 3 Amrita IIs. Restores 100 TP to a single target.
Visen isn't as strong as Tourita, but his attacks deal some nice damage and provides Chaser fuel for Ace. He'll only use his AOEs, nothing else. He'll cheat and use the same elements your party members use so Ace can chase more attacks.
Mau Mau
Class: Arbalist
Stats:
- HP: 290
- TP: 174
- STR: 36
- VIT: 32
- AGI: 43
- LUC: 29
- TEC: 34
Equipment:
- Senpuuhou - Crossbow, 138 Attack.
- Nothing.
- Exorcism Gloves - Gloves, 30 Defense, +20% Curse RES.
- Kilt Tassels - Boots, 15 Defense, +10% TP.
Skillset:
- HP Up: Level 2 - Increases max HP by 13%.
- TP Up: Level 3 - Increases max TP by 16%.
- Giant Kill: Level 4 - Increases the user's damage output by 31% as long as their targets have more than twice as much HP as them.
- Bolt Mastery: Level 5 - Increases normal attack damage by 6% when using a Crossbow.
- Proper Form: Level 3 - Increases the user's hit rate by 15.
- Night Vision: Level 2 - Increases the user's critical hit rate by 17% during the night.
- Extend: Level 5 - The user recovers 50 HP after killing an enemy.
Double Action: Level 4 - Single target offensive skills have a 16% chance of activating again.
- Heavy Shot: Level 5 - 7 TP. Deals 153% Pierce damage to one enemy.
- Strafe: Level 1 - 7 TP. Randomly hits enemies 2 to 3 times, dealing 100% Pierce damage per hit.
- Fire Barrage: Level 1 - 8 TP. Deals 80% Fire/Pierce damage to all enemies.
- Ice Barrage: Level 1 - 8 TP. Deals 80% Ice/Pierce damage to all enemies.
- Volt Barrage: Level 1 - 8 TP. Deals 80% Volt/Pierce damage to all enemies.
Supplies:
- 3 Amrita IIs. Restores 100 TP to a single target.
Mau Mau doesn't use her physicals for some reason, even though there's a point in the fight where they would be really handy. Instead, she just opts to use regular attacks at that point. At any rate, she just exists to provide Chaser fuel for Ace. And she's wearing no armor, so she's really fragile. You may want to do this Sea Quest at night to take advantage of Night Vision. Unlike the first time you fought with these guys, they're actually a bit weaker here, so this Sea Quest can be a bit rough. You may want to bring a damage dealer and a support.
Now let's take a look at our guild.
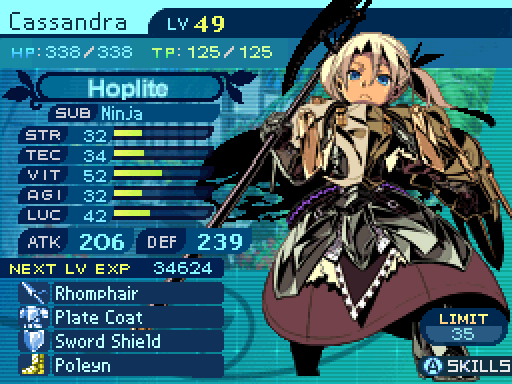
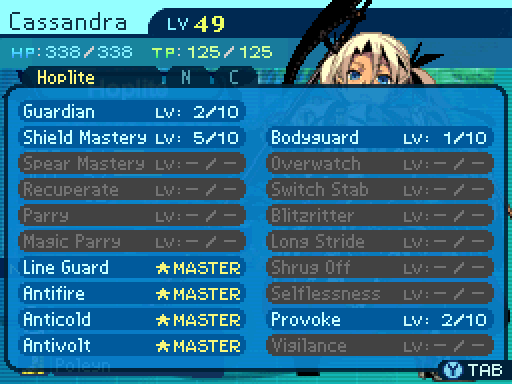

Cassandra is a fantastic support to bring to the fight, as there are a lot of elemental attacks being thrown around, so her Antiskills can make life so much easier for the party. Bunshin also enables her to defend against 2 different elements at once, making life even easier.
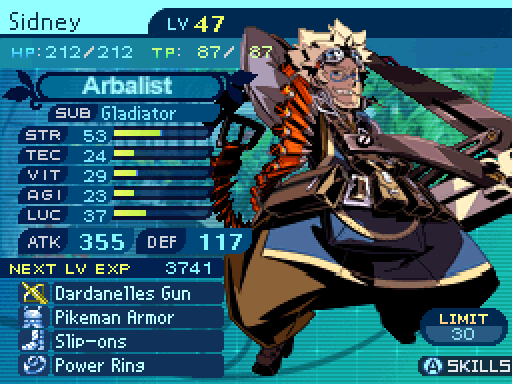

Sidney is a strong offensive party member to bring along, as he has access to both physical and elemental attacks, and it's vital to make use of both in this fight. Granted his elementals aren't as strong as Asteria's.
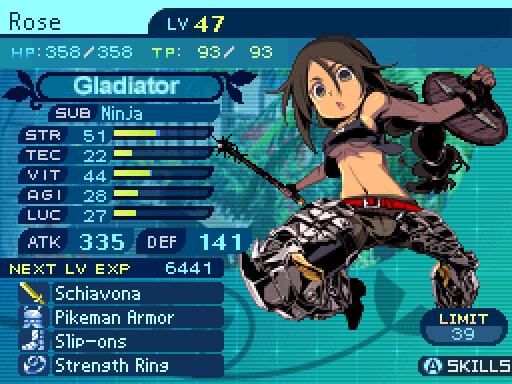
Rose is a strong physical attacker, but her low TEC provides little defense against the minion's elemental attacks. Blade Rave can at least hit multiple targets for a bit of crowd control.

I restored Faye's skillset to what it was before. She's another great support, with fantastic healing capabilities and being able to prevent ailments.
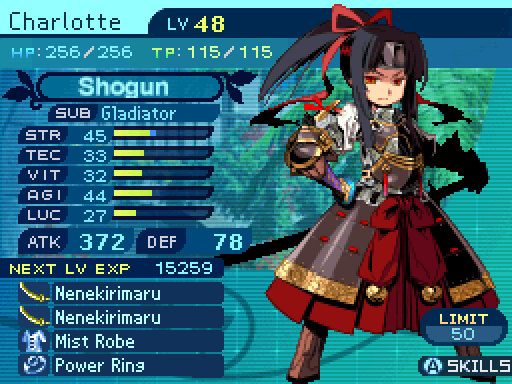

Charlotte is another strong physical attacker, and also one of the most fragile party members. 5-Ring Sword at least gives her the ability to attack multiple targets at once for a bit of crowd control.
Oh as an aside, if you have a character with Bloody Lance, bring them to the fight for some hilarity, as Bloody Lance is a really good passive. Sadly I have no party members with that ability anymore.

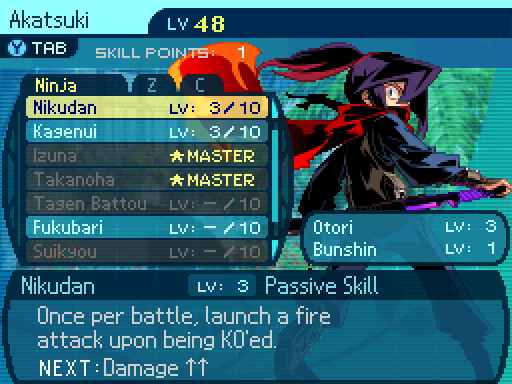
Nikudan deals 240% Fire damage to whoever kills Akatsuki. And that's pretty much all the skill points I'll put into this skill.
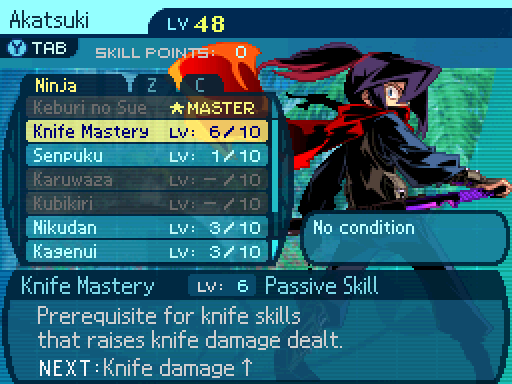
To unlock Akatsuki's next big skill, I want to max out Knife Mastery.
Akatsuki is a nice support unit, providing infinite TP to a row and can provide a bit of crowd control with his attacks. Unfortunately, he can't just use Izuna on the boss' minions, as they have Lethal Resistance.

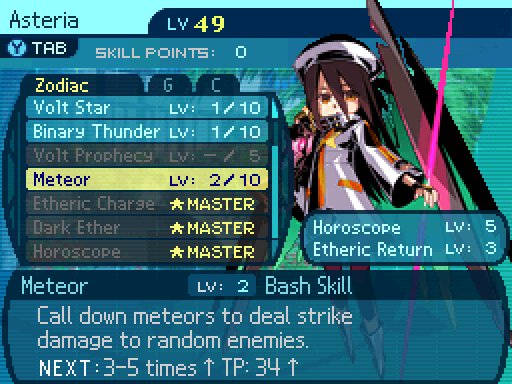
 Time to do some clean up with a little meteor shower!
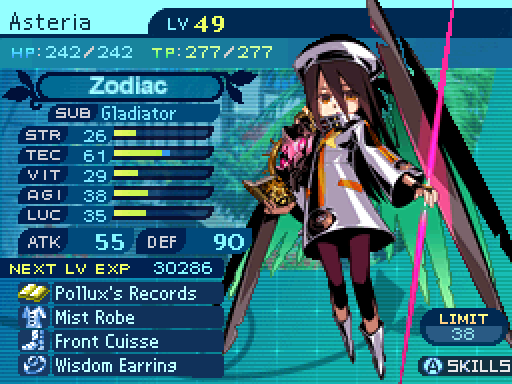
And Asteria finally has her best damage skill. Meteor is a Strike attack that randomly hits all enemies 3 to 4 times, dealing 38% damage per hit. And it's TEC damage too, so that actually hits really hard. It's why I got the Gladiator subclass for Asteria, as their physical damage boosts work with Meteor.
Asteria is a fantastic damage dealer to bring along, as her elemental can wipe out the boss' minions easily, and she has a physical attack in the form of Meteor, so she can deal heavy damage to the boss itself.
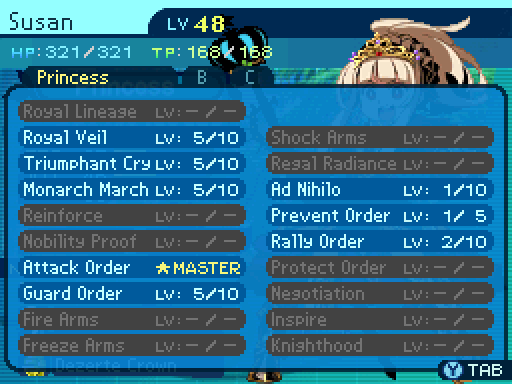

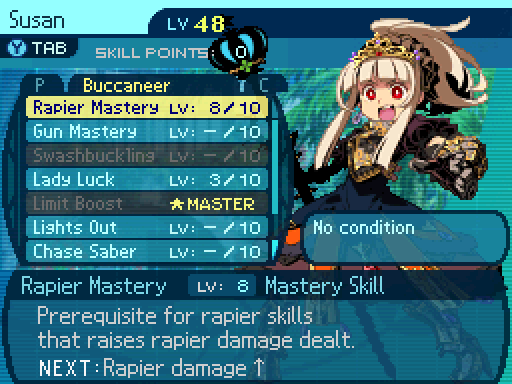
Megaqueen just got Rapier Mastery up to 8, so I'll be working on Gun Mastery now for Swashbuckling.
Megaqueen can build up Limit really fast, and can enable our party to kill things faster with her buffs. Prevent Order is also great at stopping any of the ailments the minions try to dish out.
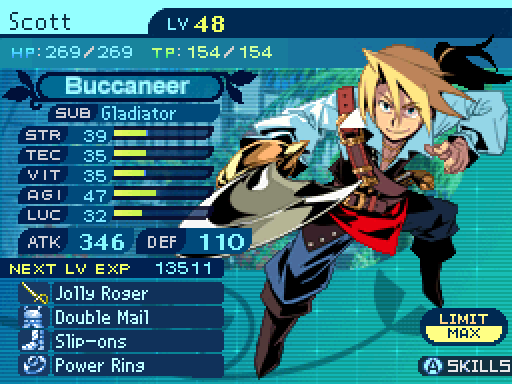
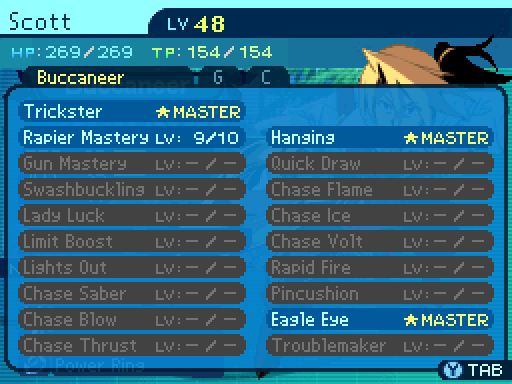

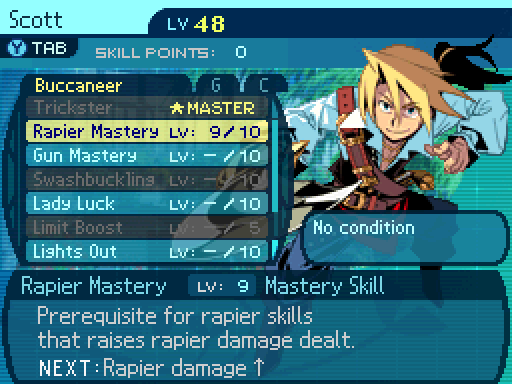
Unfortunately, Scott is about to fall off since he no longer has a damage advantage over the other physical attackers. So I'm trying to get his best damage skill for him, but I may respec him to get him at that point sooner.
Scott can increase our party's damage with Eagle Eye, but it's a single target skill. He's an okay physical attacker, and head binds can help out the party a bit.

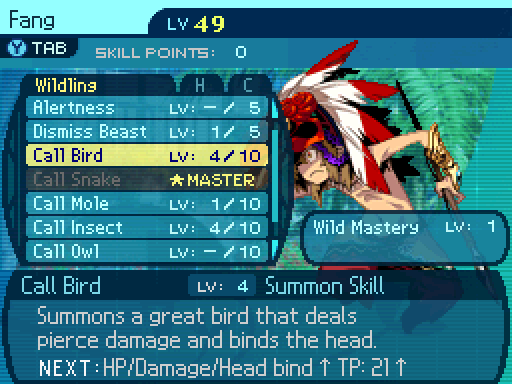
Call Bird has a 32% chance to inflict head bind, the bird comes with 55 base HP, and its initial attack deals 95% damage, while its AI attacks deal 85% damage.
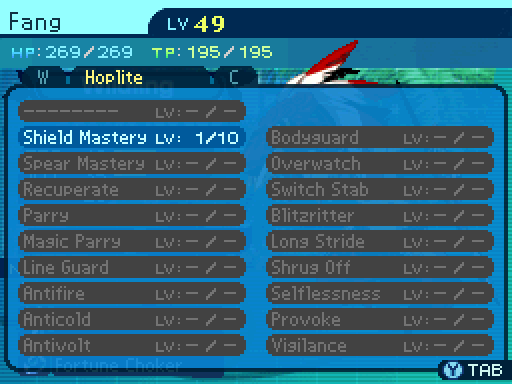
Fang is actually a fantastic support to bring to this fight. He pretty much excels in fights that involve multiple minions being summoned over and over due to the accumulative resistance mechanics. He can decrease all enemies' physical defenses with Primal Drums, and Call Elephant is fantastic lockdown in these fights. Unfortunately he kind of conflicts with other Bunshin users due to how summoning is handled in this game.
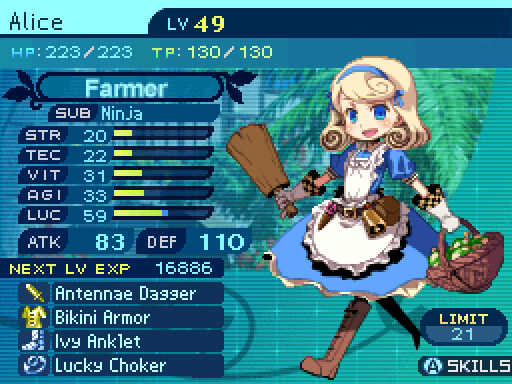


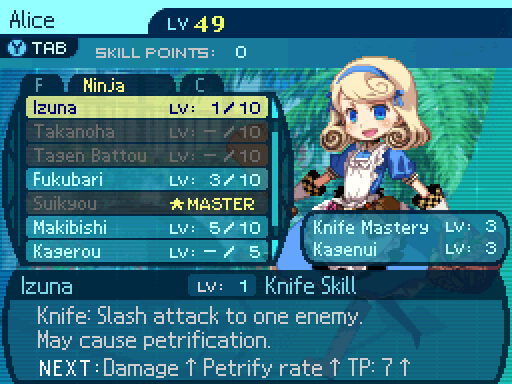
Finally. Getting Knife Mastery to 3 unlocked Izuna.
 Um, this seems dangerous.
That may be true, but it is necessary for fast eliminations.
Now that Alice has Izuna, she can spend some TP to eliminate targets I really want gone fast.
Alice is well, Alice. If you think she would excel in fights where there are a bunch of minions being summoned, you would be right. Except in this fight, the minions have Lethal Resistance. So she really can't do much. Aside from maybe putting them to Sleep with Lullaby.
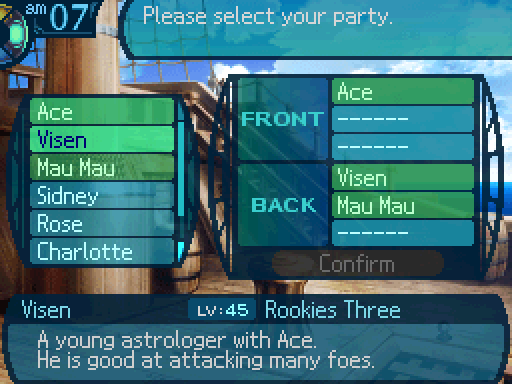
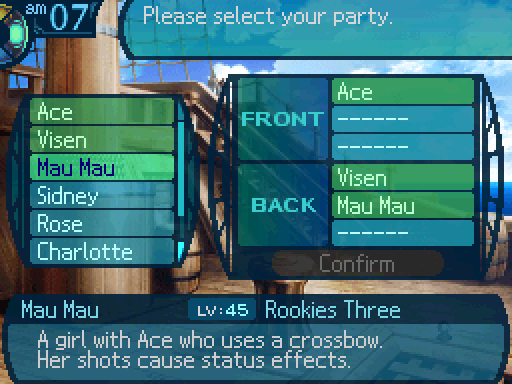
Vote for up to 3 party members you want to see participate in these Sea Quests. Votes must be in bold.