Toggle Background Color
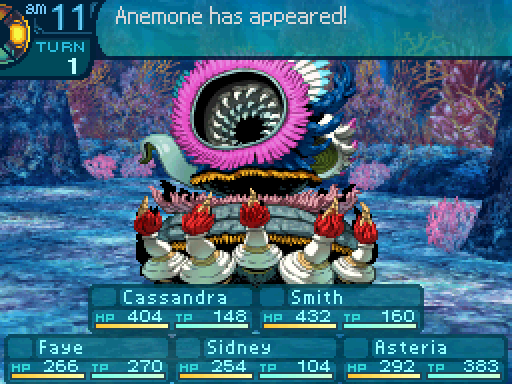
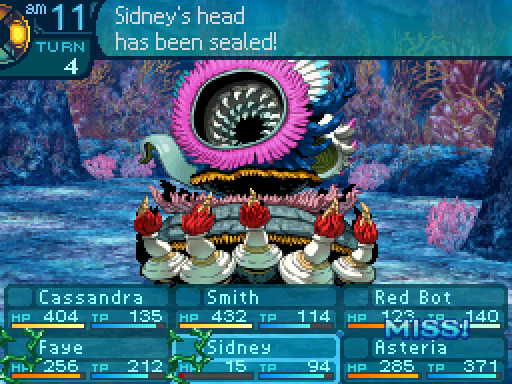
Update 89: Anemone
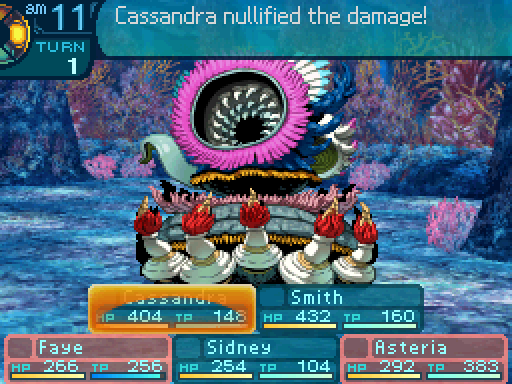
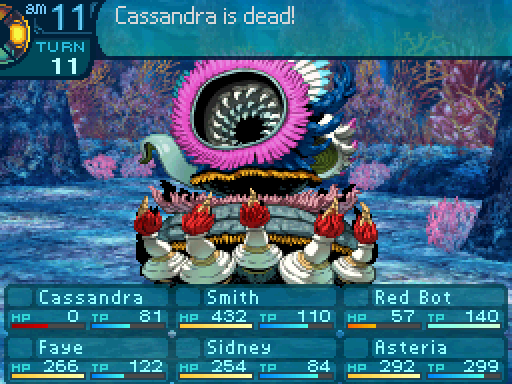
 What’s everyone so annoyed about? That thing wasn’t too bad to take down.
 Uh huh. Of course you would say that, Mr. I Can’t Be Hogtied.
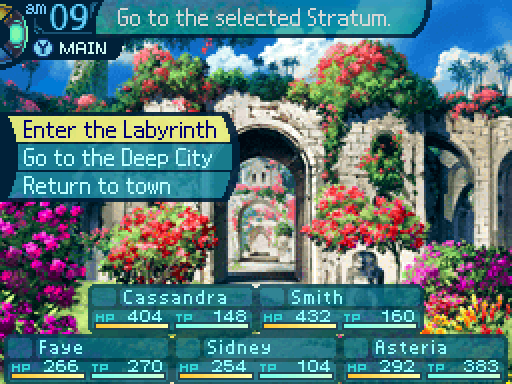
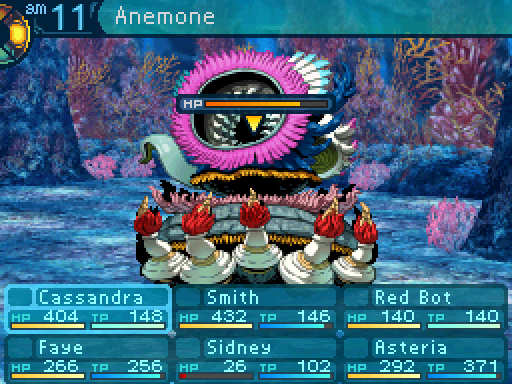
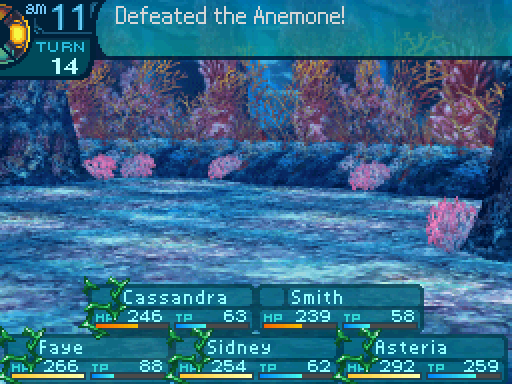
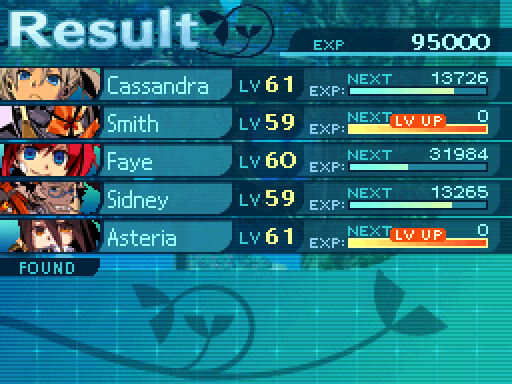
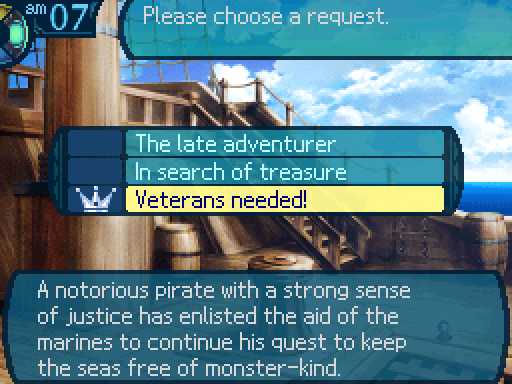
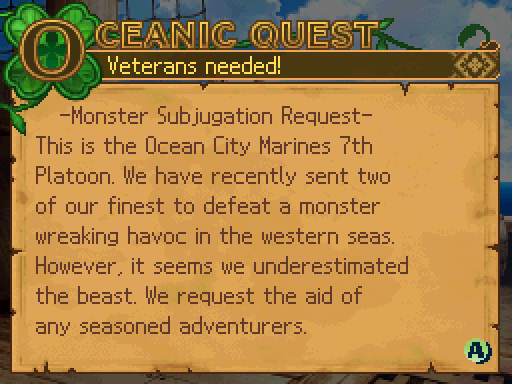
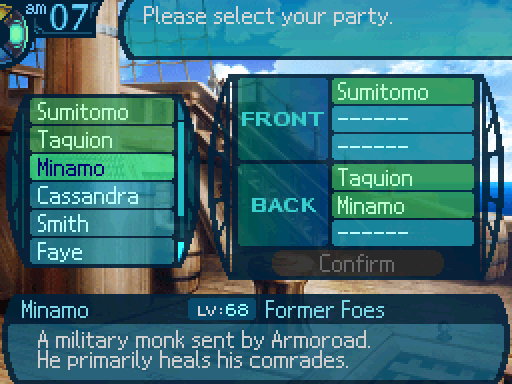
This was the party that was voted in for this fight.
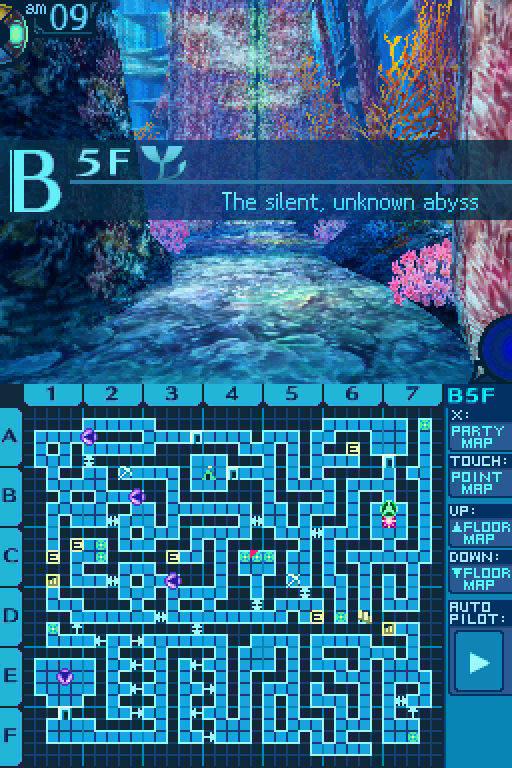
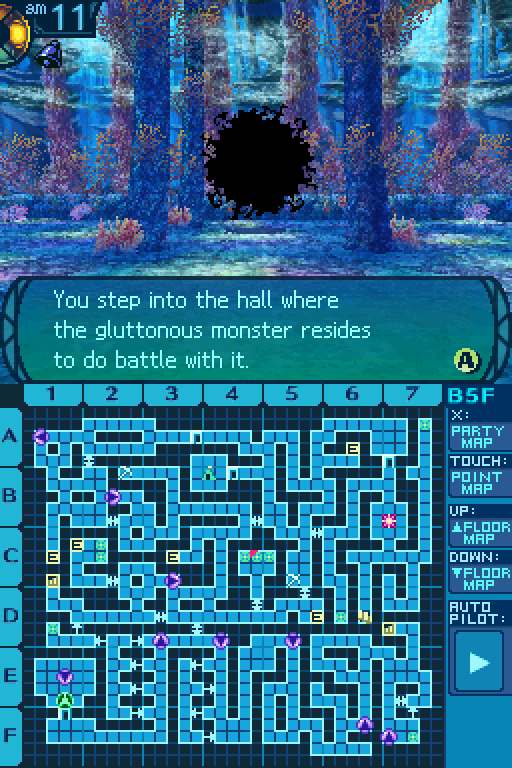
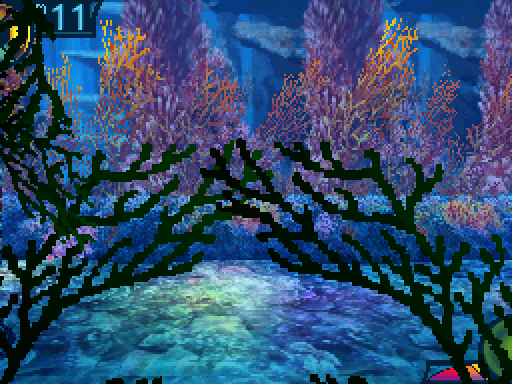
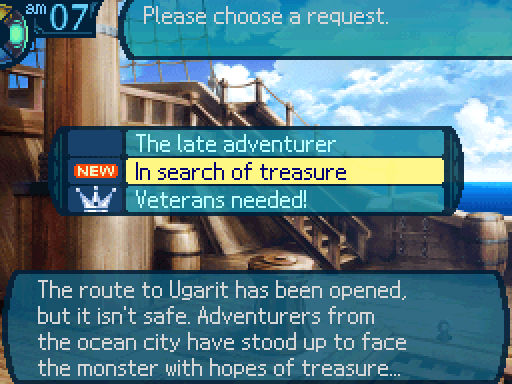
Unlike Kraken, Anemone is a lot easier to get to. No searching for a specific tile you were given no hints about. All you need to do is reach its room, which is in the bottom-left corner. Of course, you need that shortcut to the secret area unlocked first to get to it easily.
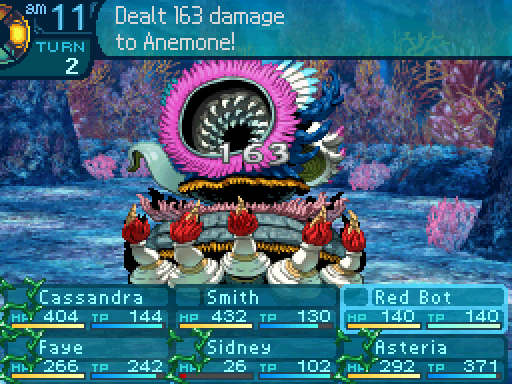
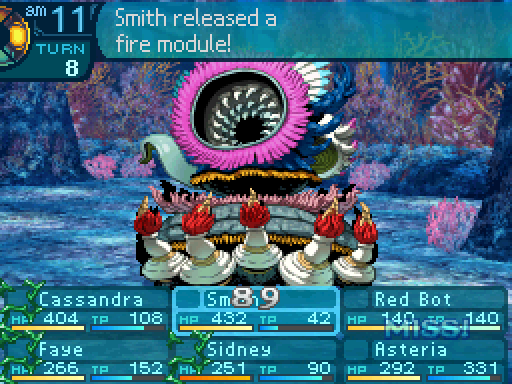
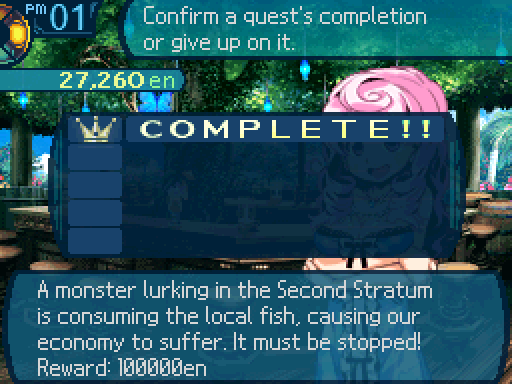
An unimaginably gigantic sea anemone is writhing grotesquely in a sickening manner! Its mouth is large enough to swallow a ship whole... It must be devouring the fish!
Hoo wee! Look at the maw on that thing!
 I’ve never seen something like that before! I wonder if there’s something in the water to cause such a mutation...

Yeah, we’ll restore balace, alright.
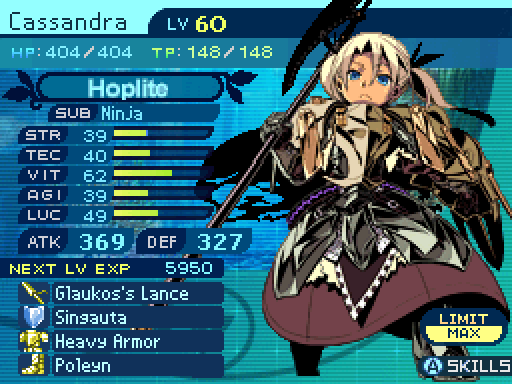
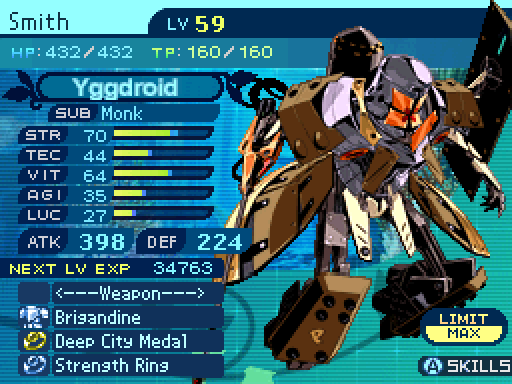


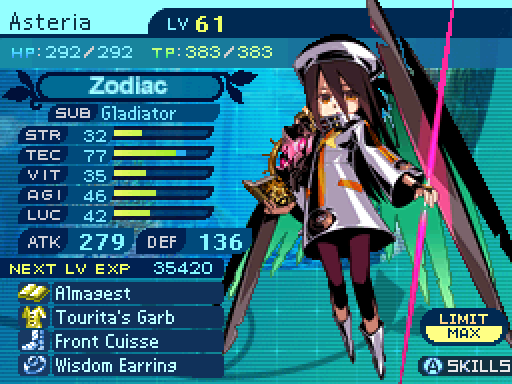
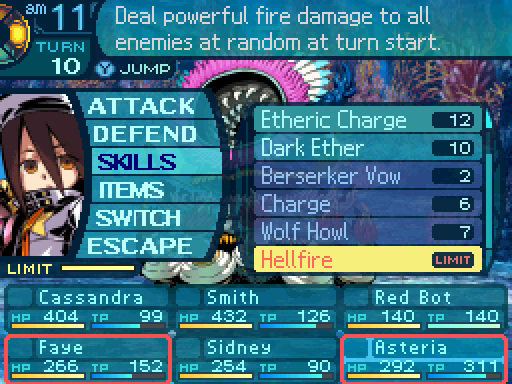
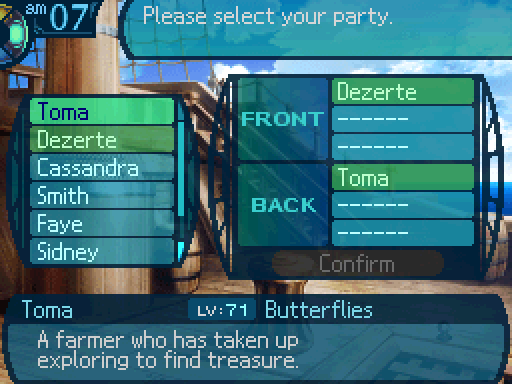
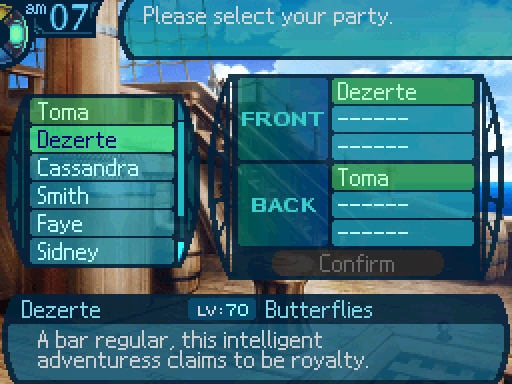
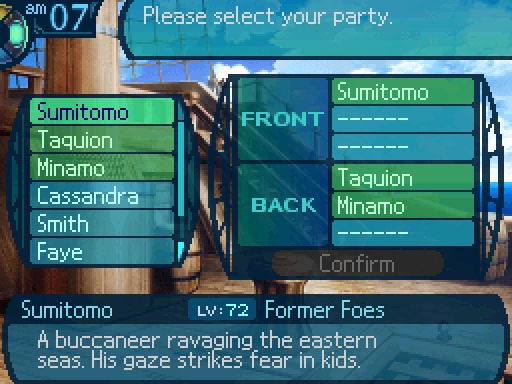
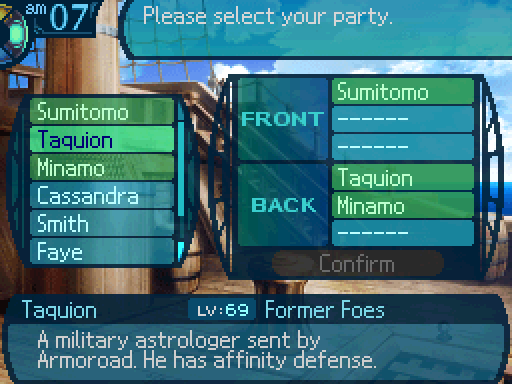
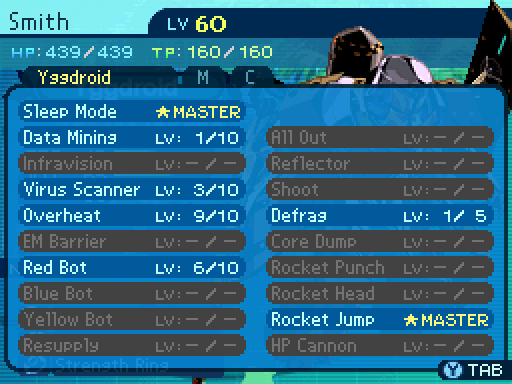
Here’s my equipment setup. The only one who I really want to make note of is Faye. I changed around her equipment so that she would be faster than the boss, as it like to make use of disables, and I want Faye to dispel them as soon as possible. I also put a Head Guard on her, since the boss can also bind heads, and Faye needs to make use of hers to be able to use her skillset.
Dinnertime’s over, you weird... underwater... flower... what are you, anyway?
 Video: Anemone


Anemone
Level: 69
HP: 17000
STR: 61
VIT: 68
AGI: 52
LUC: 49
TEC: 62
Attack Type: Pierce
Exp: 160000
Item Drops:
-Normal: Dimension Disc - 100% Drop Rate. Unlocks the Joukahainen Bow (Crossbow. Must be restocked.)
--Oral ring of an increasingly vicious, enlarged anemone.
-Gold: Blue Bone - Don’t kill with elemental damage. 100% Drop Rate. Prevents normal drops. Unlocks the Knight Armor (Hoplite’s ultimate Heavy Armor. Must be restocked.)
--Unbelievably sturdy and flexible metallic bone.
Description: A sea monster with an enormous appetite that causes trouble for the fishermen near Armoroad.
Damage Resistances: Slash: 25% Strike: 25% Pierce: 25% Fire: 150% Ice: 150% Volt: 150%
Ailment Resistances: Sleep: 10% Confusion: 10% Plague: 10% Poison: 10% Blind: 10% Curse: 10% Paralysis: 10%
Bind Resistances: Head: 30% Arm: 30% Leg: 30%
Other Resistances: Death: LR – 6% Petrification: LR – 6% Stun: 10%
Skills:
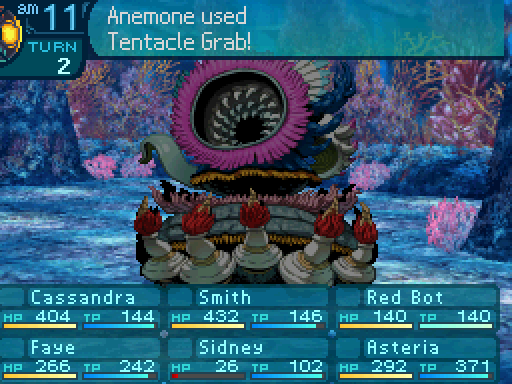
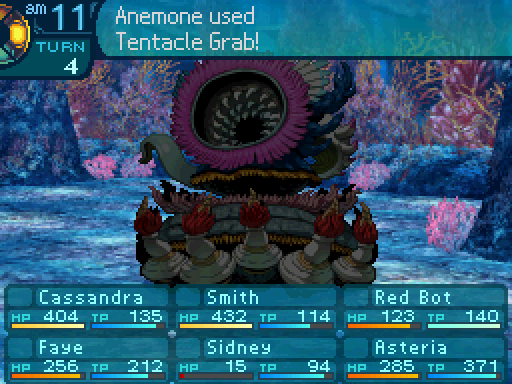
Tentacle Grab: Uses the Legs. Attempts to inflict head, arm, and leg binds on all party members, and has a 30% chance of succeeding. Has an action speed of +/-0.
Cnidocyte Rush: Uses the Arms. Randomly hits the party 4 to 6 times, dealing 110% STR-based Pierce damage per hit. Attempts to inflict Poison and Paralysis, with a 40% success rate. Has an accuracy of 150. Has an action speed of +/-0.
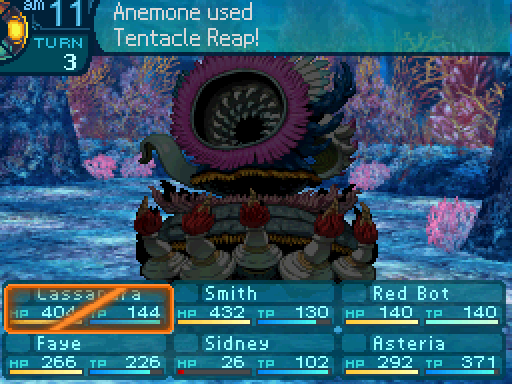
Tentacle Reap: Uses the Legs. Deals 10% STR-based Slash damage to the entire party. Has a 1% chance to instantly kill the targets. Instant death success rate becomes 50% if the targets are either Poisoned or Paralyzed. Has an accuracy of 90. Has an action speed of +/-0.
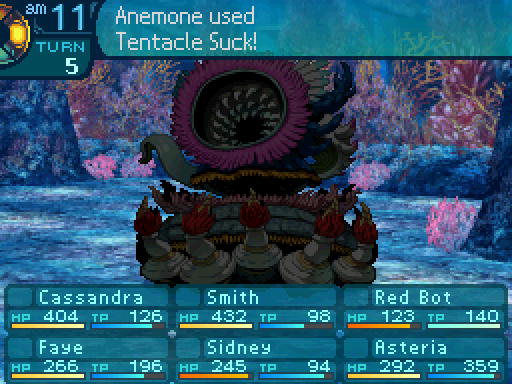
Tentacle Suck: Uses the Legs. Deals 150% STR-based Strike damage to the entire party. Anemone is then healed for twice the damage dealt. Deals more damage the more binds the targets have. Damage is equal to [Skill Power * 2 ^ Number of Binds on the Target]. Has an accuracy of 99. Has an action speed of +/-0.
Oh look, 25% resistance to all physical damage types! On top of its ability to heal itself! I sure hope you have some form of elemental damage, or you’re going to be here for a long time.
Anemone’s AI Script posted:
If HP is below 31%, Cnidocyte Rush cannot be cast again until Tentacle Grab is cast.
From 100% to 61% HP:
If at least one party member has their head, arms, or legs bound:
59% chance to cast Tentacle Suck. (Standard targeting.)
10% chance to cast Tentacle Grab. (Standard targeting.)
31% chance to cast Tentacle Reap. (Standard targeting.)
Else:
79% chance to cast Tentacle Grab. (Standard targeting.)
10% chance to cast Tentacle Reap. (Standard targeting.)
11% chance to cast Tentacle Suck. (Standard targeting.)
From 60% to 31% HP:
If at least one party member is Poisoned or Paralyzed:
59% chance to cast Tentacle Reap. (Standard targeting.)
10% chance to cast Cnidocyte Rush. (Standard targeting.)
31% chance to cast Tentacle Suck. (Standard targeting.)
Else:
69% chance to cast Cnidocyte Rush. (Standard targeting.)
20% chance to cast Tentacle Reap. (Standard targeting.)
11% chance to cast Tentacle Suck. (Standard targeting.)
From 30% HP to death:
If at least one party member has their head, arms, or legs bound:
Cast Tentacle Suck. (Standard targeting.)
If not, move onto the next routine.
If at least one party member is Poisoned or Paralyzed:
Cast Tentacle Reap. (Standard targeting.)
Else:
79% chance to cast Cnidocyte Rush. (Standard targeting.)
21% chance to cast Tentacle Grab. (Standard targeting.)
If you know what you’re doing, Anemone isn’t really a difficult fight. It’s just really really annoying. It’s yet another fight based around the concept of “dispel these disables as soon as possible, or suffer the consequences.” Sheesh, how many times did they use that as a template for a boss fight? I get it, disables are bad. No need to hammer in that concept so many times.

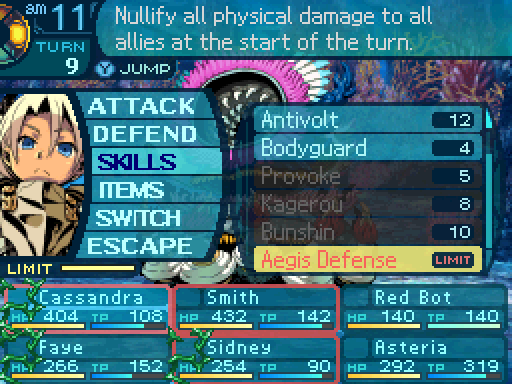
Anemone only has access to physical attacks, so I’m casting Aegis Defense on the first turn so I can set up safely.

Smith making use of his self-binding skills is a bad idea here, since that will pretty much cause Anemone to go crazy with Tentacle Suck. So instead, I’ll make use of his red bot.
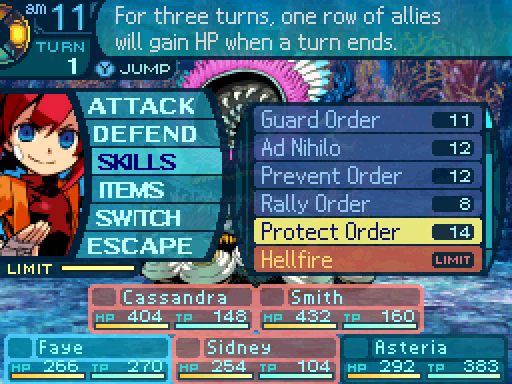
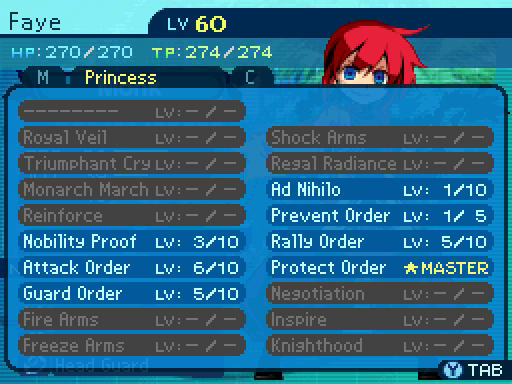
Faye will set up Protect Order.
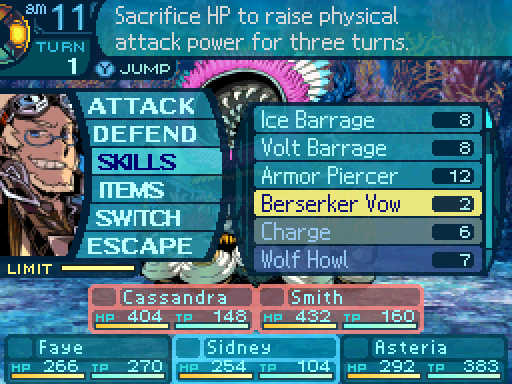
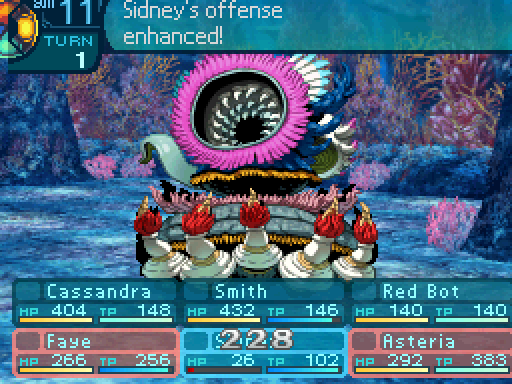
And Sidney will set up Berserker Vow.
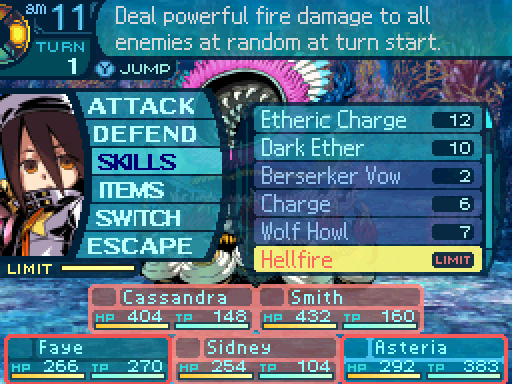
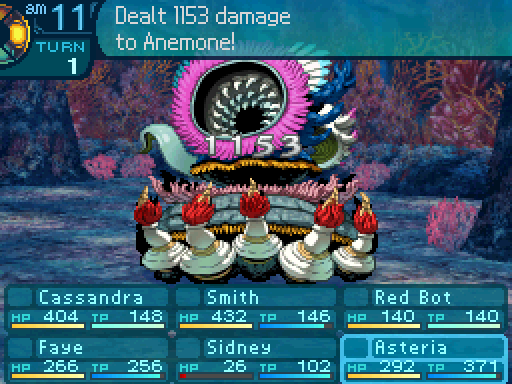
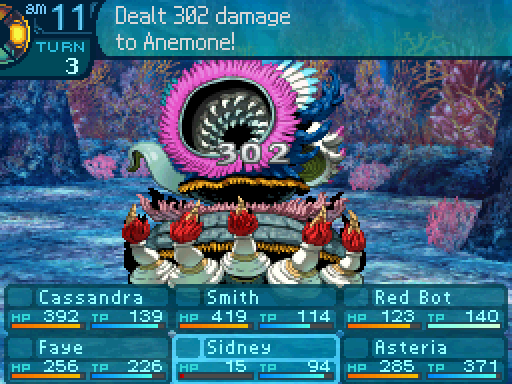
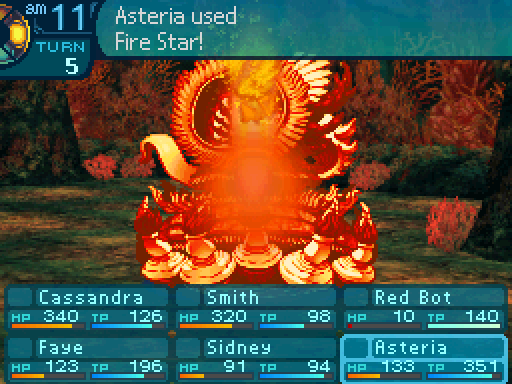
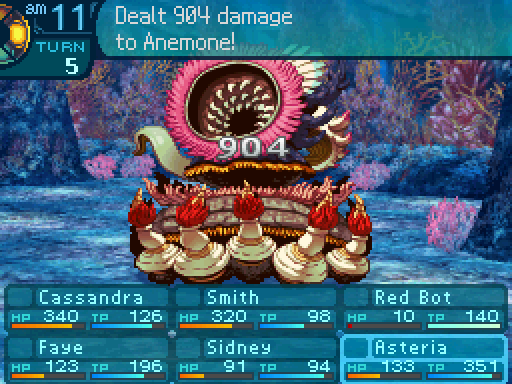
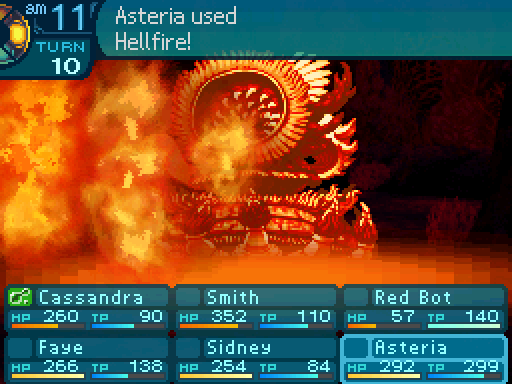
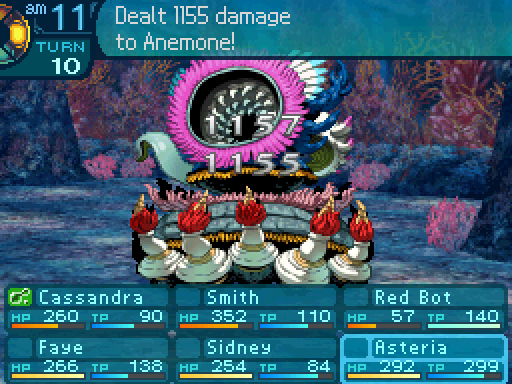
And I’ll start off the fight with an Etheric Charged Hellfire to take off a chunk of its HP.
 Whatever you’re planning to try, don’t bother.
I’ll cover you!
Why do they never listen?
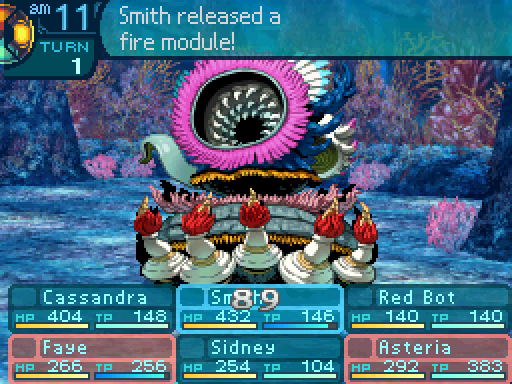
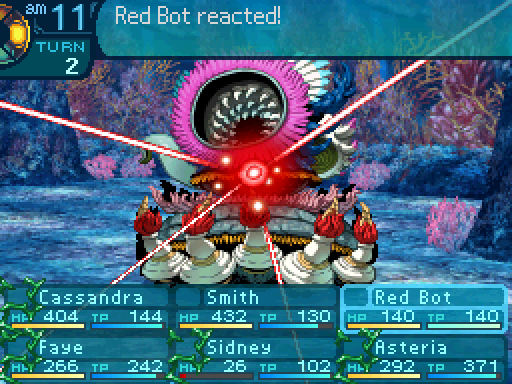
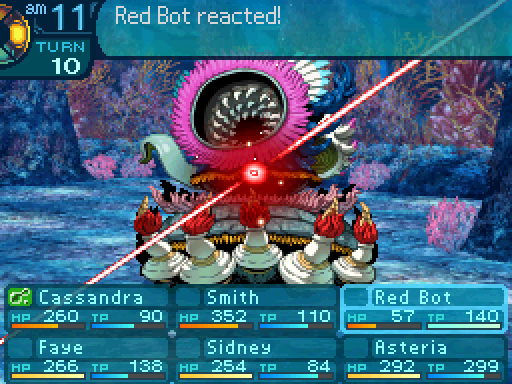
What up, little guy? I’ll call you, Reddy.
 Hee hee hee...

Ready when you are, Faye.


Ehh, that could have gone better.
Mmm, not our best work.
Bah, only 3 hits got rolled for there.
Yeah, that kind of didn’t do all that much. Asteria struggles to stay relevant if she can’t make use of Meteor.
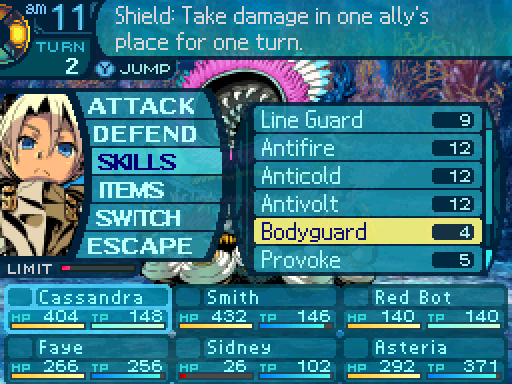
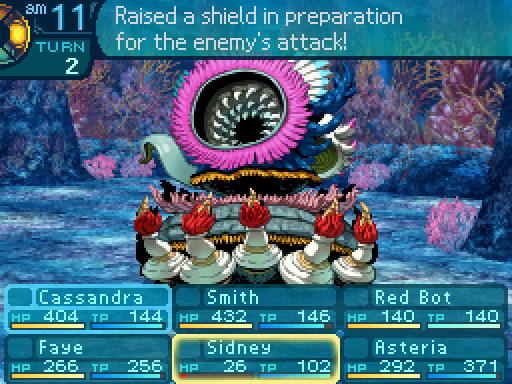
Just in case Anemone attacks, I’ll have Cassandra Bodyguard Sidney.
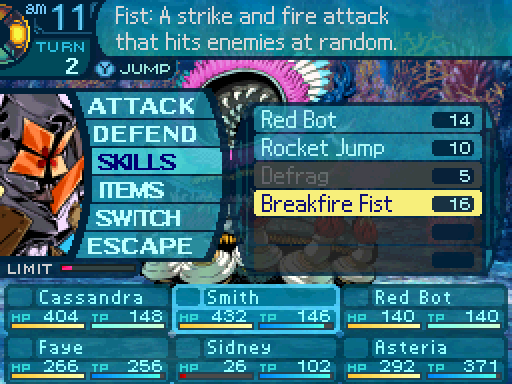
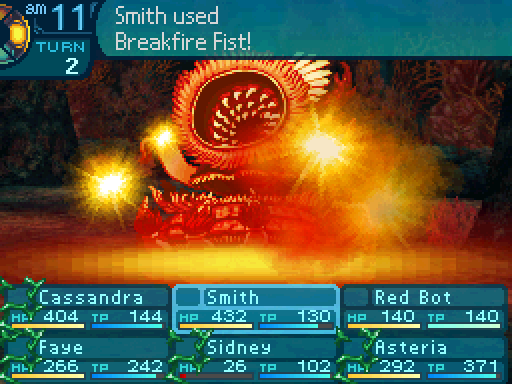
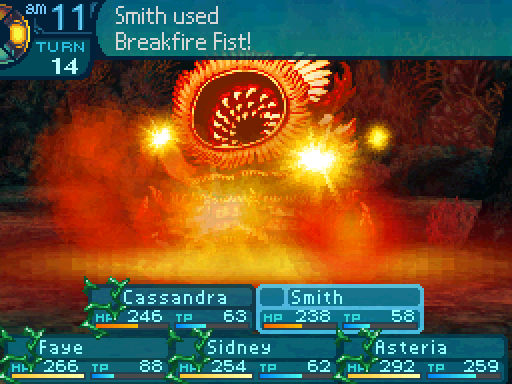
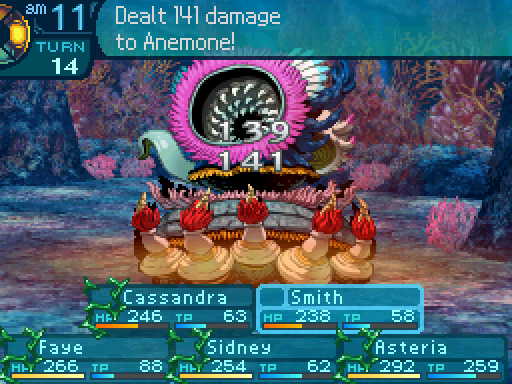
Now Smith will spam Breakfire Fist.

And Asteria will pretty much go Etheric Charge > Fire Star for the rest of the battle.
Stay behind me, Sid.
I should have saw that coming, given that I read its AI file before even attempting this fight.
Ahahaha, nice try, bucko! But you can’t tie me down!

MMMMMPH! MMM MMM MMMMMMMRRRGGPPHHH!
Sorry Sidney, but there’s only so much I can do against attacks like that.
The unfortunate part of Bodyguard is that it can only protect someone if enemies try to damage them.

Punchy punchy?
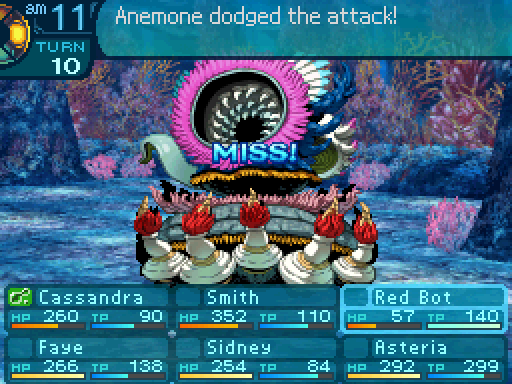
Uhh, nice punching, but you really need to work on your aim.
Blame my defective optical parts. I can barely see outta these things! Ah screw it. Just fry it, Reddy.
...That’ll do, I guess.
Well, every bit of damage helps.
Mrgh.
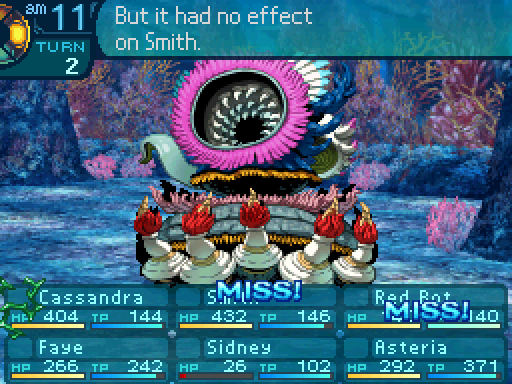
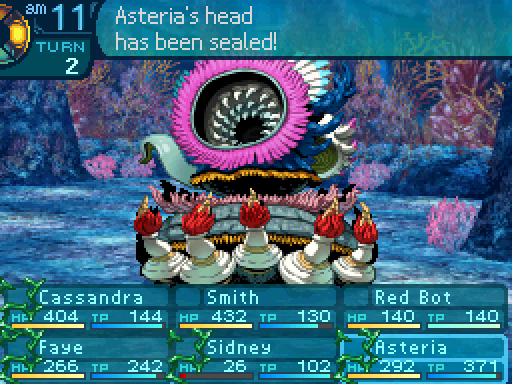
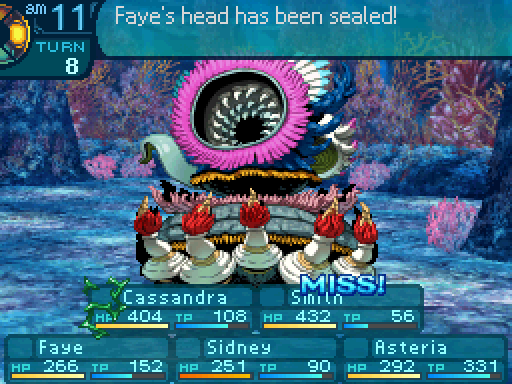
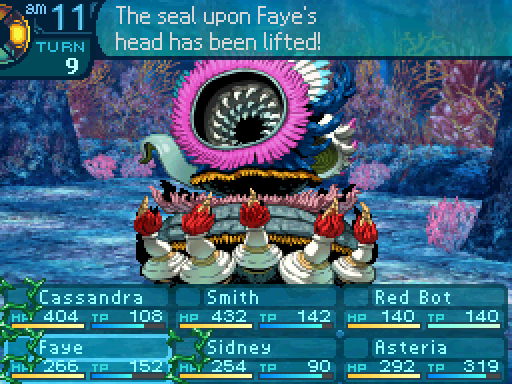
Tentacle Grab is why the fight is so annoying. It basically forces your party to do nothing if they get any important body parts bound.
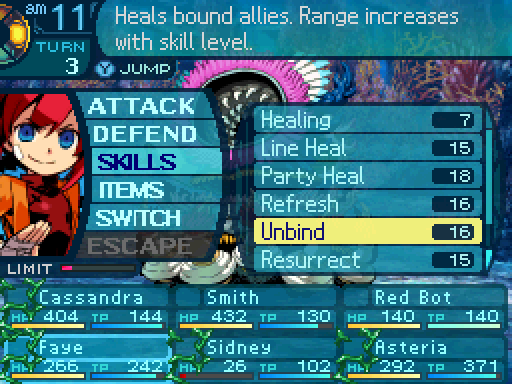
However, that’s exactly why I made sure to outfit Faye appropriately, so she can dispel the binds as soon as possible. Tentacle Suck is very likely to come out, and its damage scales exponentially with the number of binds on the victims. So it’s important to get rid of the binds.

Unfortunately, Sidney not being able to Berserker Vow twice pretty much killed his damage output, so I’m just gonna have him cast Fire Barrage to make the most of what’s left of that buff.

Also, if your characters can’t do anything meaningful, have them defend. This will reduce the damage that Tentacle Suck does, and won’t cause Anemone to heal itself for as much.
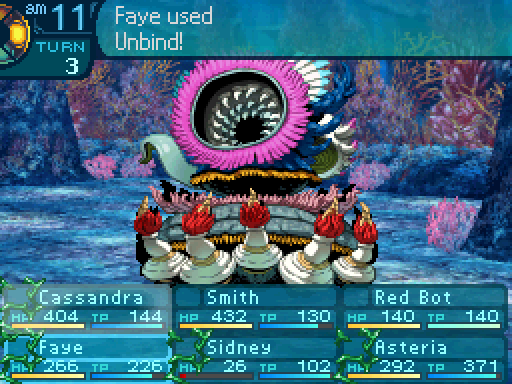
Okay, let’s get those off!
Ech. Thanks for that. Gonna be tasting weird underwater tentacles for weeks! Blech!
Oh, never mind. It opted to go for Tentacle Reap instead.

...Are you even trying?
Tentacle Reap is Anemone’s weakest move. It barely does any damage, and has an extremely low chance to instantly kill the party. Unfortunately, due to the RNG present in the ailment infliction formula, that extremely low chance can jump up to fairly low. And one wrong application of instant death can completely screw over my party. Especially if Faye happens to be a victim.

Rrrgh, lousy stupid tentacles!
Even if Sidney had time to make use of Charge, Smith still outdamages him. In fact, Smith is pretty much my best option for damage in this fight, aside from Asteria’s charged elemental limits. What is this bizarre world where Yggdroids are legitimately good? Can this happen more often, please?
Oh we won’t be having that again.
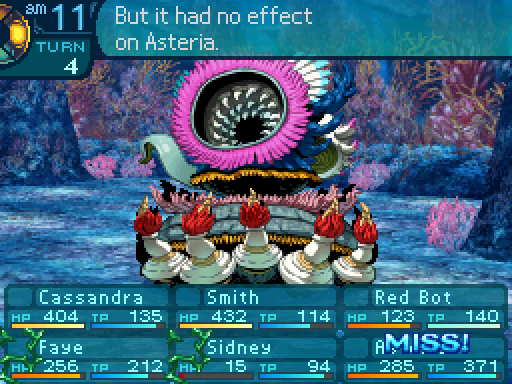
One thing to keep in mind is that accumulative resistance also affects your party as well. So while Tentacle Grab is annoying at first, it’ll get much less effective as the fight goes on. In fact, that’s part of my strategy. Try to survive the beginning part of the fight so my party can build up enough resistance, then go to town once Anemone’s disables become ineffective.
MRRRRRRGGGGGHHHHHH!
Unfortunately, Sidney got his head bound again.

Don’t worry Sidney, I’ll make sure to pick up the slack for you.
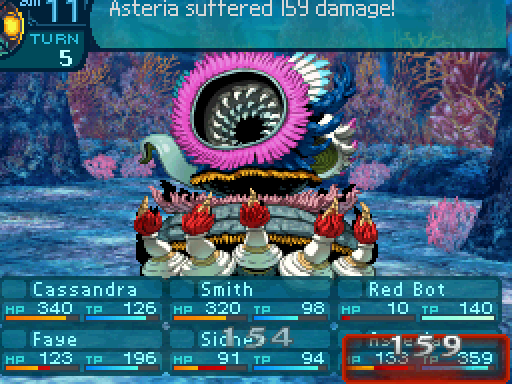
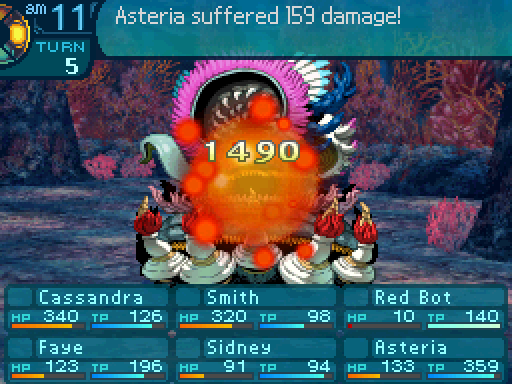
And that’s why you want to make sure your party is unbound. That’s how much damage it deals normally. If it deals anymore than that, you can lose a lot of progress in the fight since Anemone will be healed for so much.
I can tell that this is going to take a while.
Yes that’s right, Smith outdamages Asteria in this fight. A truly bizarre world we’re in, I must say.

Reddy, NOOOooehhh, I can always deploy another one.
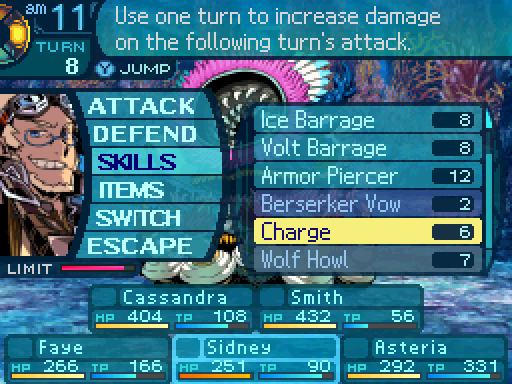
Sidney finally gets an opportunity to make use of Charge. Assuming he doesn’t get his arms bound again.

Muh moh.
Oh, this is not good.

Will you stop that!?
Oh, insult to injury!
I’ll call you, Reddy II!
Fortunately, I can use Aegis Defense to avoid any Tentacle Sucks that come this way.
And I did have backup plans in case something like that happened.
Can’t keep a good girl quiet!

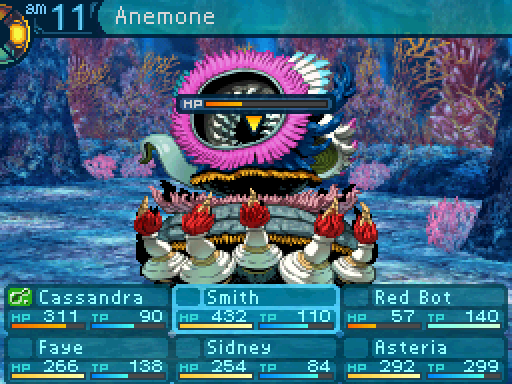
By the way, we’re only 10 turns in and that’s how much HP we’ve taken off. I could have done more if the party didn’t keep getting their momentum shut down by Tentacle Grab! This is what I meant by the fight being more annoying than actually difficult.
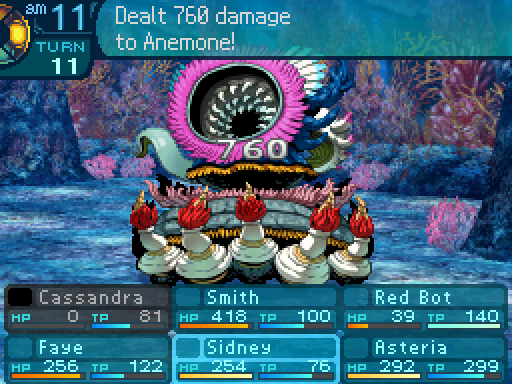
Asteria has another Hellfire ready to go, so this should put another dent in its HP.
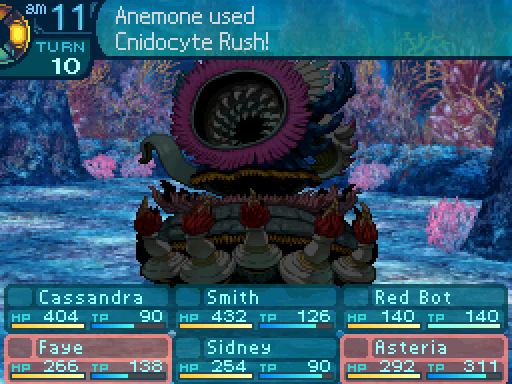
Uh oh. Cnidocyte Rush by itself isn’t that deadly, but the ailments it inflicts massively increases the success rate of Tentacle Reap’s instant death component.

Rolled 4 hits there instead of 3, so that should have made a bigger dent.
...Really?
Okay, hopefully we can finish it off soon.

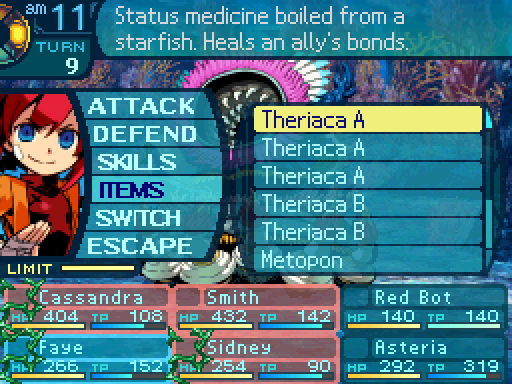
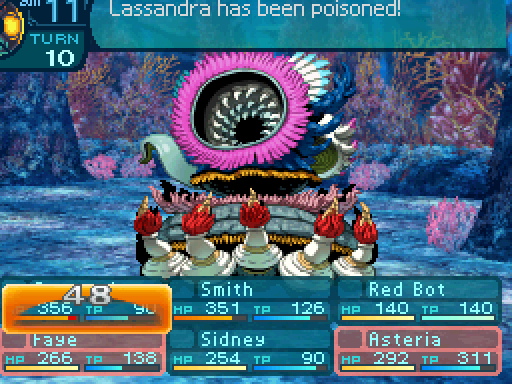
I don’t want Cassandra to get instantly killed, so I’ll have Faye cure the Poison.

Oof, Cassie, you’re not looking too hot. Lemme take a look at that.

This is unfortunate...
WHAT. 1% chance. 1% CHANCE! 
The other bad thing about this? Dying resets accumulative resistance, so if you’re banking on that as a strategy, Tentacle Reap can completely screw with it.
Eventually...
Did you see that!? Tell you saw that!
Heh, I knew my punching techniques weren’t worthless! Go out there, Smithy and fulfill my dreams. Be what I could never become.
Oh, don’t be so melodramatic.


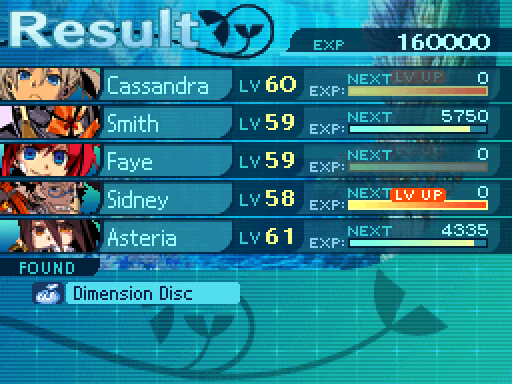
And uh, that’s Anemone. Honestly? There’s not much to the fight other than dispelling any disables as soon as possible. And hoping you don’t get screwed over by bad RNG. Granted if you don’t know that you’re supposed to dispel any disables as soon as possible (the game honestly does not really communicate it all that well), the fight can be hair pulling since party members will be dying left and right. But if you know exactly what to do? It’s one of the more boring post-game fights.

As its massive form goes limp, you take a deep breath in celebration! The request is now complete! Hurry back to the bar to report your victory!
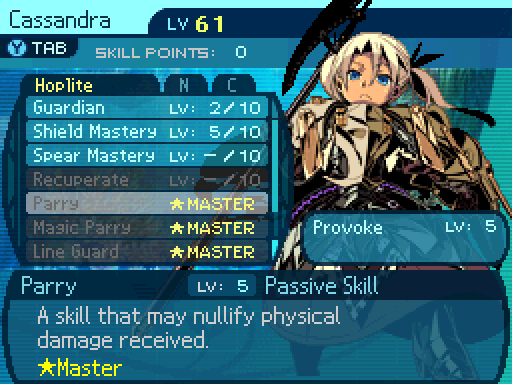
Parry is now maxed out, so it has an 18% chance to nullify physical attacks.
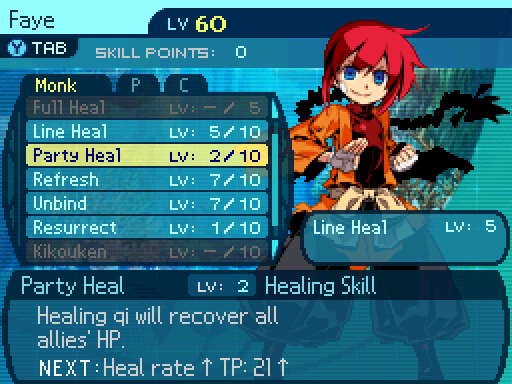
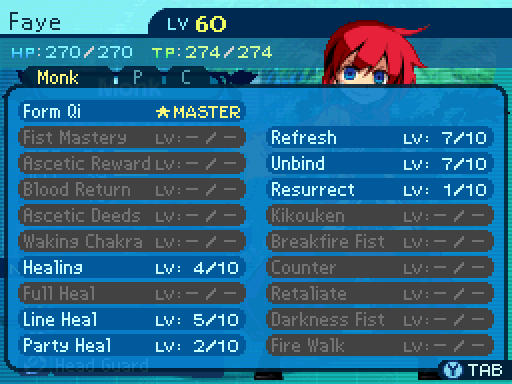
I start investing in Party Heal, as I’m expecting to use it more often. It has a healing power of 55%.


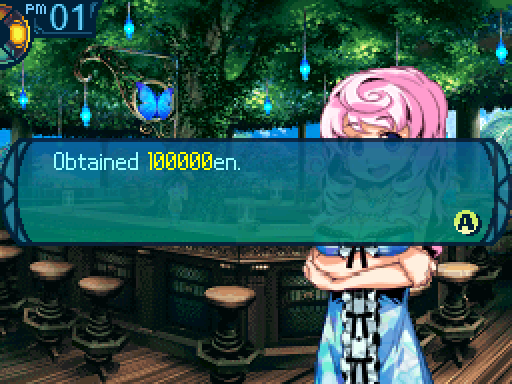
 It looks like the anemone has been defeated! The fishermen have set sail again already! That’s good... The fish from around here are so delicious! It would be a shame if we couldn’t eat them anymore. But no worries now, right? Hey, why not order something to eat while you’re here? Oh! Before I forget, here is your reward!
Well that sure was a quest and a boss fight.
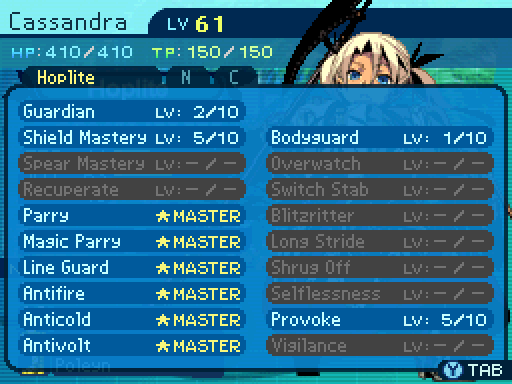
The red bot now deals 130% damage per chase, has 175 HP and TP, and the chance to chase is only reduced by 25% per chase.
Let’s see what Anemone’s drop unlocks. I won’t bother with the conditional drop yet, because bad RNG really got in the way of that run. (Tentacle Reap somehow managed to score 4 kills despite only having a 1% base chance.)

It unlocks a Crossbow, but not the ultimate Crossbow. We already unlocked that with Shin’s conditional drop. Though if you didn’t do the Deep City path and don’t want to bother with it, this is a nice alternative. But now, I think it’s time we take on the last available Sea Quest boss. Uh, the last regular quest boss? Yeah no, we’re still not ready for that thing yet.
We’ve seen the boss of this set of Sea Quests briefly, Leviathan, when I did the RNG exploit to get Lucky Hammer early. Here’s some info on it.
Leviathan
HP: 17440
AT: 65
DF: 61
Weakness: Slash, Ice
Resistance: Strike, Pierce, Fire, Volt
It’s got quite the set of resistances, but it does have some exploitable weaknesses as well.

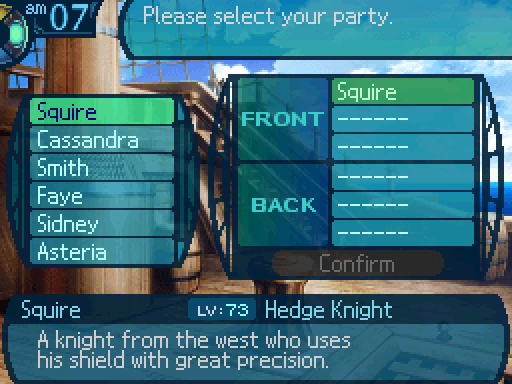
Squire
Class: Hoplite
Stats:
- HP: 478
- TP: 206
- STR: 42
- VIT: 72
- AGI: 44
- LUC: 57
- TEC: 48
Equipment:
- Grasida - Spear, 166 Attack.
- Nothing.
- Hildebrand - Shield, 65 Defense.
- Dark Gauntlets - Gloves, +5% TP, +1 TEC.
Skillset:
- TP Up: Level 2 - Increases max TP by 13%.
- Guardian: Level 4 - Decreases physical damage by 19%.
- Shield Mastery: Level 6 - Decreases physical damage by 6% when equipped with a Shield.
- Spear Mastery: Level 5 - Increases normal attack damage by 6% when using a Spear.
- Recuperate: Level 6 - Restores 35 HP to the user when they defend.
- Parry: Level 3 - 10% chance to nullify physical damage.
- Magic Parry: Level 3 - 10% chance to nullify elemental damage.
- Line Guard: Level 6 - 5 TP. Reduces the amount of physical damage one row takes by 16% for the current turn. Damge reduction increases to 37% if the user casts it on their own row.
- Antifire: Level 10 - 12 TP. Nullifies any Fire damage the party takes for the current turn.
- Antice: Level 10 - 12 TP. Nullifies any Ice damage the party takes for the current turn.
- Antivolt: Level 10 - 12 TP. Nullifies any Volt damage the party takes for the current turn.
- Bodyguard: Level 5 - 6 TP. User takes damage in place of another ally for the current turn.. Reduces physical damage by 42%.
- Overwatch: Level 3 - 12 TP. Negates any damage an ally takes for the current turn, if the amount of damage they take exceeds the user’s current HP.
- Shrug Off: Level 5 - 8 TP. Dispels all ailments and binds on the user.
Selflessness: Level 3 - 6 TP. Sacrifices half of the user’s current HP to reduce physical damage taken by 46% for 4 turns.
- Provoke: Level 3 - 4 TP. Adds 3 to 7 aggro on the user for 4 turns.
Supplies:
- 3 Amrita IIs. Restores 100 TP to a single target.
Squire’s AI Script posted:
If at least 1 party member is below 31% HP and Leviathan uses an Ice attack, 69% chance to cast Antice. (Targets the front row.)
If at least 1 party member is below 31% HP and Leviathan uses a Fire attack, 69% chance to cast Antifire. (Targets the front row.)
If at least 1 party member is below 51% HP and Leviathan uses an Ice attack, 39% chance to cast Antice. (Targets the front row.)
If at least 1 party member is below 51% HP and Leviathan uses a Fire attack, 39% chance to cast Antifire. (Targets the front row.)
If Leviathan uses an Ice attack, 9% chance to cast Antice. (Targets the front row.)
If Leviathan uses a Fire attack, 9% chance to cast Antifire. (Targets the front row.)
If self has the Plague, head bind, arm bind, or leg bind, cast Shrug Off. (Targets self.)
If a party member has the Plague and Leviathan casts Overeat, 39% chance to cast Overwatch. (Targets the party member that Leviathan targets.)
If self is below 51% and Leviathan targets a party member with Overeat and the attack deals more damage than self's current HP, cast Overwatch. (Targets the party member that Leviathan targets.)
If self is below 51% and Leviathan targets a party member with Overeat, cast Bodyguard. (Targets the party member that Leviathan targets.)
If Leviathan uses a physical attack, cast Line Guard. (Targets the front row.)
If self is below 36% TP, use an Amrita II. (Targets self. Limited to 3.)
If Leviathan is below 2% HP, use a regular attack. (Targets the enemy with the lowest HP.)
Else, if self is unable to do anything else for whatever reason, defend. (Targets self.)
Squire’s skillset may look impressive, but in all honesty, he’s not a reliable ally as you can see from the probabilities. Leviathan’s most threatening attacks are its elementals, and you really want some way to block them. If Squire does something nice for your party, great. But you’re better off not planning around what he does.
Bring whoever you want for this Sea Quest, but I highly suggest bringing your own Hoplite since Squire doesn’t do that good of a job at being one.
Toma
Class: Farmer
Stats:
- HP: 308
- TP: 191
- STR: 22
- VIT: 43
- AGI: 48
- LUC: 71
- TEC: 32
Equipment:
- Shuriken - Knife, 134 Attack, +6% ATK.
- Judgement Plate - Light Armor, 106 Defense.
- Dark Gauntlets - Gloves, 38 Defense, +5% TP, +1 TEC.
- Cianontedae - Boots, 21 Defense, +3 AGI.
Skillset:
- Earth's Bounty: Level 7 - Increases exp gain by 22% as long as the user is alive at the end of the battle.
- Brave Heart: Level 5 - Recovers 5 TP at the end of each turn as long as the user is in the front row.
- Persistence: Level 5 - Gives a 24% chance for the user to automatically revive if dead once per battle.
- Waste Not: Level 5 - Increases the drop rate by 5%.
Lullaby: Level 7 - 8 TP. Has a 45% chance to put all enemies to sleep. Puts the user to sleep as well.
- Play Possum: Level 5 - 5 TP. Reduce the user's aggro value by a value of up to 9 for 4 turns.
- Strange Seeds: Level 10 - 8 TP. Has a 60% chance to apply random binds to all enemies.
- Rotten Egg: Level 7 - 8 TP. Lowers all enemies' physical attack by 7% (38% if they have an ailment) for 5 turns.
- Sympathy Pain: Level 7 - 7 TP. Has an 82% chance to transfer an ailment the user has to the target.
Supplies:
- 20 Medicas. Restores 50 HP to a single target.
- 5 Medica IIs. Restores 160 HP to a single target.
- 3 Medica IIIs. Restores 300 HP to a single target.
- 3 Amrita IIs. Restores 100 TP to a single target.
- 10 Theriaca As. Dispels all binds on a single target.
- 10 Theriaca Bs. Dispels an ailment on a single target.
Toma’s AI Script posted:
When healing, prioritize party members with the lowest HP.
If self has any ailments or binds, cast Sympathy Pain. (Standard targeting.)
If at least 1 party member is below 21% HP, use a Medica III. (Targets allies. Limit of 3.)
If at least 1 party member is below 51% HP, use a Medica II. (Targets allies. Limit of 5.)
If at least 1 party member is below 81% HP, use a Medica. (Targets allies. Limit of 20.)
If at least 1 party member has the Plague, use a Theriaca B. (Targets allies with ailments. Limit of 10.)
If at least 1 party member has their head bound, use a Theriaca A. (Targets allies with disables. Limit of 10.)
If at least 1 party member has their arms bound, use a Theriaca A. (Targets allies with disables. Limit of 10.)
If at least 1 party member has their legs bound, use a Theriaca A. (Targets allies with disables. Limit of 10.)
When restoring TP, prioritize party members with the lowest TP.
If at least 1 party member is below 31% TP, use an Amrita II. (Targets allies. Limit of 3.)
Else, if self is unable to do anything else for whatever reason, defend. (Targets self.)
Toma is back, and once again, he operates as our healing support. Unlike Squire, you can pretty much count on him to do his job well. Though there are limits as to what he can do since he doesn’t have access to multi-target healing.
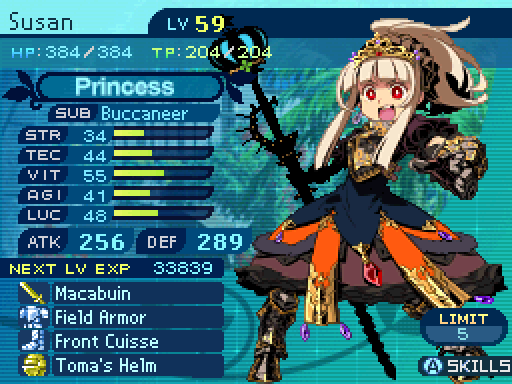
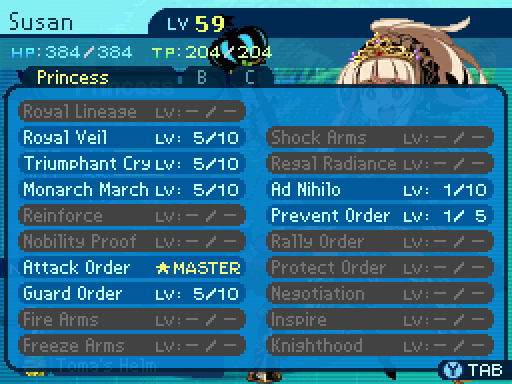
Dezerte
Class: Princess
Stats:
- HP: 389
- TP: 251
- STR: 39
- VIT: 64
- AGI: 48
- LUC: 56
- TEC: 52
Equipment:
- Dvergr Sword - Sword, 164 Attack.
- Nothing.
- Hildebrand - Shield, 65 Defense.
- Dark Gauntlets - Gloves, +5% TP, +1 TEC.
Skillset:
- Royal Lineage: Level 8 - Restores 8 TP when receiving a buff.
- Royal Veil: Level 8 - Party recovers 34 HP at the end of the turn as long as user's HP is full.
- Reinforce: Level 8 - Restores 34 HP to targets that receive buffs.
- Nobility Proof: Level 7 - Restores 9 TP when a buff wears off.
- Attack Order: Level 5 - 11 TP. Increases a row's physical power by 30% for 4 turns.
- Guard Order: Level 5 - 11 TP. Increases a row's physical power by 30% for 4 turns.
- Regal Radiance: Level 5 - 15 TP. Dispels any elemental imbues on an ally and deals 168% damage to all enemies. Damage type depends on the element dispelled and the weapon type. Uses the ally’s attack to calculate damge.
- Ad Nihilo: Level 10 - 16 TP. Dispels all buffs on one enemy and deals 240% Almighty damage.
- Prevent Order: Level 5 - 4 TP. Prevents ailments from hitting a row for 4 turns.
- Protect Order: Level 5 - 9 TP. Heals one row for 4 turns. Healing is equal to 1.65 * User’s TEC.
- Inspire: Level 10 - 12 TP. Dispels all debuffs on one row, and restores their TP with a healing power of 12%.
Supplies:
- 3 Medica IIIs. Restores 300 HP to a single target.
- 5 Amritas IIs. Restores 100 TP to a single target.
Dezerte’s AI Script posted:
If Leviathan has a buff, cast Ad Nihilo. (Targets enemies with buffs.)
If at least 1 party member has a debuff, cast Inspire. (Targets party members with debuffs.)
If the front row does not have the Prevent Order buff, cast Prevent Order. (Targets the front row.)
If self is below 31% HP, use a Medica III. (Targets self. Limit of 3.)
If self is below 31% TP, use an Amrita II. (Targets self. Limit of 3.)
Else, if self is unable to do anything else for whatever reason, use a regular attack. (Targets the enemy with the lowest HP.)
Dezerte returns as our buffing support, and fortunately, she is a reliable ally... At least, when it comes to making use of Ad Nihilo and Inspire. Leviathan is capable of inflicting the Plague on our party, and Dezerte will try to make sure it doesn’t hit the front row. Unfortunately, she doesn’t really care about the back row at all. I should also note that Leviathan’s Plague attack also inflicts a massive accuracy debuff (Hit rate gets decreased by 70!) which Dezerte can dispel with Inspire. Overall, this is one of the easier Sea Quests since you actually have reliable allies. You should probably focus on bringing offensive oriented party members to this one.
Sumitomo
Class: Buccaneer
Stats:
- HP: 381
- TP: 234
- STR: 51
- VIT: 46
- AGI: 65
- LUC: 40
- TEC: 51
Equipment:
- Egeking - Rapier, 158 Attack.
- Judgement Plate - Light Armor, 106 Defense.
- Dark Gauntlets - Gloves, 38 Defense, +5% TP, +1 TEC.
- Cianontedae - Boots, 21 Defense, +3 AGI.
Skillset:
- TP Up: Level 2 - Increases max TP by 13%.
- Trickster: Level 8 - User recovers 8 TP for every offensive skill they cast.
- Rapier Mastery: Level 10 - Increases normal attack damage by 11% when using a Rapier.
Gun Mastery: Level 8 - Increases normal attack damage by 9% when using a Gun.
- Swashbuckling: Level 6 - The user has a 24% chance to attack twice when using normal attacks.
- Lady Luck: Level 6 - Increases the user's critical hit rate by 12%.
Lights Out: Level 10 - 12 TP. Deals 165% Pierce damage to one enemy, and has a 70% chance of inflicting Blind.
Hanging: Level 10 - 17 TP. Deals 250% Pierce damage to one enemy, and has a 60% chance of inflicting Head Bind.
- Pincushion: Level 7 - 29 TP. Randomly hits enemies 1 to 3 times, dealing Pierce damage equal to 133% + 3 * User's AGI per hit.
- Eagle Eye: Level 7 (Yes, you read that right.) - 9 TP. Lowers one enemy's physical defense by 35% for 4 turns.
Supplies:
- 3 Amrita IIs. Restores 100 TP to a single target.
Sumitomo’s AI Script posted:
If Leviathan has a buff, cast Eagle Eye (Targets enemies with buffs.)
Cast Pincushion. (Targets the enemy with the lowest HP.)
If self is below 26% TP, use an Amrita II. (Targets self. Limit of 3.)
Else, if self is unable to do anything else for whatever reason, use a regular attack. (Targets the enemy with the lowest HP.)
Sumitomo is the heavy hitter in this party. Nothing more to say about that. He just casts Pincushion if he can do so, and will dispel Leviathan’s defense buff if possible. Unfortunately, due to Leviathan’s Pierce resistance, he does have his work cut out for him. Also, he does have access to a level 7 Eagle Eye, but it’s no different from a level 5 version whatsoever.
Taquion
Class: Zodiac
Stats:
- HP: 284
- TP: 376
- STR: 34
- VIT: 39
- AGI: 54
- LUC: 48
- TEC: 70
Equipment:
- Goetia - Book, 123 Attack, +15% Curse Chance.
- Apode - Clothes, 84 Defense.
- Cathbharr - Helm, 61 Defense, +10% Strike RES.
- Cianontedae - Boots, 21 Defense, +3 AGI.
Skillset:
- TP Up: Level 1 - Increases max TP by 10%.
- Ether Mastery: Level 6 - Increases elemental damage by 13%.
- Fire Mastery: Level 6 - Increases Fire damage by 7%.
- Ice Mastery: Level 6 - Increases Ice damage by 7%.
- Volt Mastery: Level 6 - Increases Volt damage by 7%.
- Singularity: Level 3 - Upon striking a weakness, the attack deals 30% more damage.
Fire Star: Level 8 - 18 TP. Deals 68% Fire damage to one enemy.
- Binary Fire: Level 6 - 26 TP. Deals 41% Fire damage to all enemies.
- Fire Prophecy: Level 3 - 17 TP. Nullifies one enemy's Fire attacks and deals 75% Fire damage upon nullification.
- Ice Star: Level 8 - 18 TP. Deals 68% Ice damage to one enemy.
Binary Ice: Level 6 - 26 TP. Deals 41% Ice damage to all enemies.
- Ice Prophecy: Level 3 - 17 TP. Nullifies one enemy's Ice attacks and deals 75% Ice damage upon nullification.
Volt Star: Level 8 - 18 TP. Deals 68% Volt damage to one enemy.
- Binary Thunder: Level 6 - 26 TP. Deals 41% Volt damage to all enemies.
- Volt Prophecy: Level 3 - 17 TP. Nullifies one enemy's Volt attacks and deals 75% Volt damage upon nullification.
- Meteor: Level 1 - 30 TP. Deals 35% Strike damage to random enemies. Hits 3 to 4 times.
- Etheric Charge: Level 3 - 10 TP. Increases the power of the next elemental attack by 260%.
Supplies:
- 3 Amrita IIs. Restores 100 TP to a single target.
- 1 Amrita III. Restores all TP to a single target.
Taquion’s AI Script posted:
If at least 1 party member is below 11% HP and Leviathan uses an Ice attack, 79% chance to cast Ice Prophecy. (Standard targeting.)
If at least 1 party member is below 11% HP and Leviathan uses a Fire attack, 79% chance to cast Fire Prophecy. (Standard targeting.)
If at least 1 party member is below 51% HP and Leviathan uses an Ice attack, 39% chance to cast Ice Prophecy. (Standard targeting.)
If at least 1 party member is below 51% HP and Leviathan uses a Fire attack, 39% chance to cast Fire Prophecy. (Standard targeting.)
If Leviathan uses an Ice attack, 9% chance to cast Ice Prophecy. (Standard targeting.)
If Leviathan uses a Fire attack, 9% chance to cast Fire Prophecy. (Standard targeting.)
If self is below 21% TP, use an Amrita II. (Targets self. Limit of 3.)
Cast Ice Star. (Targets the enemy with the lowest HP.)
If self is below 36% TP, use an Amrita III. (Targets self. Limit of 1.)
Else, if self is unable to do anything else for whatever reason, defend. (Targets self.)
Taquion is the party’s support as well as their damage dealer. He can block Leviathan’s elemental attacks. Unfortunately, just like Squire, he’s not really good at using his Prophecy skills, instead opting to pelt Leviathan with Ice attacks.
Minamo
Class: Monk
Stats:
- HP: 302
- TP: 337
- STR: 51
- VIT: 44
- AGI: 56
- LUC: 33
- TEC: 65
Equipment:
- Goetia - Book, 123 Attack, +15% Curse Chance.
- Judgement Plate - Light Armor, 106 Defense.
- Cathbharr - Helm, 61 Defense, +10% Strike RES.
- Cianontedae - Boots, 21 Defense, +3 AGI.
Skillset:
- TP Up: Level 1 - Increases max TP by 10%.
- Form Qi: Level 8 - Healing skills restore 55% more HP.
- Ascetic Reward: Level 8 - If the user dies, all allies restore 80 HP once per battle.
- Blood Return: Level 6 - If an ally dies, the user restores 12 TP.
- Ascetic Deeds: Level 6 - Every time the user casts a skill, they restore 50 HP.
- Waking Chakra: Level 6 - Increases the user's recovery rate from status ailments and binds by 50%.
- Healing: Level 7 - 10 TP. Heals a single target with a healing power of 100%.
- Full Heal: Level 4 - 22 TP. Fully heals a single target.
- Line Heal: Level 6 - 17 TP. Heals one row with a healing power of 85%.
- Party Heal: Level 5 - 25 TP. Heals the entire party with a healing power of 70%.
- Refresh: Level 10 - 10 TP. Dispels all status ailments on the entire party.
- Unbind: Level 10 - 10 TP. Dispels all binds on the entire party.
Supplies:
- 3 Amrita IIs. Restores 100 TP to a single target.
- 1 Amrita III. Restores all TP to a single target.
Minamo’s AI Script posted:
If at least 1 party member in each row are below 71% HP, cast Party Heal. (Targets the party.)
If at least 2 party members in the front row are below 71% HP, cast Line Heal. (Targets the front row.)
If at least 2 party members in the back row are below 71% HP, cast Line Heal. (Targets the back row.)
If one party member is below 31% HP, cast Full Heal. (Targets the party.)
If one party member is below 71% HP, cast Healing. (Targets the party.)
If self is below 21% TP, use an Amrita II. (Targets self. Limit of 3.)
If at least 1 party member is petrified, cast Refresh. (Targets allies with disables.)
If at least 1 party member is asleep, cast Refresh. (Targets allies with disables.)
If at least 1 party member is confused, cast Refresh. (Targets allies with disables.)
If at least 1 party member has the plague, cast Refresh. (Targets allies with disables.)
If at least 1 party member is poisoned, cast Refresh. (Targets allies with disables.)
If at least 1 party member is blinded, cast Refresh. (Targets allies with disables.)
If at least 1 party member is cursed, cast Refresh. (Targets allies with disables.)
If at least 1 party member is paralyzed, cast Refresh. (Targets allies with disables.)
If at least 1 party member has their legs bound, cast Unbind. (Targets allies with disables.)
If at least 1 party member has their arms bound, cast Unbind. (Targets allies with disables.)
If at least 1 party member has their head bound, cast Unbind. (Targets allies with disables.)
If one party member is below 81% HP, cast Healing. (Targets the party.)
If self is below 11% TP, use an Amrita III. (Targets self. Limit of 1.)
Else, if self is unable to do anything else for whatever reason, use a regular attack. (Targets the enemy with the lowest HP.)
Minamo is the party’s healer, and he’s fairly good at keeping the party healthy.
Not one of the easier Sea Quests, though the NPCs are fairly competent, at least. You’ll probably want to bring 2 damage dealers, or a damage dealer and a support.

Faye is a great support to have, since she can heal, dispel any buffs on Leviathan, and dispel any status effects and binds on the party.
Only problem with her? She only really shines in the first Sea Quest. She’s kind of redundant in the other 2 Sea Quests, since there are already healer NPCs there.

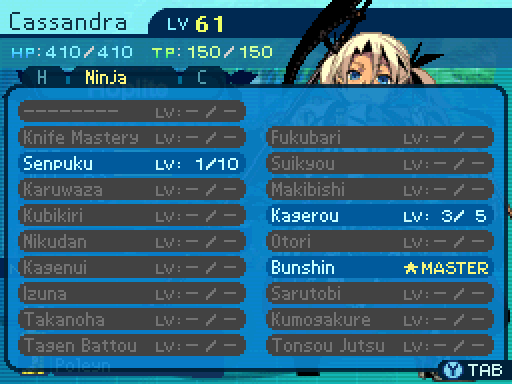
Cassandra is an excellent support to have. She can block Leviathan’s elemental attacks, which are its most deadly attacks in its entire skillset. Unlike Faye, she’s not really a redundant party member, since the NPCs that are supposed to block Leviathan’s elemental attacks aren’t really good at that job unless someone is dying.
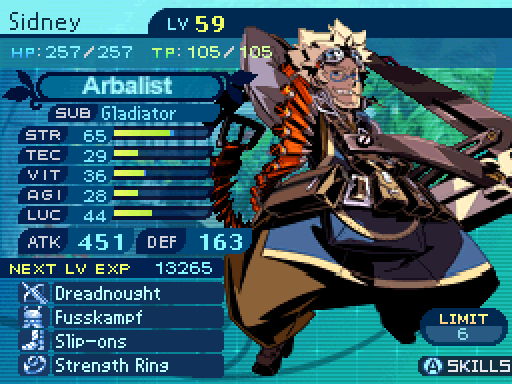
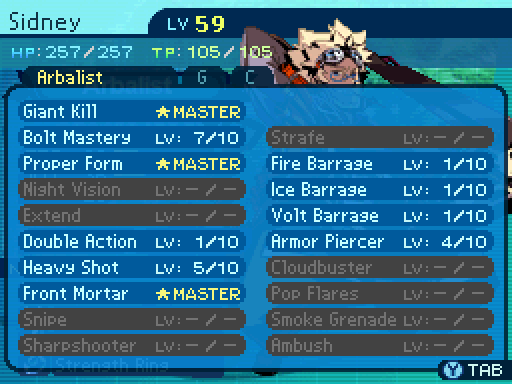
Sidney is also a good support to bring along. Yes, support. You see, he’s the only member of the guild that can prevent or dispel accuracy debuffs, which Leviathan has access to, thanks to Pop Flares. As a damage dealer, he’s not really that great thanks to Leviathan having some resistance to Pierce attacks. He does have access to Ice Barrage, at least.
Of course at this point in the game, you can buy Unihorns, which pretty much cover what Sidney can do. Though if Rose comes along, she would certainly appreciate the Pop Flares buff.
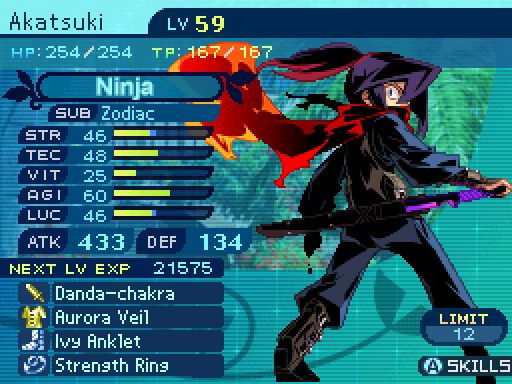

Akatsuki can make for a nice damage dealer thanks to Tagen Battou. He does have access to Dark Ether, but at this point in the game, it’s really not necessary anymore.
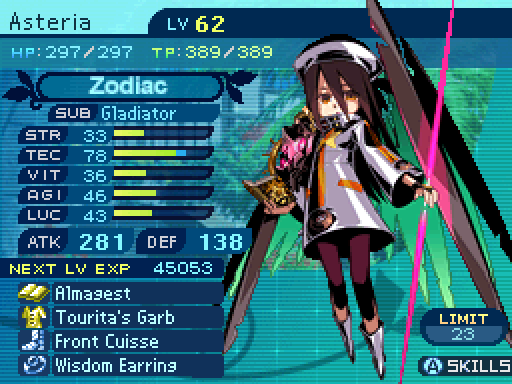

Unfortunately, Leviathan is resistant to Strike attacks, so that means that Asteria can’t really make good use of Meteor. Though she can take off a good chunk of Leviathan’s health with Etheric Charged Absolute Zeros.
MEGAQUEEN here is a nice support to bring along. She can buff the party’s physical damage output, and Ad Nihilo is useful due to the fact that Leviathan likes to put a defensive buff on itself every so often.
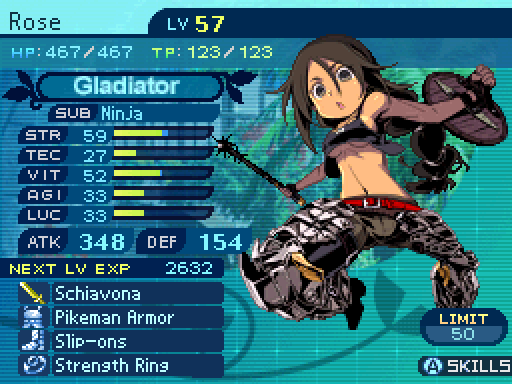


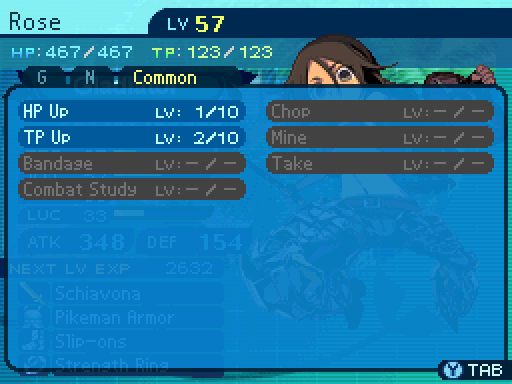
Rose excels as a damage dealer thanks to the fact that Leviathan is weak to Slash attacks. The downside with her is that her TEC stat is so low, that Leviathan’s elementals can one-shot her if they aren’t properly defended against. Oh, and if she gets hit by Leviathan’s accuracy debuff, she is pretty much going to whiff all her attacks if it isn’t dispelled.
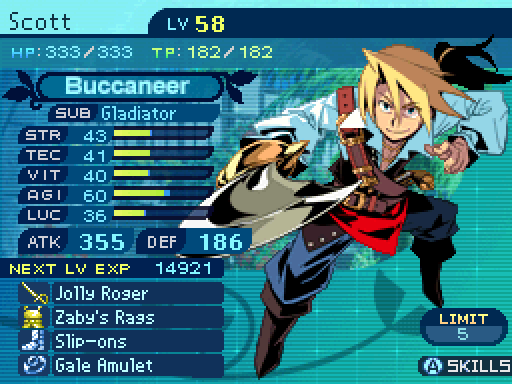
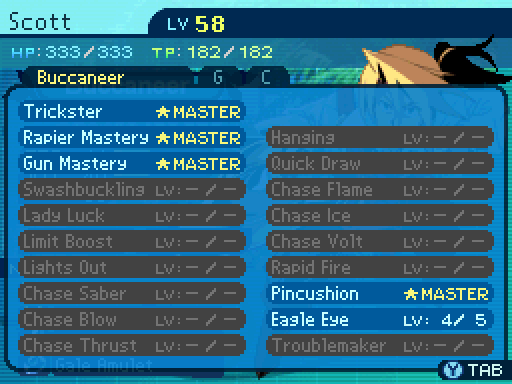
Scott is not that great of a choice thanks to Leviathan’s Pierce resistance. He does have Eagle Eye, which can dispel Leviathan’s defense buff, but that’s about all he can do.
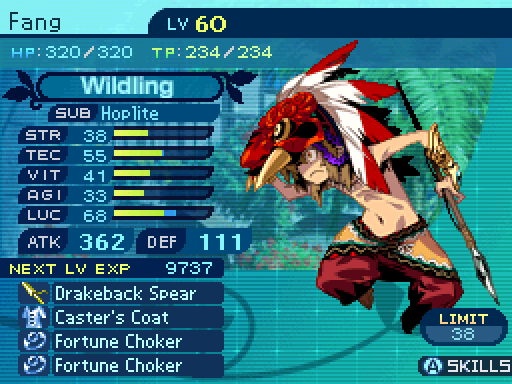
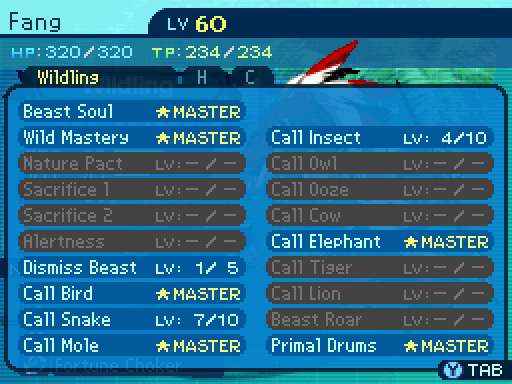
It’s the post-game. Fang is dead weight. All he can really do is dispel Leviathan’s defense buff with Primal Drums.
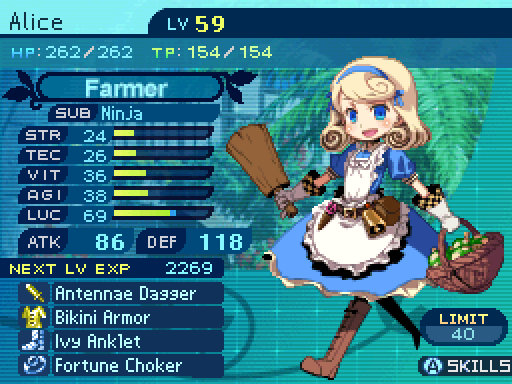

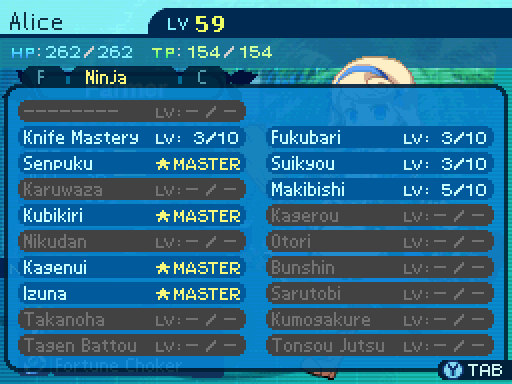
Alice has always been dead weight whenever it comes to the big fights.
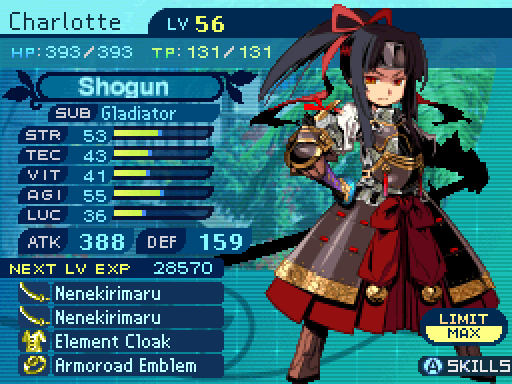
Charlotte is another excellent choice for a damage dealer since she primarily makes use of Slash attacks. And her higher TEC stat lets her take elemental hits far better than Rose can.
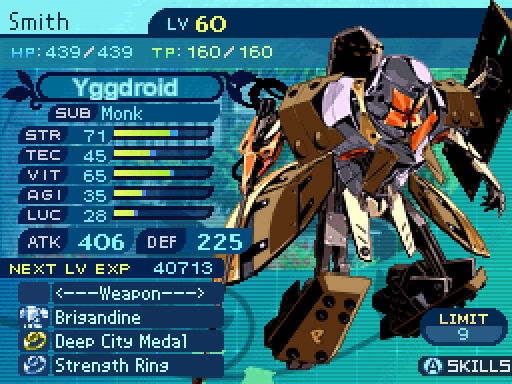
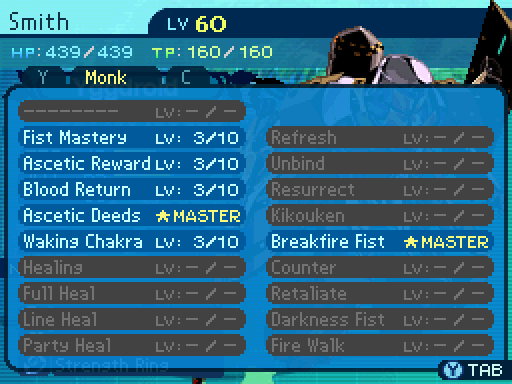
Smith can’t really do much to Leviathan since it resists both Fire and Strike attacks, meaning that he can’t make use of Breakfire Fist all that well.
Vote for up to 3 characters to partake in the Sea Quests. Votes must be in bold.