Toggle Background Color
Class Showcase: Healer


Healers do what their name suggest. They’re a support class that focuses primarily on healing your party and keep them in tip-top shape. But that’s not all they can do. They have access to some other skills to provide some offensive support as well, such as being able to poison enemies or just smack them with their staves. Both can actually be surprisingly effective for a party member whose main job is typically just to heal the party.
Stats
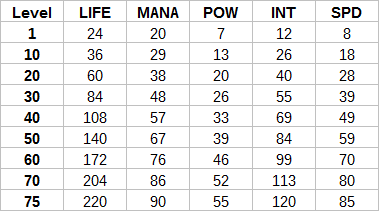
Healers are a bit of a fragile class. They have the 2nd worst HP and POW stats in the game, meaning that their defenses are very low (on top of having lackluster offenses.) Their SPD is decent, ranking in at the 3rd best SPD stat out of all the classes, so they can fire off their skills decently fast. Which is really good for a class that’s focused on having your party survive. They do have the 2nd best mana and INT stats out of all the classes, which means that they can cast their skills more often and shrug off spells more easily. However INT doesn’t benefit Healers as much as it does Mages, as Healers don’t have access to spells. As for what INT does for a Healer...
The formula used to determine healing is as follows:
Healing = Skill Healing Power * [1 + (0.2 * Mastery Power)] + (INT / 5)
If the Healer’s version of Medicine is not learned, then Mastery Power = 1
If EX is used, then Healing is multiplied by 1.2.
Unlike with Mage spells, while INT does have an influence on healing, it’s ultimately minor compared to what INT does for a Mage. Increasing INT can help with healing, but it’s really best to not to get too hung up on doing so.
Detect Enemy
Skill Type: Passive
Maximum Level: 10
Prerequisites: INT Bonus – Level 1, SPD Bonus – Level 1
Nullifies surprise attacks.

Notes:
- Each instance of Detect Enemy in the party is individually checked for.
- Does not activate if a dragon or a big enemy walks straight into your back.
Not really a skill I would prioritize all that much, as surprise attacks aren’t really that dangerous in this game. If it worked on dragon or enemy symbols running into your back, it could be worth taking as a safety measure, but since it doesn’t work on those, that kills the usefulness of this skill. Then again it does work if bosses somehow manage to roll a surprise attack, so it could be a safety net for that.
Microanatomy/Macroanatomy
Skill Type: Passive
Maximum Level: 10
Prerequisites: INT Bonus – Level 1/3
Increases the entire party’s critical hit rate against small/big monsters.

Notes:
- There are quite a few monsters that do not classify as small or large, meaning that both of these skills have absolutely no effect against them.
These skills are basically useless. Only random encounters can be classified as small or big enemies, meaning that these passives are completely useless against dragons and bosses. And random encounters are barely a threat.
Not only that, but even if these could work on the big fights, these passives still wouldn’t be that useful. Critical hits only affect regular attacks, but also critical hits are awful in this game. The way this game handles crit damage is that the enemy’s DEF stat is reduced by 30% for that attack. Not a 30% boost to your ATK or damage, a 30% reduction to the enemy’s DEF. And DEF does not have a huge factor on damage in the damage formula, so critical hits are barely a damage boost. These skills should be completely ignored.
Medicine
Skill Type: Passive
Maximum Level: 10
Prerequisites: None
Boosts the healing capabilities of the Healer’s healing skills and increases the casting speed of Medicine skills.

Notes:
- The healing boost only affects healing skills.
- Mastery Power is not the actual multiplier for healing skills. It is run through a formula of 1 + (0.2 * Mastery Power) to get the actual healing multiplier.
- The healing multiplier is applied before the healing bonus from INT is applied.
A very handy passive to level up, as it lets Healers do their main jobs a lot easier. The healing boost is very much appreciated, but the casting speed boost is also very helpful in letting Healers help out a party member before anything worse can happen to them. The speed boost even affects non-healing Medicine skills as well, such as the Recover skills. Just keep in mind that it doesn’t affect Craft Mana, as that restores mana and not life. Not a skill to max out right away aside from snagging prerequisites, but one that can be worth investing SP into later.
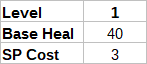
Cure
Skill Type: Active
Maximum Level: 10
Equipment Needed: N/A
Speed Modifier: 80%
Prerequisites: Medicine – Level 1
Restores one party member’s LIFE.

The Healer’s bread and butter. This skill is pretty much one of the very first things you should invest your skill points into. It provides you with a renewable source of healing, so that you don’t have to buy a bunch of Paro Fruits to get through the early game. Past that point, this skill falls off in usefulness. And there’s very little reason to use this skill over Cure II once you have it unlocked, unless you desperately need to heal for a tiny amount quickly. Speaking of Cure II...

Cure II
Skill Type: Active
Maximum Level: 10
Equipment Needed: N/A
Speed Modifier: 70%
Prerequisites: Medicine – Level 5
Greatly restores one party member’s LIFE.

This is the Healer’s main healing skill. Past the early-game, this is what Healers should mainly be making use of. How many SP you put into it is up to you, but it can be worth maxing out once you hit end-game.
Recover I
Skill Type: Active
Maximum Level: 5
Equipment Needed: N/A
Speed Modifier: 90%
Prerequisites: Medicine – Level 3
Dispels physical status effects from one party member. As the skill gets stronger, it can dispel more ailments.

Definitely a skill you really want to get to at least level 4. If you’re coming from the Etrian Odyssey series, know that dispelling ailments isn’t as easy to pull off in 7th Dragon. Ailments require specific items to cure instead of being able to use one catch-all item to do so. And said catch-all items are really hard to get your hands on in this game. That said, even though all level 5 does is reduce the mana cost to 1, it’s very much worth it to max out this skill, as that unlocks a very useful skill.

Cure All
Skill Type: Active
Maximum Level: 10
Equipment Needed: N/A
Speed Modifier: 70%
Prerequisites: Medicine – Level 8, Cure II – Level 5
Restores LIFE to the entire party.

This skill can be a very handy way to keep your party topped off in the case of attacks that hit multiple targets. The healing scales in exactly the same way as Cure, but the AOE aspect definitely makes this skill worth considering. However it’s slower to go off than Cure and Cure II, so be mindful of that.
Resurrection
Skill Type: Active
Maximum Level: 10
Equipment Needed: N/A
Speed Modifier: 50%
Prerequisites: Recover I – Level 5, Recover II – Level 5
Revives one party member and restores their LIFE.

By far one of the most important skills a Healer can get. Unlike in Etrian Odyssey, revivals are much harder to come by in 7th Dragon, and the Healer is the only class with access to those. More often than not, a dead party member means that you have to drop everything and go back to the nearest inn to get that party member revived. Picking this skill up avoids that situation, unless it was the Healer that got pasted. But the chances of that happening are fairly low.
Resurrection is slow to go off, but that’s both a good and a bad thing. Bad because if your Healer gets pasted before they can revive someone, well that person isn’t getting revived. Good because slow revives give more of a chance for the enemy to act first, which means they aren’t hitting the party member you revived during that time and rekilling them. Unlike in Etrian Odyssey, the revival isn’t a set heal, so the Healer’s capabilities can boost the amount it heals for, adding some more security against rekills. How much you level up this skill is up to you, but even just picking it up will do wonders for your party.
Recover II
Skill Type: Active
Maximum Level: 5
Equipment Needed: N/A
Speed Modifier: 90%
Prerequisites: Medicine – Level 5
Dispels mental status effects from one party member. As the skill gets stronger, it can dispel more ailments.

Like with Recover I, this is definitely worth getting to level 4 as soon as possible. And to level 5 to unlock Resurrection. Something to note is that the Healer has no way to dispel Bleed, Charm, and Skill Seal between these 2 skills. While not being able to dispel Bleed isn’t a big deal, not being able to wipe away Charm and Skill Seal is. So be very careful around enemies that can inflict those, as the Healer doesn’t have an easy way to wipe those out.
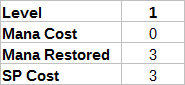
Craft Mana
Skill Type: Active
Maximum Level: 5
Equipment Needed: N/A
Speed Modifier: 70%
Prerequisites: INT Bonus – Level 5, Medicine – Level 10
Restores MANA to the entire party.

Notes:
- The net loss or gain of mana from this skill for the caster is -3/-2/-1/0/+2.
It’s a handy little skill. Not really a skill you would make use of all that often in serious fights, but while you’re trekking through dungeons, it can be a skill you spam for a while in a non-threatening fight to top off your party members. Definitely get it to max level if you’re going to do that since they actually gain some mana back at that point. Using EX on this skill doubles the mana restoration, but it’s absolutely not worth using EX for.
Miracle Cure
Skill Type: EX
Equipment Needed: N/A
Speed Modifier: 100%
Prerequisites: Resurrection – Level 5
How to Unlock: After defeating King, talk to the Smiling Doctor in Kazan.
Restores LIFE to the entire party, revives all dead party members, and dispels any status effects on the party.
This EX skill is basically a panic button skill, and it’s a really good one. If your party is in a bad state during battle, this skill can more likely than not get them back up and running. The healing component is mediocre, but it’s not terrible since EX boosts the healing by 20%. It’s more of the cherry on top since the real draw in the AOE revival and ailment dispel. It’s also the only way the Healer can cure Bleed, Charm, and Skill Seal, so it’s very much worth picking up just for that as well.
Toxicology
Skill Type: Passive
Maximum Level: 10
Prerequisites: None
Increases the poison damage Venom skills casting speed of said skills.

And now we get into the venom skill branch of the Healer’s skill tree. The Healer has an entire set of skills dedicated to poisoning their enemies. It’s not an amazing set of skills. The poison damage is nice for earlygame, but it does fall off. And if you want them to contribute offensively to a battle, there’s a much better option for that.
Now I’m only saying this is the case if you only have 1 Healer. If you have multiple Healers? Then Poison is actually their best form of offense by far. As for why that is, that will be discussed in a later skill.

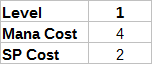
Venom
Skill Type: Active
Maximum Level: 10
Equipment Needed: N/A
Speed Modifier: 80%
Prerequisites: Toxicology – Level 1
Attempts to inflict Poison on one enemy.

The poison power is run through a formula of Poison Damage = (20 * Poison Skill Power + 3) * Poison Boosts to determine poison damage. No I don’t know why they didn’t just set the Poison damage since it’s mostly static in this game.
It can be a handy way for a Healer to contribute to battles early on whenever they don’t have to heal. But the damage falls off pretty quickly and needs the help of a later skill to keep it relevant. Toxicology does boost the damage to 146 at max level at least. But even that will be outclassed eventually, and there are better ailments to be making use of. If you do intend on using this skill on the big fights, remember that using EX can make the skill hit more reliably, though it won’t actually increase the Poison damage if it lands.

Venom Mist
Skill Type: Active
Maximum Level: 10
Equipment Needed: N/A
Speed Modifier: 70%
Prerequisites: Toxicology – Level 3, Venom – Level 3
Attempts to inflict Poison on all enemies.

This skill on the other hand, is not that useful period. AOE Poison damage is only really good in random encounters. It might be worth it if your Healer is your only form of offense, but aside from that, you really don’t even need this skill. Even if you do intend on specializing in Poison, Venom will more than suffice.

Venom Veil
Skill Type: Active
Maximum Level: 10
Equipment Needed: N/A
Speed Modifier: 80%
Prerequisites: Toxicology – Level 5
Places a buff on an ally for 10 turns. When the ally is attacked with physical damage from a melee attack, the attacker will be counterattacked with an attempt to Poison them.

Notes:
- The incoming attack must connect and must be a physical melee-ranged attack. Spells and ranged attacks will not trigger counterattacks.
- If an incoming attack hits multiple times, the counterattack will activate for each hit. There is no limit on how often a counterattack can be triggered.
- Ignores counter skills.
- EX has absolutely no effect on the infliction rate of this skill.
- Overwrites another Veil buff if one is in place.
- Since Shieldcraft counts as a Veil buff, this skill will overwrite that buff as well.
This is one way you can try poisoning your enemies, as you can have your Healer just toss this onto a few party members and just do their normal duties for the rest of the battle. However the infliction rate is a bit smaller than Venom or Venom Mist, so keep that in mind. For best results, cast this on a Knight using Provoke.

Venom Boost
Skill Type: Active
Maximum Level: 5
Equipment Needed: N/A
Speed Modifier: 70%
Prerequisites: Toxicology – Level 8, Venom – Level 5
When cast on a Poisoned enemy, the amount of Poison damage they take is multiplied by 1.3, and the duration of the Poison is extended.

Notes:
- Both the damage multiplier and duration extension effects stacks with multiple casts.
- There is no cap as to how many times you can cast Venom Boost on a given target.
- Works on any form of Poison, not just ones that came from a Healer.
This skill is what makes Poison very relevant after earlygame. And this is why I said Poison builds are much better in parties that have multiple Healers, as you can cast this repeatedly to ramp up the Poison damage on an infected target to ludicrous levels within a given turn! The only part of this skill that scales is the duration extension effect, so you can leave this skill at level 1, maybe level 2, to make it easier on your Healer’s SP and mana pools. Another thing to keep in mind is that if you want to make a party centered around Poison and Venom Boost, you may be better off having a Rogue with access to Scorpio in the party. As that skill has a 75% infliction rate compared to Venom’s 70%, so it can inflict Poison easier, at the cost of the Rogue not having access to Toxicology, meaning that the Poison damage doesn’t start off at that initial boost.
Mana Mastery
Skill Type: Passive
Maximum Level: 10
Prerequisites: None
Increases the cast speed of Mana skills.

There’s nothing much to this skill, and the skills in this skill branch aren’t particularly amazing. Not really worth maxing this out, as increasing the casting speed of these skills isn’t really all that important.
Ele Resist
Skill Type: Active
Maximum Level: 10
Equipment Needed: N/A
Speed Modifier: 70%
Prerequisites: Mana Mastery – Level 3
Places a buff on one party member that increases their resistance to Fire, Ice, and Lightning damage for 5 turns.

Holy crap, Immunize got gutted. It was the parent skill in Etrian Odyssey 1 and it was absolutely overpowered there, utterly trivializing the game by reducing all incoming damage to comically low levels. In this game, it’s... considerably less so. The damage multiplier got reduced from 40% to 70%, it no longer works on physical skills, and the biggest kicker is that it’s now single target instead of AOE. This skill is basically nothing more than a shadow of its former self. Enemies with access to elemental attacks almost always have them attack multiple targets. If you need elemental defense, use a Knight’s break skill instead to protect your party. Even if you lack a Knight, your Healer is most likely better off just healing off the damage instead of offering rather pitiful protection against elemental attacks. It does have one use in that it can dispel resistance debuffs, but only if said debuffs lowered elemental resistance. It may be worth taking 1 point in this skill for that at least.

Life Saver
Skill Type: Active
Maximum Level: 10
Equipment Needed: N/A
Speed Modifier: 65%
Prerequisites: Mana Mastery – Level 5, Resurrection – Level 3
Places a buff on one party member for 10 turns. If that party member dies while this buff is active, they have a chance to be revived at 1 LIFE.

Ouch, they took CPR down a peg as well, as that parent skill was an AOE in EO1. This is kind of a weird safety net skill, and not a particularly reliable one. Even in cases of emergencies, there’s a far better safety net skill the Healer can be making use of if you’re really worried about your party. With that said, this skill does have a use in that it can be cast on the Healer themselves to save their lives. And a dead Healer can be a huge setback to the party.
Healing Mana
Skill Type: Active
Maximum Level: 1
Equipment Needed: N/A
Speed Modifier: 75%
Prerequisites: Mana Mastery – Level 8
Restores the Healer’s mana when cast.
Like the Mage’s version, this is also not a good skill! Especially when Healers have access to Craft Mana, which helps the entire party instead of just themselves! Sure Craft Mana only heals 1 less Mana to the Healer at max level compared to Healing Mana, but the net gain and utility from Craft Mana makes it a far more useful skill.

Concentrate
Skill Type: Active
Maximum Level: 1
Equipment Needed: N/A
Speed Modifier: 75%
Prerequisites: Mana Mastery – Level 5
When cast, Recover I, Recover II, and Resurrect are powered up on the next turn, and affect the entire party instead of a single ally.

Notes:
- This skill is actually coded as a 2 turn buff.
- As a result of that, this means that the Concentrate charge is not actually used up upon casting a skill. And only wears off when the next extra turn phase comes around.
Kind of a weird panic button skill. You basically have to anticipate something bad happening to your party to get the most out of it, or hope that your Healer can hang on for just 1 more turn. The effect is really good, but the wind-up time can make it really hard to capitalize on. It best synergizes with the use of Rescue React due to how this skill was coded, letting you get off an AOE version of Resurrect on the extra turn that you get, or on the next normal turn right after that.
Swing Crush
Skill Type: Active
Maximum Level: 10
Equipment Needed: Staff
Speed Modifier: 80%
Prerequisites: POW Bonus – Level 5
Deals melee ATK-based Blunt damage to one enemy.

Healers are also capable of just dishing out damage by smacking things with their staff. With that said, if you want to be making use of a battle Healer, this is not the skill for that sort of thing. The Healer’s offenses aren’t that great, even though Staves typically come with large amounts of ATK. The lack of a Staff mastery skill basically tanks the Healer’s offenses, and they just can’t compare to the actual dedicated damage dealers when using this skill. It’s only really worth picking up if your Healer is literally your only form of offense in the party. With that said, battle Healer isn’t an unviable build. Oh no, you actually want to be using the next skill if you want a battle Healer.

Earthbreaker
Skill Type: EX
Equipment Needed: Staff
Speed Modifier: 100%
Prerequisites: POW Bonus – Level 10
How to Unlock: Talk to the Traveling Maid in Kazan, then in Zeza, and then finally in the Nevanplace quest office.
Deals melee ATK-based Blunt damage to one enemy. The Healer’s ATK is boosted during this attack.

Notes:
- The ATK Bonus is affected by buffs and debuffs.
This skill is what you want to be making use of if you want to use a battle Healer! Sure the damage multiplier is lower than Swing Crush’s damage multiplier, but the ATK bonus it provides the Healer during the attack is what skyrockets the Healer into damage dealer territory for the turn they use this! It’s very much worth using, though there are a few caveats to keep in mind. Since this is a melee skill, you’ll have to put that Healer on the front row, where they’re more susceptible to danger. And because this is an EX skill, it can only be used 3 times per battle unless you have some Dragon Eggs on hand. As a result, this also means that the Healer has less opportunities to use EX for other things if they really need to, like getting off a Miracle Cure. So be very mindful of that.
Rescue React
Skill Type: Active
Maximum Level: 1
Equipment Needed: N/A
Speed Modifier: 80%
Prerequisites: SPD Bonus – Level 5
Places a react buff on the Healer for 5 turns. While the buff is active, the Healer is granted an extra turn if at least 1 party member dies.
Notes:
- Multiple deaths in a given turn will not give out more than 1 extra turn.
This is the Healer’s true safety net skill. The react condition may seem a little strange and have little use, but it’s purpose is to let you basically instantly rescue anyone that died this turn and sacrifice the Healer’s extra turn phase to get that party member back up and running like nothing every happened by the next actual turn. Though any buffs they had will have to be reapplied. Though if you have a Princess in the party and her react skill went off, that does mitigate that issue. Though there is the option to have your Healer do something else during their extra turn instead of reviving the party member that just died, if you so wish.
Great Work
Skill Type: Passive Field Skill
Maximum Level: 5
Equipment Needed: None
Prerequisites: POW Bonus – Level 3
Increases the number of times the party is able to gather per day.

Notes:
- Multiple instances of this skill stack.
- This passive is only active as long as the Healers with this skill are alive. Dead healers will take away any extra gathering attempts they gave until they are revived.
Not worth taking at all. Gathering is really not a big deal in this game, and you unlock plenty of gathering attempts per day through party skills.
Invisible
Skill Type: Active Field Skill
Maximum Level: 10
Equipment Needed: None
Prerequisites: INT Bonus – Level 3, Detect Enemy – Level 1
Reduces the encounter rate for a certain number of steps.

Notes:
- When you enter an area that has random encounters, a counter starts at 100, and a value is subtracted from it each time you take a step. When this skill is in effect, that value is divided by Reduction Power.
- Said value is rounded down to the nearest whole number, so it is possible for this value to be reduced to 0.
- Stacks with the Samurai’s Evil Eye skill, as those skills have entirely different effects.
- Does not stack with Bamboo Flutes since it acts like a level 2 version of this skill.
- Likewise, it does not stack with Ronam Flutes since it acts like a level 8 version of this skill.
Are you playing without the USA patch and does your party lack a Samurai? Then take this skill, unless you really want to have a bad time with the game! The encounter rates on the world map are absolutely ludicrous, and this skill is pretty much mandatory in order to make the game tolerable! If you’re worried about losing out on experience points, then don’t be. Random encounters don’t give out that much experience points, and if you want to be leveling up, you should be killing Dragons instead.
Now if you do have a Samurai in the party, that means you potentially have access to Evil Eye, which nullifies encounters if your level is higher than the enemies in the area. Which skill you take is up to you, as they both have very different effects. Evil Eye doesn’t have a direct impact on the encounter rate, but just simply nullifies them. However, it won’t have any effect if you’re too weak for the area. While Invisible can’t stop encounters from happening entirely, it does directly reduce the encounter rate, so there’s also that to consider. You don’t need to take both skills, as that is complete and utter overkill. I should note that the encounter rates in dungeons aren’t too bad, so neither skill isn’t as necessary there.
If you’re playing with the USA patch, then you really don’t need this skill! (Or Evil Eye.) It’s just plain overkill, especially at high levels!
The Healer is a great defensive support to bring along, that also has capabilities to contribute to battles in different ways as well. They can make life much easier for your party to keep them going. Just make sure that the Healer themselves don’t get taken out.