Toggle Background Color
Overworld.mp3
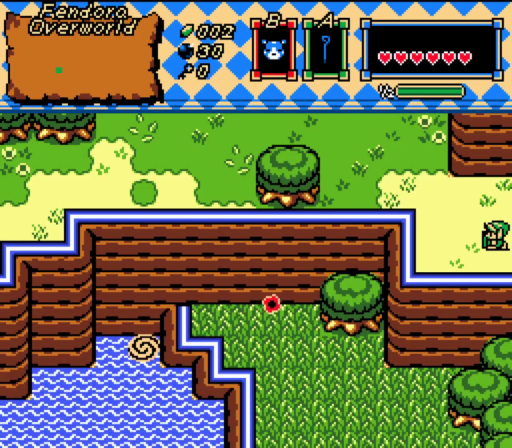
The beautiful land of Fendora awaits us! Has a pretty catchy tune too.
Most ZC Quest Authors aren't exactly composers, so they usually have to settle for whatever music already exists. In the old days, they used to be limited entirely to midis. Not exactly great.

Let's follow the coast!

There's some annoying crabs over here. I could use the cane to take them out...

But our new Moosh transformation lets us deal with them pretty handily.

Yet another heart piece we can't get yet 


The coast doesn't seem to have much to do. Except...


Aha! We've found secrets. S e c r e t s 

3/4 Heart Pieces! Only one more to go for another full heart container!

We head back to the fork in the road and head north this time.


Forest.mp3
We've reached Aspath forest! Supposedly one of the 3 crystal spring bananas is located here.

Moblins aren't much of a problem for us, and neither really are Goriyas (the boomerang guys).

Heading north yields a dead end! There's a whirlwind here that tosses us a bit into the air, but it's not enough to bridge the gap and reach the switch.

We've found the title screenshot! It's a nice looking screen, though the mountain corner water connection looks a bit off.


Heading west, then north leads us to another dead end. Again, we can't bridge the gap.

No matter how many times we die trying.

Heading north from the water screen leads us to yet another crossroads.


East and West are both dead ends though. And there's yet another heart piece we can't yet have 

Heading north leads us to... yep, you guessed it. Another crossroads. Let's take the east path first!

It takes us right out of the forest. I have a feeling this isn't where we need to go, but let's explore!
Also, that's the 3rd heart piece we can't get this update. We don't get nice things this early.

Oh hey, another crossroads. Who would've guessed? Let's head south.

We can hit a switch to lower this barrier, but we have no way of getting down to that barrier yet.

20 dollars for me.
With a red rupee in our pocket, let's head back into the forest.

Heading west leads to a tower with cracks in it. It seems we've stumbled on our first dungeon!

Level 1.mp3
Welcome to the Tower of Winds! It's hard to hate any dungeon with a theme as good as Sky Tower playing in the background.

There's some moblins and bats up north. Bats are fairly annoying, as they take two hits from the cane to kill and are a bit hard to hit!
The stairs are behind a lock block. We'll need a key to open it.

More wind and pits over to the west...

And north of that is a block puzzle. Ohhh boy.

Heading east from the block puzzle is a dead end, though there is a path we can take by going north from lockblock stairs room with the moblins and bats. But first...

The whirlwind in the room south of the block puzzle room does launch us a bit higher than the other winds we saw before! It's enough to cross this pit and see what's below.

A room with wind, bats, and a giant moving spike trap! Yikes! That spike trap moves in a rectangle in that box, so be careful of it.

The stairs obviously take us to floor two. Let's see what we have in store up here...

Not much, unfortunately. The wind here isn't strong enough to reach the north side and is certainly not strong enough to reach the east. Even if we could reach the north, that door won't open no matter what we do. However, if we kill all the enemies...

We get a compass for our troubles! This tells us the location of the spring banana as well as makes a chime in any room with a key in it. Very useful!
If we fall down into the pit, we get sent back down to the floor below, the room right below the block puzzle room.

Alright, let's stop procrastinating on this block puzzle and actually solve it. Gary Oak can push a block by walking into it. The blocks with arrows only move in that direction. The blocks with two arrows can be pushed in either of those two directions. The blocks with circles on them move in any of the 4 directions. Do you think you can figure it out?

The way this is set up, we can't push any block into the center. If a block is pushed onto a switch, it gets locked in place, and we can't push a block from above into the center because of the up direction block preventing us from getting above the circle block to push it down.

It's best to get garbage blocks out of the way if they can be pushed out of the way in a way they don't get in your way. Do you see the trick to this puzzle yet?


How about now?

The trick is that the puzzle should be done from left switch to right. Solving the middle switch first will prevent you from solving the left switch...


And solving the right switch first will prevent you from solving the middle switch.

We get a key for solving the puzzle! Yay!

Now lets head north of the staircase lockblock room. We need to bomb this cracked block here to destroy it.

...
4/4 heart pieces not obtained in this update 

It's a cool room though! Very fun platforming room.

This is not a cool room though. This room sucks.
or, should I say, blows

The room did not like my pun and I get through it with only 1/3 of my healthbar left.

This spike roller will make getting to the chest a bit tricky, especially with our low health.

You need to hide in these little crevices to dodge it.

Key get!

A whirlwind provides a handy little shortcut back to the start.

Let's head upstairs using one of our keys!

We only have access to the right side of this giant gap. We head north...

And almost immediately get our first game over of the quest to a dumb snake. Stupid Ropes!
Confirmed Deaths: 1

5 seconds of backtracking later...

Midboss.mp3
Our first miniboss!

It's a goriya that shoots wind boomerangs!
When he attacks, he either shoots 2 boomerangs that curve in towards you, both leaving behind a trail of wind...

Or he'll shoot 1 boomerang straight directly at you, also leaving behind a wind trail. He also moves decently fast.

Confirmed Deaths: 2

The second time around, we go for heavy artillery. In this case, bombs.

He dies in exactly 3 bomb blasts. He's not hard if you know what you're doing, though he can be a bit tricky if you can't time the bombs right as he moves fast enough to clear the blast zone.
Also, bosses have a neat explosion death animation. It's simplistic, but a nice touch.

Sweet loot 

and soar through the air.
Sweet! Now we can fly!

Our subscreen is looking a bit more comfy now.


One of the propellers isn't moving. We use our new item and shoot out a gust of wind, causing it to start spinning. Now we can make like a grass type an- wait I already used that joke didn't I.

Our new item lets us spam out wind like crazy, and uses barely any stamina!... right, that's a thing that exists. It's basically just a magic bar that refills over time. Up until now, the only thing that's used it is Moosh's dash attack.

It can also stun enemies, and it can kill those bats we've been seeing in one hit! It's very nice!

Last, but not least, it can let us soar when we jump into a whirlwind!

We can make short work of that pit we saw earlier in the room where we got the compass.

Where we reach the other side of this room! There's another unmoving propellor on the left, and if we gust that, this bridge appears, offering us a very handy shortcut back to the start!
This seems like a good point to end off on.
Death Count: 2
Heart Pieces obtained: 3
Heart Pieces we can't reach: 5
Next time: We conquer the rest of the Tower of Winds!