Toggle Background Color

Hi there, I'm your local Dimi. I'm here, breaking the timeline of the update for a bit, to show you something.

See this pit? Fall down it.

Now that you're on the lower floor, try not to move too much or the pit will activate. Face to the right with as little movement as possible (it's not that precise, so there's a fair bit of leeway here), and use the Kunai.

Congratulations. You've now skipped 90% of the suffering I'm about to go through in this update and are free to go south and grab the boss key. If you don't feel like going through the hell I'm about to put myself through for the majority of this update, you don't have to.

I'm not going to do that, because I intend on showing off everything in this dungeon.

...I'm already regretting that decision.

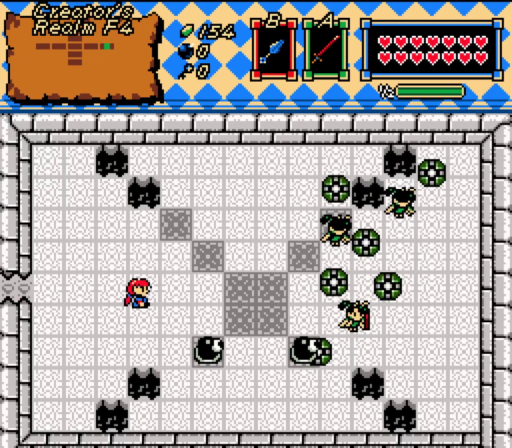
Sneaking past that hell somehow, we have... Bumper Lumens.


I'm so distracted by both disgust and amazement that I get caught by a Beamosmaster.

Let's fall down the bottomleftmost hole.

Falling...

Falling...

...Oh, caress off.
You're seriously doing another "sorry, but it's nothing" joke? How unoriginal can yo-


Never mind, my own impatience foiled me.
Very handy!

What we really want is the bottom left hole that's above and right the one we just fell down.

Bingo. This block puzzle is unsolvable without pushing this block outward.


At least we don't have to put in effort.
We've explored most of the main path of the dungeon. We're just tackling loose ends at this point.


Uhhh
If you get caught by a wallmaster in this room in a specific position, you somehow end up 5,000 feet in the air when you get sent back. No idea how that happens.

We want this room.
(photo taken seconds before disaster)

Either of the bottom holes work for our purposes.

Well that looks fun.

These Kunai tiles only appear when you step on the stars. This is to prevent you from getting out of the center cage if you fall into it except via the beamosmaster.

Welp, time to timing.

... This spike is purposefully off sync with the other spikes to trick you. Rude.
Confirmed Deaths: 54

Let's try that again.


Barriers lowered.

By the way, this is the pit that takes you into that cage below.

Fall into the topleft hole instead...


And head into the portal.


Oh, I wonder what secrets Moosh has stored away.

...Is that a blood altar?
 : "First a goat must be sacrificed. Once the fat has burned in the ceremonial torches, the scripter must consume the goat's heart before reclining on the altar. If done correctly, the Lord of Darkness shall appear to the scripter and bestow upon him the scripting knowledge he seeks."
That Moosh sure works black magic, eh?

Boss.mp3
Falling down the pit leads us to... oh god no.

Confirmed Deaths: 55

Confirmed Deaths: 56

Need I bring out the big guns?

That's all but the ice golem taken care of.

15-ish light arrow hits later. Jesus this guy is tanky.


And there's that door open, in this room we have yet to see.
 I guess I can't put off the worst part of the dungeon any longer.

We have yet to head south.

We have this cool rainy outdoor section that's kinda cool. It's littered with spike traps though.

And then we have this loving room.
THIS LOVING ROOM.
I'm cutting out all of the 20 minutes I spent trying to get past this room and all the backtracking it takes to get back here if you screw up even once in this room. You have wallmasters rocketing out of the walls, and killing them has to be done every time you return cause the walk back here is so long they will always respawn. You have a moving platform and cycling spikes that both desync and you have to wait for them to sync up to get on the platform. And then, you have the gears. This one room takes my love of gears and twists it into a vile hatred unbeknownst to man. They both move at completely different speeds, with the left one going so fast it's nigh-impossible to fit into the door. They are both extremely finnicky, so you can step one pixel off the gear and fall in the pit, and trying to move against the fast one will just move you farther and farther from the center. If you fall in the pit, you have to backtrack all the way back here to the point it's faster to just die or restart or get wallmastered and restart from the beginning, which still takes a long time to get back here. You have to do this one room every single time you fail this upcoming segment, and it took me 20 minutes to get 1 passthrough of this room. This room loving sucks.

I'm cutting all of that out for your enjoyment, and to keep my dignity.

More bumper Lumens await you on the other side of that room.

Killing one doesn't remove the bumpers it leaves behind.

Yes, that means it's possible to softlock yourself if you kill them while their bumpers cover your exits out. Lovely.

In the next room is more bumper lumens and wallmasters that bounce off the bumpers. It's ver-

FUCK

5 minutes of attempting the gear room later, I get another attempt and succeed.

That's a suspicious number of pots...

Thing.mp3
...What.


The ice bounces and lingers, the orbs explode. They're almost dead tho-

Never mind, I got killed by a Lumenkranz.
Confirmed Deaths: 57


Let's try that again.

Confirmed Deaths: 58

Eventually, old reliable fire rod carries me through the battle.

This lets you get down here...

And access here. This is the intended way of getting to this platform. You can skip everything I just did by doing the sequence break I showed at the start of the update. You're welcome.

This unlocks a shortcut that makes it so we never have to do what we just did again. Thank god.

Rude room, but nothing compared to the gear room.

Beamos rising out of the floor? That can't be good...

Of course.

Of.

Course.

So many friends.

So many surprises.


Get me out of here.

With the boss key in hand, we're able to fight the boss... right now.

The Wall.mp3


[THE WALL] is a multi-part monstrosity, with multiple parts you can attack. Dealing enough damage to any part other than the main part will shut it down temporarily and keep it from attacking.

Dealing enough damage to the main part is what wins the fight, however.

The two orbs in the corner shoot out rings of fireballs at set intervals, and each can be taken out with 2 Xaya light arrows and have a chance to drop a magic container when they shut down. The small tiny orb on the bottom moves left to right (curving around the main part when it reaches it), and shoots out a laser every now and then. It can only be disabled with the sword or staff.

Confirmed Deaths: 59

The main part can shoot out electricity that, when it hits a wall, will move towards the east/west wall (whichever is closer), move up towards the north wall, move back towards the center, and when it's above Link, will shoot downwards. Think Dr Wily.

Spoiler alert: Light Arrows aren't very effective against the main part.

The main part can also shoot a stream of Xaya's bouncing starshots she used.

Got lasered.
Confirmed Deaths: 60

The starshots linger for a bit, so watch out.

Finally, it can shoot these purple orbs that alternate between 1 shot aimed at you and 2 shots aimed to the sides of you. This one can be nasty to avoid. Use Xaya if you're trying, though be aware Xaya takes double damage.

Confirmed Deaths: 61
...Is it time for a death montage?


Confirmed Deaths: 66

Eventually I realize Kunai is the superior attacking option for the main part.


Confirmed Deaths: 70
I die, I die, I die. This thing is meant to be a superboss to compare with the superbosses Evan (the creator Isle of Rebirth) is adept at making; though without Evan's touch of fair and balanced (if unforgiving) design, it just ends up being a show of spectacle and not much else. Bring a potion or two if you want to try this yourself.
Until eventually...

I succeed.
(To be continued)


 : "First a goat must be sacrificed. Once the fat has burned in the ceremonial torches, the scripter must consume the goat's heart before reclining on the altar. If done correctly, the Lord of Darkness shall appear to the scripter and bestow upon him the scripting knowledge he seeks."


 I guess I can't put off the worst part of the dungeon any longer.


