Toggle Background Color
TLOD 6: Tour of Insect Nests
In the northwest of Catacombs level 3, a spider key opens up a staircase to a subsection. Going through it causes the enemies to change, while it remains internally the same level:


These giant ants can have a chance to poison with their hits. The manual says this is due to abdominal stingers much like many real ant species have, but their attack animation only has a bite. There are also black ones, though I don't know if they're any different. They're not very tough, as Calandra could regularly one-shot them, but they appear in fairly large numbers in an open area.


There are two corners like this in the sublevel. The other one has the West Wind, one of the things needed from here, along with an antidote and equipment that's nothing special.

Between them you'll get a couple randomized comments, saying that "No one has been here in a long time." and "This place is kind of creepy." Ther are also a few small rooms like this. In one of them you can find a +2 dagger called "Sa Shull". In the east side of this section there is a Dark Moon key. The keys are needed to get through a corridor in the main area.

There are two shelves along the way in that corridor. The first one has the South Wind, which completes the set. This second one requires a grey key to get into, and has these scrolls plus Raise Dead. Amber scribes Fireball. Past this are stairs up to the isolated northeast corner of Catacombs level 2, where it is possible to rest again. I'm holding off on that for now, but there is something else I want to do there.

This map is reused from an earlier update, so party and enemy positions are inaccurate. The small cyan squares represent items, and there's one in the bottom-left corner. It's way outside of what's normally accessible, but I can use ASE's teleport function to go inside the wall and pick it up.

Interesting.

Shortly after going up to Catacombs level 1, you can find this pile of weapons. All three of them are cursed. The opposite end of the hallway has a lock opening into the spider area, which this party hadn't visited before. The items of relevance there are a copper key and a scroll of Magic Missile, which somehow neither mage knows yet. I teach it to San-Raal, who I also briefly took to the front row against the last spider to increase his HP with Vampiric Touch.

Back at the temple's entrance is the reason for collecting the horns from the catacombs. Blowing on all four in any order will make this wall dissolve, revealing stairs up.

We have entered the Silver Tower, the first of three. It holds the initiation for this temple's priests, which will immediately make you wonder how there can possibly be as many as there are.

First, you must follow a moving pattern. Stay on unlit tiles, or the whole party will be hit with an electric beam. This pattern goes to a southern wall and follows it until going back north just before the other corner.

Of course, the pattern makes it unavoidable to get shocked at least once.
At the end, four mantis warriors are there to greet us. I intentionally went onto a lit tile, since it will only activate the electric beam once until you step on it again. Staying on the moving path means the tile you're on can light up multiple times and almost inevitably kill your party by electrocution. Getting into melee of course means dealing with their paralyzing attacks on top of that, so I use Ice Storm and Cone of Cold to take them out from a distance.

That's a cursed axe which requires going through at least two electrified tiles from any direction to reach.

One member of the thri-kreen welcoming comittee dropped a bone key. It can open a door to the north, but there's really nothing of interest in that room. On the south wall is a lever that deactivates many of the electric tiles, making a safe path back. This also includes tiles to the rooms north of the entrance.

A corridor to the south has this sword. It's cursed, -2 and according to the clue book causes the food meter to deplete faster. Believe it or not this is something you might need later.
Another corridor has this shelf. An item placed into it will be turned into a wand of lightning. This can only be done once.

One of the rooms north of the entrance has this encounter. If you choose heal, it will just attack you immediately. They're annoying enough that I don't want to fight more of them than I have to, so I chose kill. Either way, it drops a mantis key when it dies.

An adjacent room has this encounter.

He doesn't properly introduce himself, but this is Tanglor, the last NPC recruit.

If you refuse:

There will be a +1 short sword and shield on the floor next to this event if you accept him, but not if you reject him.

He comes equipped with a holy symbol, a normal dagger and plate mail. I finally got all six of the NPC recruits together, but it won't last very long:

The red dots south of the party's current position represent electrified tiles. It's necessary to go through another one to progress, and doing that will spawn a mantis warrior in that room. We're in no condition for that right now, being in bad health and running out of spells. I have to rest now, which means Insal won't be with the party any longer. I put the +5 long sword and all rings on the floor before doing so. He won't steal any essential items and drops everything in his own inventory upon departure. I go back downstairs to see who those bones I got belong to.

Shorn? but he's right there.

Doing this gets you another one, as an entirely separate character. I don't intend to go through with two of the same guy, so I reload from here. To prepare for the electric tile, I cast Aid on everybody then bring San-Raal up front to use Vampiric Touch on a mantis warrior in one of the north rooms. I decide to keep him there for this level since it gives him more HP than anybody besides Calandra and I want both clerics in the middle for least risk of paralysis. With a robe and bracers that are both +5, his AC is decent at 0. I give him a potion of giant strength from the first game and the staff +1 from the catacombs to give him good melee damage.

This magic mouth's request can be fulfilled by any combination of skulls and femurs.

Full sets won't work for it.

We get another bone key. A theme of the silver tower is holding on to otherwise useless items.

Here's the lock for the mantis key we got earlier. Two mantis warriors will spawn in the room it leads to every time you step into the doorway. Shorn is holding a fire sphere, which i got a pair of in the catacombs. It's like a single-use wand of fireball usable by anybody.

Including them. There's just enough time to dodge the fireball.

Throwing an item to hit that button will remove the wall it's on and close the pit in front of it. However, it also toggles a pit in the tile we're currently standing on. To deal with that there's another button on the east wall that also toggles it. Another mantis key awaits at the end.

It unlocks a room in the northwest with eight eggs. Attacking one will open it and cause the mantis warrior inside to immediately fight back. Those ones don't carry weapons but can still do similar damage and paralyze. There is a reason to do that: when you reach the south wall of this room, all intact eggs will hatch at once. You'll have to fight them anyway, so it's easier to do that one at a time.

Here's what's at the south end. The gem from the left eye can be removed. Putting it back in will remove this wall.

There we find this mantis idol needed later, along with a fire sphere and a copper key. We have two copper keys now, and use one of them to unlock the way to stairs up. It goes in to a split path with an open hallway going west and a bone lock to a longer eastern corridor. I try west first. After giant venomous insects followed by giant insects with paralyzing attacks, what's next?

Of course, giant insects that can both poison and paralyze. As you can see, giant wasps can fit four in a tile to boot. They respawn rapidly and this area is fairly open, so there is also danger of being attacked from multiple sides.

Getting poisoned now puts an ugly green tint on that character's portrait. The only reason to come here is getting a copper key. I already had one coming in and do not need another. With that being the case, there is no need to literally stir up the hornets' nest. I reload and just take the other path. It goes to a square room with a lever at every corner. Each one opens a door in a hallway to the south but also a pit in front of another lever. Start with the northwest then go counterclockwise, but go into the hallway before the last one.

Pressing this creates an invisible barrier over the northeast pit.

With that, you can flip the last switch and move on.

The hallway leads to another nest area, but the wasps will only appear there if you went west first. Since I reloaded, it's calm and peaceful here. Past a copper lock, we encounter a familiar face:


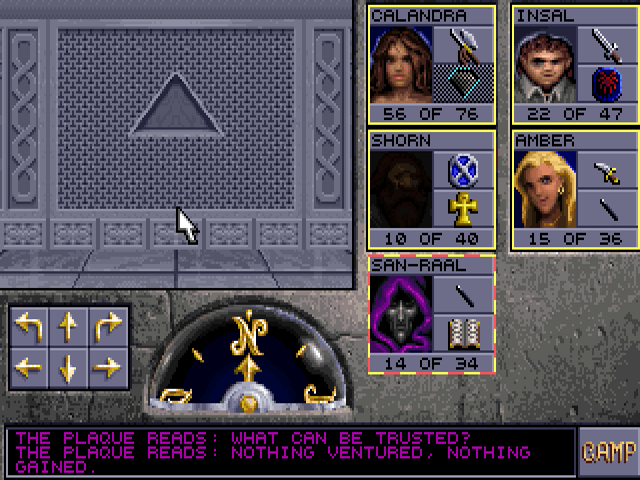
Both doors past a fork have teleporters behind them Since left and right are subjective directions, and he said you can only trust yourself at the start, west is the correct one that will take you to the stairs up. The east one will take you back to the stairs down and cause big damage to the party.