Toggle Background Color
Class Showcase: Princess


The Princess is a support class that can fill a variety of different roles. They have access to a variety of buffs to power up the party with. Or they they can go the infliction route and attempt to weaken their enemies with the wide variety of ailments they have access to. There’s also a 3rd route they can go to control enemies that are afraid of them to do the Princess’s bidding. All of which serve to make battles easier on the party.
This class has a unique attribute in that all of its portraits are flagged as female for the purpose of some side stuff in the game, instead of portraits 1 and 3 being flagged as male. If you’re just looking to complete the maingame, you don’t have to worry about any of this nonsense. (Remember that you can lie to the guard at the entrance of the Marlleaire Islands to get access to the place with male party members). But if you’re aiming to complete as much as you can or even everything in this game, just keep that little factoid in mind.
Stats
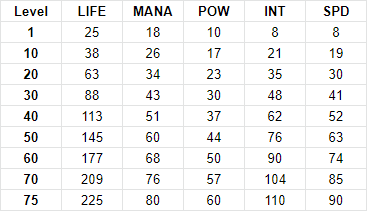
When it comes to stats, the Princess is very lacking in quite a few areas. Their defenses are pretty bad, as they have the 3rd worst LIFE stat and the 3rd worst POW stat. Said POW stat also means their offenses aren’t great already, but it gets even worse because Whips are outright the worst weapon type in the game, so their physical offenses are actually the worst among all the classes. It’s not all bad though, as their MANA and INT are the 3rd best in the game. So they can cast their skills more often and take spell damage a bit better than some other classes. Their high INT also helps their healing capabilities a bit. They’re also the 2nd fastest class in the game, so they can cast their support skills really fast and will pretty much act before the enemy most of the time.
Statecraft
Skill Type: Passive
Maximum Level: 5
Prerequisites: INT Bonus – Level 8
Increases the amount of experience points in battle the party gets as long as the Princess is alive at the end of it.

Notes:
- Stacks multiplicatively with other instances of Statecraft.
- Affects Bloom Seed experience point payouts.
- The effects of this skill are applied after the level scaling is applied in the experience point formula.
- Has no effect on exp gained from crushing tough Bloom patches in the overworld that reward 1% or 2% of a party member’s max total experience points needed to reach the next level.
Statecraft seems like a no brainer, since it makes your party a lot stronger over the course of the game. Well, that’s a bit complicated and depends on your playstyle. One of the biggest issues is that the effects of this are a bit curbed by the level scaling aspect of the experience point formula in this game. And it’s very harsh if you’re overleveled, reducing this skill's effects to almost basically nothing.
As a result, if you’re the kind of player that wants to exterminate every last living dragon, this skill isn’t going to do a whole lot for you, and you’re probably better off spending that SP elsewhere. The sheer amount of dragons that you’ll be killing will already be providing so much exp to your party that a lack of it certainly won’t be a concern.
If you’re the kind of player that isn’t interested in taking after Emille’s mindset of scorching the dragon presence from Eden entirely, then this can probably help you from falling behind.
This skill works on Bloom Seeds, which can really be a big boon, but it’s up to you on if you want to invest in benefiting from a pretty rare occurrence. Of course if you’re using RNG exploits to farm as many Bloom Seeds as humanly possible, then it’s a different story and this skill can greatly speed up the farming.
Just be warned that the value of level ups decrease past level 75. While the level cap is set to 100, you stop gaining any stats past level 75, and level ups at multiples of 5 no longer grant 2 SP past that point. So if you’re around that level and are considering picking this skill up, my advice is to basically not do that.
Nobility
Skill Type: Passive
Maximum Level: 10
Prerequisites: None
Increases the casting speed of Nobility skills.

This is the mastery skill of the Nobility branch, which is all about directly buffing up the party to let them deal with enemies faster, or to protect them. This is the most reliable of the Princess’s toolkit, since the other branches revolve around ailments, and this one just involves buffs. Easiest way for the Princess to contribute a battle by far.
Most of the Princess’s buffs last for the entire battle once cast, so after they’re done setting up, they’ve got quite a bit of flexibility on what they could do next. For that reason it’s best to invest in their other branches to give them something meaningful to do so they aren’t just sitting around twiddling their thumbs.

Nature Song
Skill Type: Active
Maximum Level: 10
Equipment Needed: None
Speed Factor: 80
Prerequisites: Nobility – Level 5
Places a buff on the entire party that regenerates their LIFE at the end of the turn for the entire battle.

Notes:
- The regeneration activates before any Poison or Bleed damage ticks.
- The effects of the regeneration buff fully stack with Lullaby.
- EX has no effect on the regeneration.
Starting off, this is not really one of the better buffs they have. It’s okay early, but the 15 points of LIFE will get pretty outclassed later on in the game. Yes this is unfortunately not a percentage based heal, otherwise I’d be saying very different words about this skill right now. The sustain this provides isn’t a whole lot, and it’s not really necessary for parties that can complete fights fast. There’s also the fact that if you need healing, the Princess has far better forms of it.
That being said, if you have an incredibly defensive party, like a Sword Fighter with Attack Down, and a Knight, you can pretty much kill the enemies’ offenses with all the defensives you can stack, and use this song as a nice little undo button to whatever pathetic amounts of damage they deal after all that.

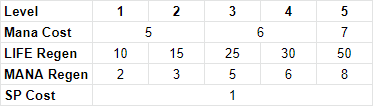
Moonlit Song
Skill Type: Active
Maximum Level: 10
Equipment Needed: None
Speed Factor: 80
Prerequisites: Nobility – Level 10
Places a buff on the entire party that regenerates their MANA at the end of the turn for the entire battle.

Notes:
- The regeneration activates before any Poison or Bleed damage ticks.
- The effects of the regeneration buff fully stack with Lullaby.
- EX has no effect on the regeneration.
Now this is more like it! MANA restoration is fairly limited in this game, as the best form of MANA healing you have are either Silver Waters, which are extremely rare and limited items, and Mana Waters, which only restore 15 MANA. So a level 10 version is just 1/3 of a Mana Water. This can help keep your party topped off while they go through a dungeon. You can just get into a non-threatening random encounter, and just wait as this tops off your party.
Now whether you use it in big fights is up to your party composition, since high offense parties won’t get much benefit from this. Though it can be very nice for a Knight that’s making use of Shield Crush, since that skill just obliterates their MANA pool.
Also yes, you are reading the table right. Six of the levels do effectively nothing, which is kind of weird since this is a game that has variable SP costs per level. Oh well.

Heated Words
Skill Type: Active
Maximum Level: 10
Equipment Needed: None
Speed Factor: 80
Prerequisites: Nobility – Level 1
Places a buff on the entire party that boosts their ATK for the entire battle.

One of the Princess’s best skills by far, and one that you should max out as soon as possible. Unless you only have Mages in the party. This is one of the few ATK boosting skills available to the player, and it’s extremely potent!
One thing to keep in mind with buffs is that buffs can be canceled out with a debuff of the same type, and vice versa, no matter what level the casted skill is at. Even if you don’t want to use this skill for whatever reason, invest at least 1 point in it to counter any ATK down debuffs that come your way.

Hard Words
Skill Type: Active
Maximum Level: 10
Equipment Needed: None
Speed Factor: 80
Prerequisites: Nobility – Level 1
Places a buff on the entire party that boosts their DEF for the entire battle.

Great for increasing your party’s survivability. By itself it might not do much, but you can stack this with the Knight’s Defenses Up, and their Shield skills to make your party ridiculously unkillable due to your sky high DEF stats. The damage formula makes DEF way more effective the more of it you can stack. For even more defensive overkill, a Fighter’s Attack Down skill can help make DEF even more effective by lowering their targets’ ATK stats.
Even if you don’t plan on making heavy use of this skill, you’ll want at least 1 point in it to nullify any DEF debuffs that get placed on the party.
Lullaby
Skill Type: Active
Maximum Level: 5
Equipment Needed: None
Speed Factor: 75
Prerequisites: Nobility – Level 3
Inflicts Sleep on one party member. A buff is also placed on the party member which regenerates their LIFE and MANA at the end of the turn as long as they are asleep. If the Sleep wears off for any reason, the buff is immediately dispelled.
Notes:
- The Sleep infliction is guaranteed and bypasses infliction calculation checks, so it cannot be prevented in any way, aside from not being able to override certain ailments already on the targeted party member.
- The buff constantly checks for the effects of Sleep on the party member. The moment the Sleep ailment wears off or is overridden by another ailment, the effects immediately end, even if Sleep is inflicted again on the same party member within the same turn.
- This can be used to dispel specific ailments since Sleep can override other ailments.
- The ailments that can be overridden are Confusion, Charm, Paralysis, and Blind.
- The ailments that cannot be overridden are Petrification, Skill Seal, Fear, Curse, Bleed, and Poison.
The effects of the regeneration buffs fully stack with Nature Song and Moonlit Song.
The buff’s duration itself has no limit, so the limit is tied to the Sleep’s duration, which has a 10% chance to last for 3 turns, a 40% chance to last for 4 turns, a 30% chance to last for 5 turns, and a 20% chance to last for 6 turns, resulting in an average duration of 4.6 turns.
The regeneration activates after the sleep duration counter decrements. This results in the regeneration not taking effect on the turn the Sleep naturally wears off, resulting in the buff itself lasting for an average of 3.6 turns.
EX has no effect on the regeneration.A bit of a quirky skill, but one of my favorite weird skills in this game. There might not be much use to this skill on the surface at first, but a bit of thinking can get some interesting uses out of it. The regeneration does stack with Nature Song and Moonlit Song, so you could use this for a pretty big burst of LIFE or MANA regeneration in conjunction with those skills. But if you want burst healing, the Princess has better skills. Because if you’re trying to heal someone with this, and they get hit in the same turn, the regeneration buffs won’t take effect.
The real draw of this skill I find is the ability to dispel Confusion and Charm, which are easily some of the most dangerous ailments in the game. While the Healer is capable of dispelling Confusion, they can’t do a thing about Charm unless they burn some EX on Miracle Cure. This is pretty much the only normal skill that’s capable of such a thing, so it’s absolutely worth taking at least 1 point in this skill to deal with that. There’s also Somanels later on in the game to deal with those statuses, but there’s no harm in having a cure on hand in skill form in case you run out of those items.

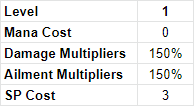
Angel Cage
Skill Type: EX
Equipment Needed: None
Speed Factor: 100
Prerequisites: Nobility – Level 10
How to Unlock: Open the treasure chest in the top floor of the western tower at Tower of the Gods.
Places a field effect that sets everyone’s elemental damage multipliers and ailment multipliers up to 150% for 3 turns.
Notes:
- Non-elemental damage is also affected by this skill.
- Instant Death is not affected by this skill.
- If a multiplier is below 150%, it is raised up to that amount. Immunities are still affected.
- Multipliers above 150% are not affected.
- As equipment bonuses are applied directly to any damage and ailment multipliers, their effects will be overridden by this skill.
- Resistance buffs are applied later in the calculations, so they stack with the effects of this skill.
- As this is a field effect and not a buff, it does not consume a buff slot.
- Field effects can only be canceled out by other field effects, such as Demon Cage.
- Despite having Nobility as a requirement, this skill does not benefit from Nobility’s casting speed boost.
Where do I even begin with this nonsense? This is frankly the most broken EX skill in the entire game. It’s not only a free massive 50% damage boost for elemental attacks and ensures that your Mage doesn’t have to resort to Mana spells to deal with stuff immune to their elementals, which is already strong enough on its own. But it works on ailments. Ailments! It does not give a damn about immunities too. Let that sink in. This skill turns almost any immunity into a weakness.
Skill Seal is one of the strongest ailments in the entire game, and it is rightfully hard to inflict, or even outright impossible to do so in big fights because it just completely shuts them down. Angel Cage just lets you waltz in and seal a boss’s skills without any trouble. Unconditionally. Oh and EX gives it priority, so everyone is basically guaranteed to benefit from it.
Hell, why stop at Skill Seal? How about Venom Boost strategies? You can just have an army of Healers go to town since they’re guaranteed to land their initial Poison.
Or make a Masked Pain Rogue’s life much easier by just setting up Pain stacks immediately and letting them spam Triple Kiss much sooner. And even ratchet the Pain counter up to 15 stacks while you’re at it! The shattered remains of the world is your oyster at this point!
Now primarily physical parties won’t benefit from this, and parties that can’t inflict ailments won’t get much out of this either, since this field skill will just be a pure downgrade for them as a result. And this affects everyone, so you’ll want to be careful about using this at the wrong time, or it can lead to a party wipe. That’s assuming you don’t go with the incredibly cheesy strategy of Angel Cage + the Fighter’s Tidal Wave EX skill for guaranteed safety. What a broken broken skill.
The Knight’s Ultima Guard EX skill also stacks with this, so that can be a way to stave off the defensive penalties, being lowered down to 112% after that. Just keep in mind it can’t do a thing about the increased ailment multipliers.
Because of how overpowered this skill is, I’m basically going make writeups and strategies assuming that players aren’t using it to serve as a sort of baseline. Because really, the effects of this skill speak for themselves.
Cruelty
Skill Type: Passive
Maximum Level: 10
Prerequisites: None
Increases the casting speed of Cruelty skills.

The Cruelty branch of the Princess’s skill tree is more focused on debilitating enemies rather than directly supporting the party. This branch is all about inflicting ailments to bring down your enemies. It can be a bit unreliable, but don’t fret too much. There are a bunch of bones the game throws you to help ailments be more reliable.
The biggest one you have against Dragon type enemies is the Bloom factor. Clearing out the Bloom around a dungeon can grant up to a 1.3x boost in ailment success rates. Not only that, each failed infliction attempt makes it easier to inflict that particular ailment on your next attempts, as a bad luck mitigation factor. Each failed attempt adds 0.2 to a multiplier and only resets upon a successful infliction. You can also use EX to essentially get 2 infliction attempts in 1 turn. And of course, there’s the Axe Fighter’s Status Down skill to make landing ailments more likely. Knowledge of these mechanics can help a Cruelty Princess be a lot more reliable at debilitating your enemies, so take advantage of these little mechanics if you need to.
The speed boost of this skill is higher than Nobility’s, but the speed factor of most Nobility skills are set to 80, and with a max level speed boost it’s effectively set to a speed factor of 100. Cruelty skills have a speed factor of 75 for the most part, so this essentially sets their speed factor to 97.5. So they’re a bit slower than Nobility skills overall.
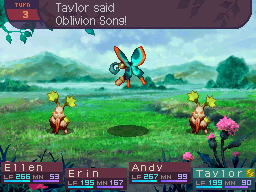
Oblivion Song
Skill Type: Active
Maximum Level: 10
Equipment Needed: None
Speed Factor: 75
Prerequisites: Cruelty – Level 3
Attempts to inflict Sleep on all enemies.

Probably one of the best skills for dealing with random encounters, as they aren’t resistant to ailments at all. Assuming you want a dedicated skill for that anyways.
As for big fights? Sleep is a pretty hard ailment to inflict on dragons and bosses because it’s pretty much a turn loss for the targets if it lands. You could also use Sleep as an additional damage boost if you can pull it off, but again, the high resistances to it make it a bit tough to execute. But a handy strategy to keep in mind.
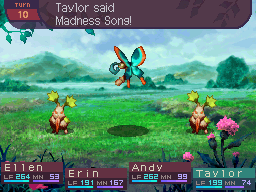
Madness Song
Skill Type: Active
Maximum Level: 10
Equipment Needed: None
Speed Factor: 75
Prerequisites: Cruelty – Level 3
Attempts to inflict Confusion on all enemies.

Another incredibly powerful ailment to make use of, and one I would probably take over Oblivion Song for big fights, as the resistances to Sleep and Confusion are about the same. Locking out dragons and bosses out of several turns instead of just 1 is pretty huge. It’s one of the longer lasting ailments too, so inflicting this can be a huge game changer.
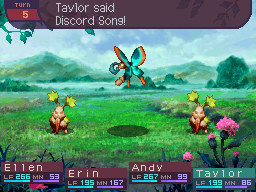
Discord Song
Skill Type: Active
Maximum Level: 10
Equipment Needed: None
Speed Factor: 75
Prerequisites: Cruelty – Level 5
Attempts to inflict Curse on all enemies.

Notes:
- Backlash damage from Curse is equal to 10% + (Curse Power * 8%).
This is the only player skill in the entire game that can inflict Curse. And if you’re wondering if it fares better here compared to its sister series Etrian Odyssey, no. Curse is pretty awful here too. And for some reason, it’s nerfed. 50% backlash damage was already pretty terrible for players in the EO series, and nerfing that for players makes it even worse here! Enemies deal less damage to players than players deal to enemies since players have much smaller LIFE pools than they do. So as a result, Curse tends to be even worse than Poison for damage over time ailments. Even if you do land the Curse, it’s one of the shorter lasting ailments in the game for some reason, only lasting for 2 to 4 turns instead of 3 to 6 turns.
So obviously it’s a simple skip, right? Hold on, because I’m not done yet. There’s one situation in where this skill really shines. Discounting Stun, Curse is actually the easiest ailment in the game to inflict, along with Paralysis. This actually makes it an excellent ailment to use for Masked Pain Rogues to build up Pain stacks more easily to let your Rogue use Triple Kiss a lot sooner!
Yeah the Curse effect itself sucks pretty hard. The idea of scaling Curse damage isn’t a bad one, but certainly not exactly executed well in this game. Still, it’ll get its time to shine eventually, in a later game, but that’s a tale for another time.
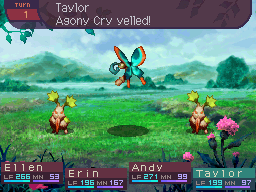
Agony Cry
Skill Type: Active
Maximum Level: 10
Equipment Needed: None
Speed Factor: 85
Prerequisites: Cruelty – Level 1
Attempts to inflict Stun on all enemies.
Stun is a bit of a questionable ailment to make use of on most damage dealers, however on a support, it has its uses. Depending on how your Princess is set up, they may not have much to do during their roles. So if they have downtime and your party members are slow and you just need some quick speed control on your side, this skill is a valid option for that, as most enemies don’t resist Stuns. Aside from Bloom Seeds, so don’t bother trying to use this to slow them down.

Bloody Cry
Skill Type: Active
Maximum Level: 10
Equipment Needed: None
Speed Factor: 75
Prerequisites: Cruelty – Level 8
Attempts to inflict Bleed on all enemies.
Bleed isn’t one of the better ailments to use early on, but later on it can help contribute some nice damage, especially in slower paced parties. Parties that can deal with big fights faster will likely not have much need for this, and Bleed isn’t a super easy ailment to inflict. So it’s not one of the better evil songs to use, but it is a possible damage option if you really need it.

Demon Cage
Skill Type: EX
Equipment Needed: None
Speed Factor: 100
Prerequisites: Cruelty – Level 10
How to Unlock: Open the treasure chest in the top floor of the eastern tower at Tower of the Gods.
Places a field effect that sets everyone’s elemental damage multipliers and ailment multipliers down to 75% for 3 turns.
Notes:
- Non-elemental damage is also affected by this skill.
- Instant Death is not affected by this skill.
- If a multiplier is above 75%, it is lowered down to that amount.
- Multipliers below 75% are not affected.
- As equipment bonuses are applied directly to any damage and ailment multipliers, their effects will be overridden by this skill.
- Resistance buffs are applied later in the calculations, so they stack with the effects of this skill.
- As this is a field effect and not a buff, it does not consume a buff slot.
- Field effects can only be canceled out by other field effects, such as Angel Cage.
- Despite having Cruelty as a requirement, this skill does not benefit from Cruelty’s casting speed boost.
Angel Cage is broken as hell, but Demon Cage shouldn’t be overlooked because of that. It’s perfect for parties that can’t benefit from Angel Cage, such as physical oriented parties. They won’t be penalized by the effects of this skill, and they’ll definitely appreciate the increased defenses to elemental damage and this is one of the few ways to provide defenses against ailments for your party.
That being said, elemental attackers and inflictors definitely won’t appreciate this skill going up at inopportune moments. It’s probably best to time this skill to go up after landing an ailment you want if you have to use Demon Cage with ailment users in the party. Like with Angel Cage, use it if the benefits outweigh the penalties, though unlike Angel Cage, this skill doesn’t have an easy way to bypass its downsides.
If you have a Knight in the party, you can stack the effects of Ultima Guard with Demon Cage to pretty much lower your elemental multipliers down to 56% for increased defense, while also providing some defense against physical attacks. This skill isn’t game shattering, but not being utterly broken doesn’t mean it’s not good. It’s definitely a worthwhile EX skill in its own right.
Dominance
Skill Type: Passive
Maximum Level: 10
Prerequisites: None
Boosts the attack power of Whips.

Notes:
- The effects of this skill will not be seen in the status, equip screens, nor the in-battle status screen.
- Dominance at level 10 will boost the strongest Whip in the game from 120 ATK to 156 ATK.
Dominance is pretty much a point sink as whips are one of the worst weapon types in the game. Their attack power is really low, and they just don’t do a lot of damage. It’s really more to unlock the Fear tree section of the Princess’s skills, where they can inflict Fear enemies and use certain skills to force them to do the Princess’s bidding.
Something to know about whips is that they ignore the back row damage penalty, so there’s no real good reason to have Princesses on the front row. That being said, they are still considered melee attacks for the purposes of counterattacks that trigger on melee attacks.
Now as for the Dominance branch, or Fear branch, this branch of skills is more focused on the Princess contributing with direct offense and revolves around controlling enemies with the Fear status. Fear on its own is nothing special, it just causes victims to not act on their turn 30% of the time, same as Paralysis. But the some of the skills you see here will only work on enemies inflicted with that ailment. Fear not, as no enemy aside from the Bloom Seed is immune to Fear, so their Fear skills will always work in any battle. Provided you can land the ailment anyways.

Terrorize
Skill Type: Active
Maximum Level: 10
Equipment Needed: Whip
Speed Factor: 90
Prerequisites: Dominance – Level 1
Deals melee ATK-based Slash damage to one enemy and has a chance to inflict Fear.

Pretty much the bread and butter skill of a Whip focused Princess. The damage modifier is fine, but as I’ve said before, Whips are the worst weapon type, so the damage from Princesses ends up being lackluster. Instead, the main draw is really the Fear, since you need it to activate their Fear skills. However, Fear is pretty heavily resisted by dragons and bosses due to how powerful the Fear tree skills are, since they all cause the targets to lose their turns. And Fear lasts for 3 to 6 turns once it lands, so that can end up winning you the fight very easily.
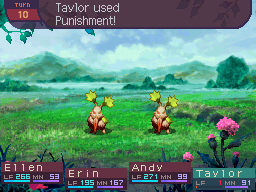
Punishment
Skill Type: Active
Maximum Level: 10
Equipment Needed: Whip
Speed Factor: 65
Prerequisites: Dominance – Level 3, Cruelty – Level 3, Terrorize – Level 3
Deals melee ATK-based Slash damage to one enemy. Damage is based off of how much LIFE the Princess is missing.

Notes:
- The damage is equal to (Max LIFE - Current LIFE) * Power.
- This damage is fixed and cannot be altered by any means after initial calculations are finished.
- The attributes of this skill being a melee ATK-based Slash attack only matter for the purposes of defensives and counterattacks.
- While Defensive skills can trigger on Punishment, Punishment’s damage cannot ever be reduced or nullified by them due to being fixed damage.
- The highest amount of LIFE the Princess can ever have is 348. This results in the maximum possible damage for Punishment being at 1388.
Now if you want your Princess to be a direct attacker, this skill is what you want. It’s a risky way for them to attack, but it’s the one that lets them contribute the most damage.
Damage equal to quadruple the amount of LIFE you’re missing sounds nuts, but this is constrained by LIFE pools not really getting all that high in this game. As I’ve said in the notes, the Princess’s LIFE can only go up to 348 with all possible boosts, and I do mean every possible boost. Still it’s a respectable amount of guaranteed unresistable damage, so this a pretty good, if a bit hard to use skill. It’s super easy to set up too. Just walk over the Bloom for a while to lower the Princess’s LIFE to 1. Though if you’re playing on the USA patch, this will be more annoying to set up since the Bloom doesn’t shave off as much LIFE there.
If you want a safe way of using this skill, use the Knight’s Guardian skill to ensure the Princess can’t ever take damage from direct attacks. Though depending on the roles your Knight and Princess took, this may not be an ideal setup. But if your Knight is mainly being a defensive unit instead of an offensive one, this can be a great way of dishing out the pain.

Stand For Me
Skill Type: Active
Maximum Level: 5
Equipment Needed: None
Speed Factor: 100
Prerequisites: Dominance – Level 8
Sends a command out to all enemies. Any enemies that are inflicted with Fear will not act at all for the current turn. In addition, any time the commanding Princess is about to take damage from an attack, an affected enemy will take damage in the Princess’s place instead. Has priority.

Notes:
- If multiple Princesses use this skill, affected enemies will protect all the involved Princesses.
- If multiple enemies are under the effects of this skill, then one is randomly selected to defend the commanding Princess.
- If the Fear status is overridden by a different ailment before the enemy can act, they will not protect the Princess and simply lose their turn.
- The Knight’s defensive skills take priority over this and will override the effects of Stand For Me.
- Stand For Me has priority over counterattacks such as the Veil buffs and will prevent them from activating, unless the Knight’s defensive skills activate instead.
- The redirection only occurs if the Princess is about to take damage from an attack. If the attack misses, the enemy will not take the attack for the Princess.
- Attacks that are blocked due to dealing low damage aren’t considered missed attacks, and will be redirected.
The involved enemies stats and the resulting attack are run through the damage formula normally with no adjustments.
Secondary effects from the attack can activate on the bodyguarding enemy.
Attacks from Confused or Charmed party members will not be redirected toward an enemy.The first of the Fear related skills, and frankly the worst one. You pretty much need multiple enemies in the battle to benefit from the redirection effect, and most battles that have that happen are random encounters, of which there are far better ways of dealing with. Not only that, the redirection only happens if the Princess gets attacked, which is not going to happen too often in normal circumstances. You need to set up Provoke with the Princess, which is just a lot of set up for such a situational skill. While using this does cause affected enemies to lose their turn, the other Fear skills also do that in addition to having better effects.
I’ll also note that the Fear skills only work on the current turn, not for the entire duration the Fear status lasts for. So you need to keep casting them in order for the effects to constantly activate.

Kill For Me
Skill Type: Active
Maximum Level: 5
Equipment Needed: None
Speed Factor: 100
Prerequisites: Dominance – Level 5
Sends a command out to all enemies. Any enemies that are inflicted with Fear will attack a random enemy with a basic attack, including themselves, instead of doing their normal actions for the current turn. Has priority.
Notes:
- This skill causes the AI to be temporarily be overwritten by using a basic attack on a random enemy. As a result, multiple uses of this skill in one turn do nothing.
- If the Fear status is overridden by a different ailment before the enemy can act, they will not attack and just simply lose their turn.
- The basic attack has all the same properties of a basic attack on a party member, and are run through various formulae accordingly.
- The basic attack can crit.
- The basic attack can miss on other enemies, but not on themselves due to how the accuracy formula works.
For who are familiar with how the Hexer’s skills work in the Etrian Odyssey series, this may surprise you to hear this, but this is actually the best commanding skill in the Fear branch. Namely because the competition is just worse. This one can target other enemies if there happen to be any, and if there aren’t, it’ll always cause the enemy to target themselves. So it’s good in both random encounters and big fights, the best of both worlds.

Die For Me
Skill Type: Active
Maximum Level: 5
Equipment Needed: None
Speed Factor: 100
Prerequisites: Dominance – Level 3
Sends a command out to all enemies. Any enemies that are inflicted with Fear will attack themselves with a basic attack instead of doing their normal actions for the current turn. Has priority.
Notes:
- This skill causes the AI to be temporarily be overwritten by using a basic attack on a themselves. As a result, multiple uses of this skill in one turn do nothing.
- If the Fear status is overridden by a different ailment before the enemy can act, they will not attack and just simply lose their turn.
- The basic attack has all the same properties of a basic attack on a party member, and are run through the damage formula accordingly.
- The basic attack can crit.
- The basic attack cannot miss due to how the accuracy formula works.
While this isn’t a bad skill, it’s just overshadowed by Kill For Me. Kill For Me is basically an outright better version of this skill, as unlike its sister skill Suicide Word in Etrian Odyssey, Die For Me scales horribly. The only thing that scales is the MANA cost, and not the number of hits like Suicide Word, so it always only hits once no matter what level this skill is at. The only benefits this has over Kill For Me is that it costs 2 less SP to snag, and that it can’t ruin Sleep related strategies since the affected enemy will only be able to target themselves. Which can only happen in certain dragon battles and random encounters, and the former situation won't be seen too often unless you have dragons constantly invade your battles. That’s it. A subjugated enemy isn’t going to do any harm, so if they can contribute damaging another enemy, that’s better than attacking themselves, which is why Kill For Me is better.
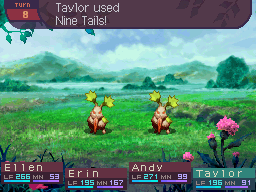
Nine Tails
Skill Type: EX
Equipment Needed: Whip
Speed Factor: 100
Prerequisites: Terrorize – Level 10
How to Unlock: Defeat the Sensualist on the eastern side of the mountains of Aizhen.
Deals melee ATK-based Slash damage to one enemy and has a chance to inflict Fear. The Princess’s ATK is boosted during this attack.

Notes:
- The ATK Bonus is affected by buffs and debuffs, but it is not affected by Dominance.
- The skill’s description saying the attack hits 9 times is merely flavor text. It only deals damage once.
This skill is terrible. I guess all the EX skills couldn’t be winners here. If you were hoping for a repeat of Earthbreaker, I’m very sad to say this is not the case. Unlike with Earthbreaker, the ATK bonus is not enough to make up for this skill’s lower damage multiplier. Well it can at lower levels, but at higher levels, it just falls off and even then the damage difference is tiny. The Fear’s infliction rate is also just worse than Terrorize’s, so there’s just so little reason to ever use this skill. Snagging this skill doesn’t even save SP, as you need to max out Terrorize to get access to this in the first place.
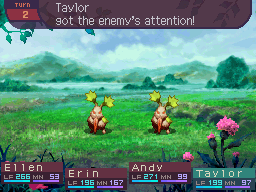
Provoke
Skill Type: Active
Maximum Level: 5
Equipment Needed: None
Speed Modifier: 80
Prerequisites: Nobility – Level 1
[Switch Skill] Places a buff on the Princess that provides a chance to force the enemy to target them. Lasts for the entire battle.
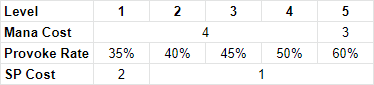
The following is a table of the probabilities that the Princess will be targeted when using Provoke in most relevant scenarios. This does not cover the case of using multiple Provoke skills.
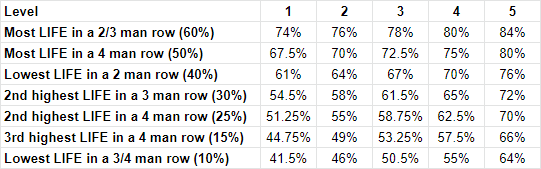
Notes:
- Takes effect immediately on cast as enemies decide who to attack when it’s their turn, not at the start of the turn.
- Provoke's check applies before any targeting checks, so enemies that normally attempt to go after specific targets can actually have their attacks redirected with Provoke active.
- If multiple Provokes succeed at drawing the enemy’s attention, the enemy will just attack one of the eligible party members randomly.
- This is a Switch Skill, meaning that the buff is unpurgeable. It cannot be forcibly dispelled by enemies, nor can it wear off from having too many buffs and debuffs. The only way to get rid of it is for the Princess to die.
This is a weird one. You might be wondering why in the world you would want your Princess to even draw aggro to themselves when they’re so fragile. The answer is namely to combo with their Stand For Me skill, since the redirection only activates if the Princess is about to take damage.
Outside of that situation? I’d say it’s extremely ill-advised. While the Princess is one of the tougher backline classes, drawing most aggro to them will still cause them to die very fast, especially since they don’t have that many defensive tools like the Knight has. Even if it’s not as strong as the Knight’s version of Provoke, drawing at least 60% of the aggro to them instead of the beefier front line classes isn’t what I would call a wise decision.

Royal Order
Skill Type: Active
Maximum Level: 5
Equipment Needed: None
Speed Factor: 90
Prerequisites: Nobility – Level 5
Inflicts the Wanted status on one enemy for 5 turns. This allows Knights to be able to use Save The Queen on Wanted enemies.

Notes:
- Wanted is a hidden ailment inflicted on the target. As a result, it is not considered a debuff nor does it consume an enemy’s buff slot.
- Fully stacks with other ailments.
- The Wanted infliction is guaranteed and bypasses infliction calculation checks, so it cannot be prevented in any way.
You know the drill. Since this skill requires a Knight to make full use of, don’t bother investing in it if you have no Knights.
This is pretty much purely to enable usage of Save The Queen, so the stuff I said in that Knight’s writeup about this skill pretty much applies here. It saves their MANA, at the cost of being forced to set this up on turn 1. It’s not ideal for random encounters, so if you’re opting to make use of Save The Queen, you’ll want some other ways to deal with that. It’s also not ideal to go with this if you have your Princess in a damage dealer role with Punishment, since that’ll cut into the amount of damage they could be dishing out through that method.

Cure
Skill Type: Active
Maximum Level: 10
Equipment Needed: None
Speed Factor: 80
Prerequisites: INT Bonus – Level 1
Restores one party member’s LIFE.

Like with the Knights, Princesses can also serve as nice Healer substitutes if you don’t have one in the party. And like with the Knights, they come with a beefed up version of the Cures to make up for the fact that they lack access to the Medicine passive. As I’ve said the other times, this is nice for the earlygame, but the healing falls off. Use Cure II instead once you’re past the earlygame.

Cure II
Skill Type: Active
Maximum Level: 10
Equipment Needed: None
Speed Factor: 70
Prerequisites: INT Bonus – Level 5
Greatly restores one party member’s LIFE.

An excellent staple healing skill and what they should be using later on in the game. This is pretty much the form of burst healing you should be using that I was alluding to earlier. The downsides of Cure II doesn’t hit the Princess as hard compared to a Knight. Princesses are very speedy, so the slow casting speed of this skill doesn’t set them back that much. And the higher MANA cost compared to the Healer’s version doesn’t hurt them as much since Princesses have a higher MANA pool and can use Moonlit song to recover MANA. If you have plenty of healing sources, then this isn’t a super high priority, and grab this whenever you wish in that case. But if you’re lacking in healing, then this is a must have.
Royal React
Skill Type: Active
Maximum Level: 1
Equipment Needed: None
Speed Factor: 80
Prerequisites: SPD Bonus – Level 5
[React Skill] Places a react buff on the Princess for 5 turns. While the buff is active, the Princess is granted an extra turn if another party member’s react skill activates.

Notes:
- This is a React Skill, meaning that the buff is unpurgeable. It cannot be forcibly dispelled by enemies, nor can it wear off from having too many buffs and debuffs. The only way to get rid of it is for it to wear off on its own, or for the Princess to die.
- If multiple Princesses have this skill active, all of their Reacts will grant them an extra turn when this React’s condition is fulfilled.
Being able to have 2 characters instead of only 1 act during an extra turn can be huge, but before you get too excited and invest in this right away, you need to keep in mind that the value of this skill depends on the React Skills available in your party. If you only have Mages, who is the only class to not come with one, or Princesses, who can’t activate this on their own, don’t bother learning this skill, it’ll be completely useless.
The Fighter’s Killer React is also not a great candidate for this, as it’s the worst React in the entire game, and there’s very little usage for this in most big fights. Only activating upon an enemy’s death sounds good at first, but this only applies to random encounters and not most of the bigger fights, so its use cases are extremely limited.
So what do we have left? We’ve got the Rogue’s Trick React, which triggers every time Trick Blade activates, which can only trigger 1 extra turn, but that’s good enough. Pretty much either means you get 2 actions there, or that the Rogue can be patched up without having to worry about burning up your extra turn on there. However, this gets more absurd if you use Trick React’s other condition, getting Ambush Crits from the Hiding buff. These have a 70% chance of occurring, but this makes this one of the few ways you can get multiple extra turns within 1 turn, which in turn, is a huge boon for the Princess as well. I’m sure you don’t need me to tell you what you can do with several extra turns.
The Samurai’s Pain React only activates each time the Samurai loses 25% of their maximum LIFE from a single hit. Which pretty much means the Samurai can either ignore the damage they took, or just patch themselves up without losing too much momentum. But a Princess joining in makes it easier to either gang up on the enemy while they can’t act, or patch up the Samurai themselves to let the Samurai go nuts freely within the extra turn phase.
The Knight’s Guard React rewards the Knight for making good use of defensive skills, so they’re already going into the extra turn phase with a lot of momentum to do whatever. And of course, your Princess can join in on the fun too. While they can only get 1 extra turn per phase, it’s by far the most flexible of the bunch since the Knight will typically be in a great position during this time. Heck it might even be a good time to set up for Save The Queen here if you have access to that skill.
Finally we have the Healer’s Rescue React. This one pretty much is used to allow for the Healer to instantly revive a party member without having to waste a normal turn phase to do so. But that’s pretty much all you can use the extra turn phase for, as leaving them dead is just a huge setback for your party unless the fight’s about to end. Royal React changes that, and allows this particular version of the extra turn phase to be more flexible.
Be warned that extra turns can still activate even if the Princess is Confused or Charmed. If you happen to trigger a React that also triggers Royal React in the process, you might want to get those ailments off the Princess before she can do any major harm.
The Princess can be a very strong support that can turn the tides of battle in your favor. There are quite a few roles they can fill, so they’re a pretty flexible support can fit into lots of teams, and it’s pretty hard to go wrong with them.