Toggle Background Color

Loading screens give gameplay hints and tips. Sometimes they're really badly timed. This particular hint won't even come into play until act 3. We're not even into act 1 yet.
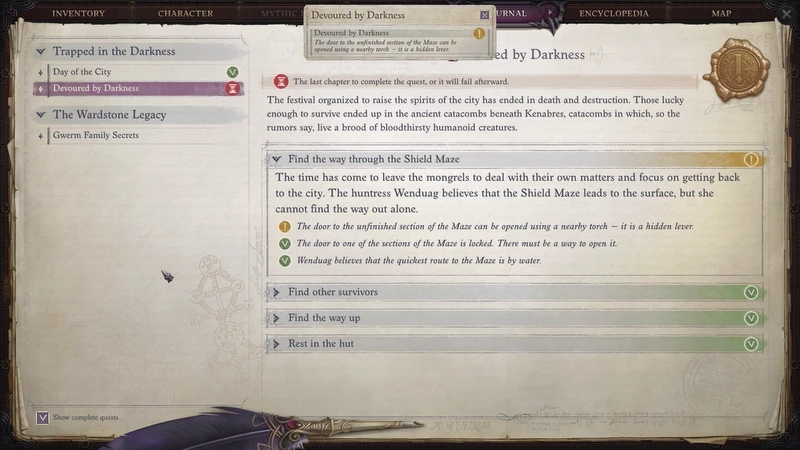
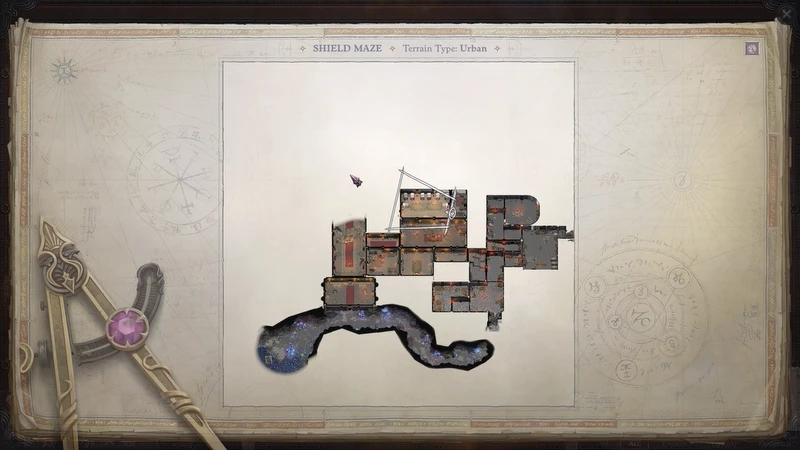
Anyway, hello everyone and welcome back. Today we're going into the Shield Maze.


Let's set up the formation first. Seelah can't ride Cookie yet, so they'll take the lead while the rest of the party fans out behind them. Wendy is in the back because she's ranged support.

If we'd picked Lann, all the various Neather tribes would be assembled here, and they'd be waiting for the right time to move in. Lann would suggest we scout ahead to mark the way for them. But because we picked Wendy, it's just us by ourselves.

The door is wide open for Lann, but with Wendy we have to "squeeze through." I guess it's the difference between an outright assault and sneaking in. Enough about could-have-beens, however. I'm not as well versed in what they look like past this point, but I've done the Shield Maze some half dozen times or more.

The inside is pretty well furnished.
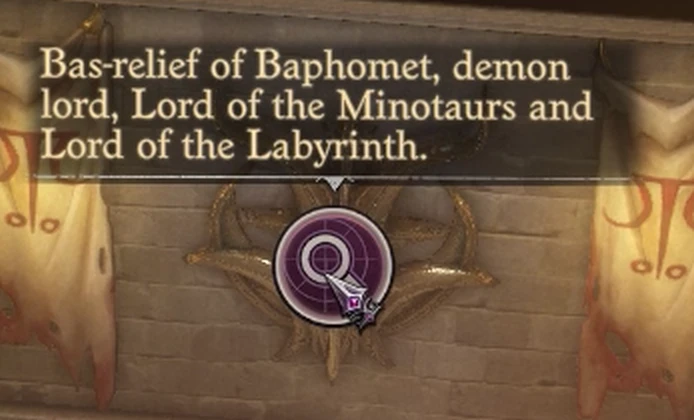
A well-carved bas-relief of Baphomet. Hmm...

I mentioned it before, but this isn't a maze. It's a temple. The way through isn't difficult, it's basically straightforward - there's only two major divergences from the otherwise linear path through the temple. And while it's true that those divergences are actually fairly lengthy, it's not exactly a complicated layout regardless. And we're forced down both divergences during exploration anyway.

The primary enemies in the maze are Baphomet cultists and their various buddies. I'm not gonna call out most encounters unless they're particularly noteworthy. So this should be a pretty brisk jog through the "maze."
Also didn't Wendy say that she had been in the maze multiple times? These cultists look pretty well established here. We'll see a little later on that they have a fully furnished kitchen, dining room, and barracks. So it's not like they're recent arrivals.
Curious...
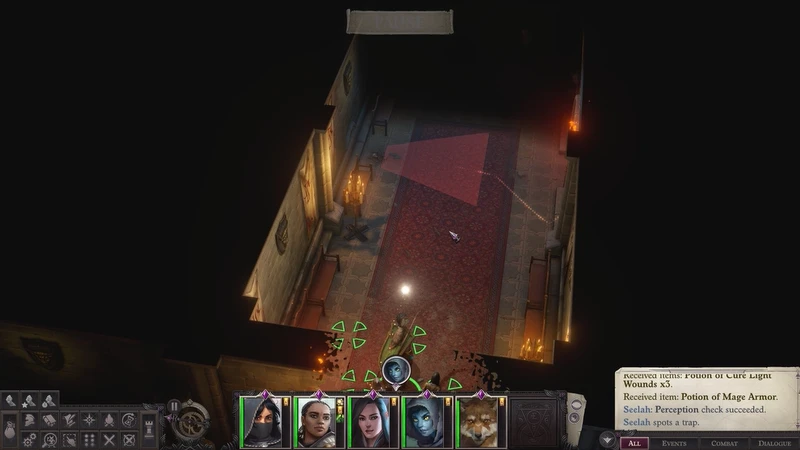
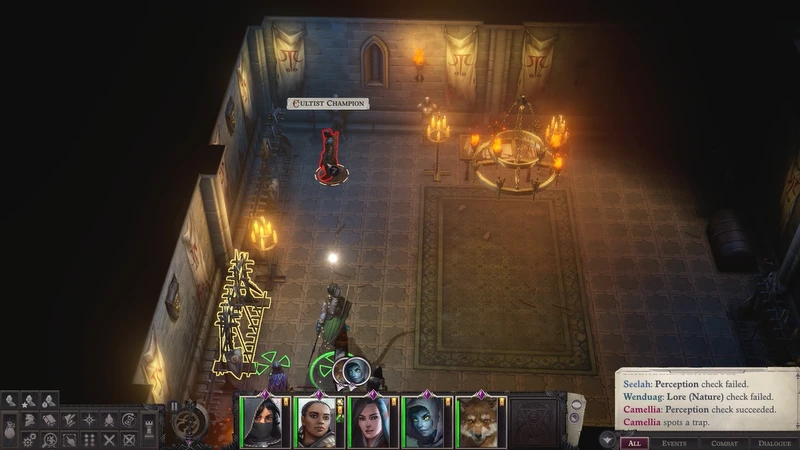
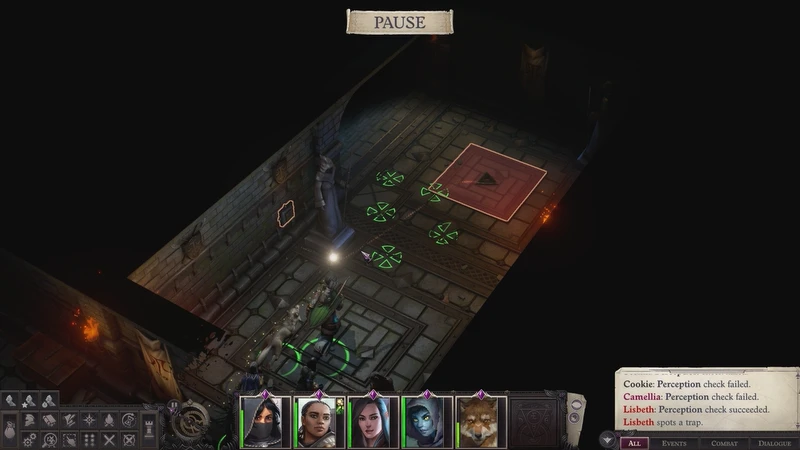
Let's take a closer look at that thing in the floor.

This little set piece is a really good tutorial without any words. Allow me to explain.

The orange-red thing on the floor is a trap, of course. By turning the camera into the wall, we can see exactly where the trap originates from (the little indentation in the wall), we can see its area of effect (the trapezoid), and we can see the disarming trigger (the switch on the wall.) I'm sure the game has a tutorial pop-up explaining it here, but I've turned those off and also forced off all tutorials in Toybox.
But even without the pop ups, once you realize you're looking at a trap, you can basically intuit everything important about it from this shot. It's quite clever in that regard!
Disarming traps uses the trickery skill. Camellia technically has a higher score than Lisbeth (13 vs 12) but both are more than enough to cover the entirety of the Shield Maze.

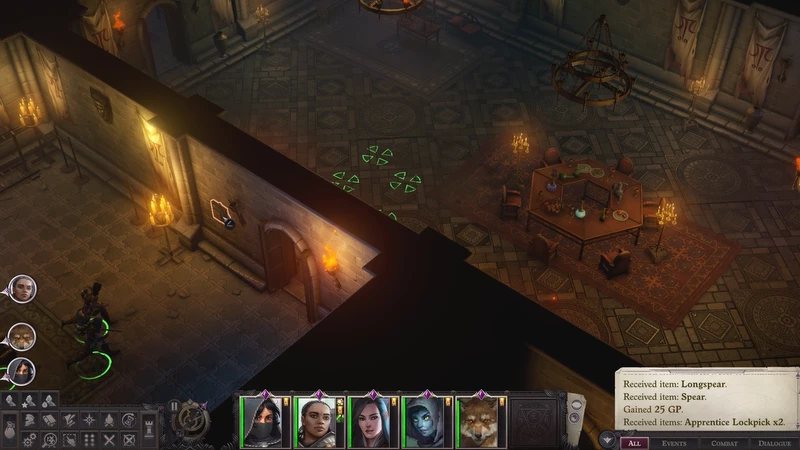
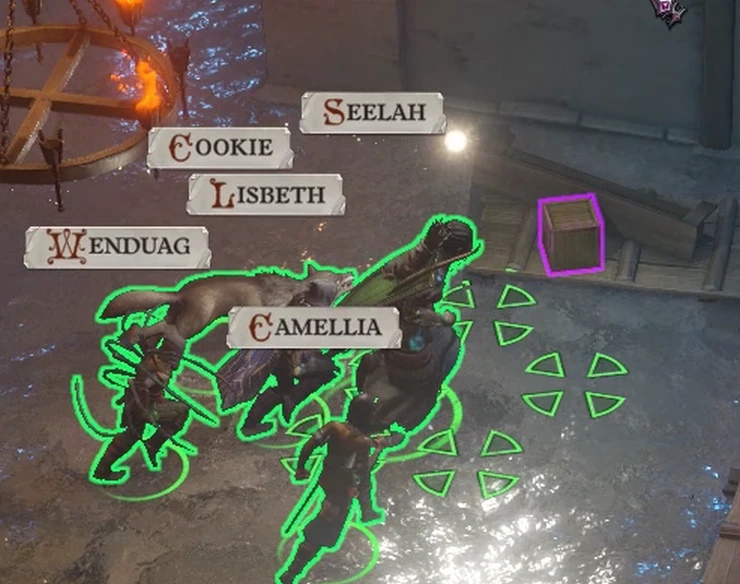
Moving on, we can see just why I love wolf/dog bully companions so much. Those attacks of opportunity are Seelah, Camellia, and Lisbeth all stabbing the shit out of this poor guy when he stands back up. Rare is the combat where you won't see an explosion of "Attack of Opportunity" appear out of the melee pile at some point! It's free damage and it happens a lot.

More evidence these cultists are well-established down here. Wendy got some 'splainin' to do.

Ahhh. This is something Toybox does that I really like. There's a million books you can read in the game, and most of them are just flavor text. But some special books will give you a small stat boost when you read them. Toybox will (or should) automatically flag those with a yellow background. It does the same thing for scrolls that your non-spontaneous casters haven't yet learned.
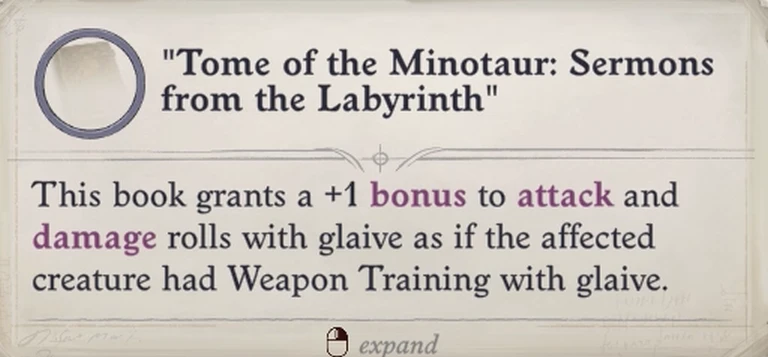
Free Weapon Training (Glaive)! Not entirely useful for Lisbeth, but I'm not gonna cry about a free feat.

This is either a dining room or a meeting room. And on the far side...

We find some Corrupted Mongrels. Very, very curious...

After we kill them, we talk to Wendy about it.
 Wenduag looks at the mongrel's corpse, her lip curling, and then turns away. "Well? Are we going or what?"
 "You never told me this maze was crawling with cultists."
"I didn't because there weren't any. Looks like they got here the same way you did — they fell from the surface."
[Perception check passed] "The Maze doesn't look like the mysterious place you've made it out to be. Looks more like a cultists' den to me, and a well-established one at that."
"The Maze has always been full of traps and subterranean monsters. And now it's got cultists as well. What does it matter to you?" Wenduag studies you with narrowed eyes. "I promised to lead you to the surface and that's what I'm doing. You do not belong here. Let's go." She turns away."
Gained 4 experience
Wendy is very obviously lying to us here. And Lisbeth saw right through it.
It's a very lovely place.

Anyway, this room has three exits. One of the major divergences I mentioned happens here. We need to go that way first anyway, so let's set out.
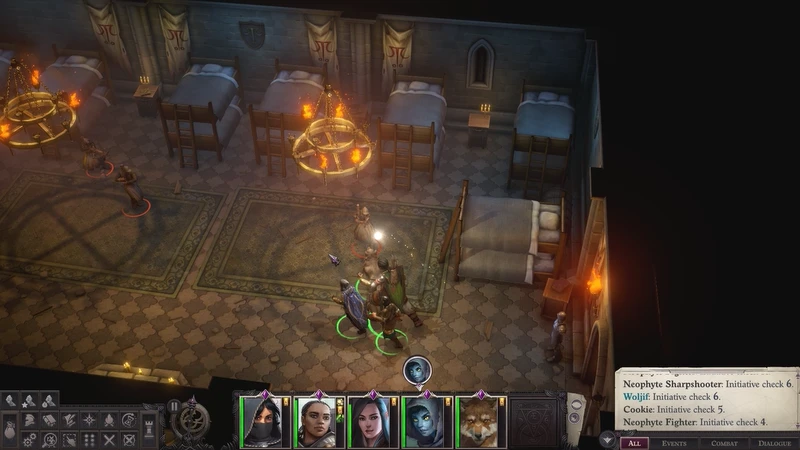
But first, another side room. This one is special because it has something of a mini-boss inside. Cultist Champions have a lot of AC, which makes them particular bastards to hit at level 2 like we are.

I put it on turn based to demonstrate, actually. Cookie rolled high on his initiative, so he went first. His first attack knocked the champion right over. Remember what I said about being prone?
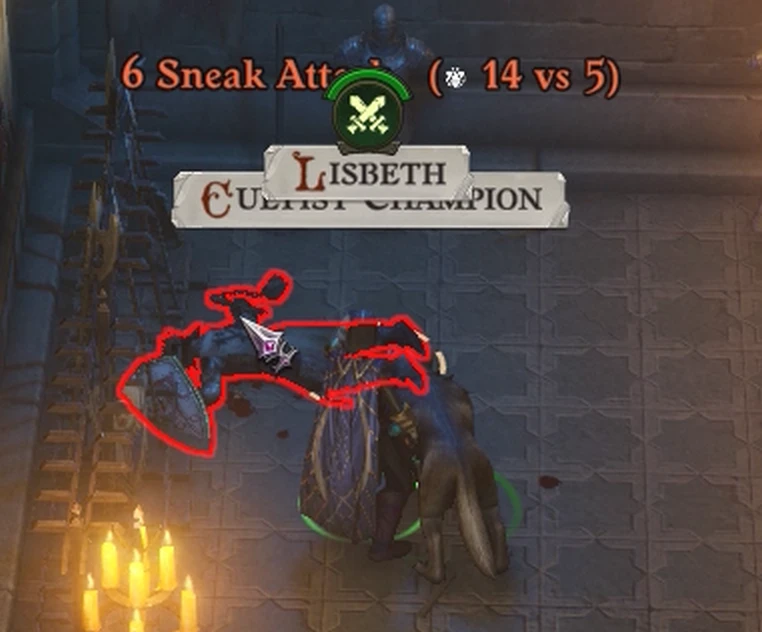
All the AC in the world don't mean shit when you're lying on the ground getting the shit kicked out of you.

Seelah, who is currently under the effects of Enlarge Person and the Light spell, is still in melee range thanks to her increased reach.

It never gets old. Also note that while the enemy does have maluses to AC while prone, you aren't guaranteed hits against them. Sometimes you just roll low.
While we're in this room, I mouse over a trap disarm switch on the wall. It controls the trap in the next hallway, so we'll just turn that off before we even see it.

Moving on, we descend some stairs into a flooded basement.
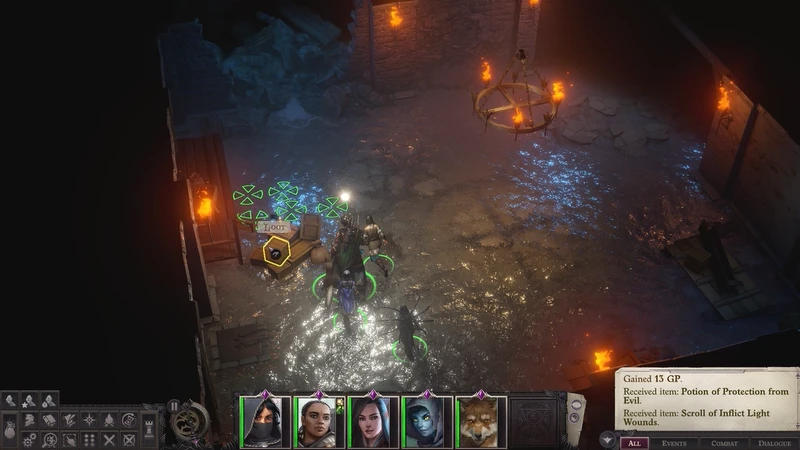
And a little further past that, we can see why. One of the walls has collapsed and water is flooding in through it.
Also there's this mysterious box. I had originally written up that I'd never been able to force my characters to spot it. But in the spirit of S C I E N C E, I have loaded up a prior save file and used Toybox to set everyone's perception to 250 base.
Even with 5 characters with enough perception to spot anything else in the game from clear across the map, the hidden spot still won't trigger. So it's probably legitimately just a bugged interaction.
There's a similar spot much later in the game. I'll point it out when we reach it.

We're tearing right through the hapless cultists without a lot of trouble. Outside of the rare mini-boss monsters, most encounters have trouble even hitting us before we merc them.


This encounter drops a magical ring. I think it's a +1 AC ring. But because the party is collectively not very good at arcane lore, nobody can identify it. We'll have to wait until we enter act 1 and get the next companion in a couple updates.

Deskari really messed up Kenabres, both physically and politically. The city, after this mini cataclysm, is in for some dark days ahead.

Anyway, the second basement is ahead. You can actually see the water cascading down both the stairs and the walls. So within a few days, this "maze" is gonna be unusable.


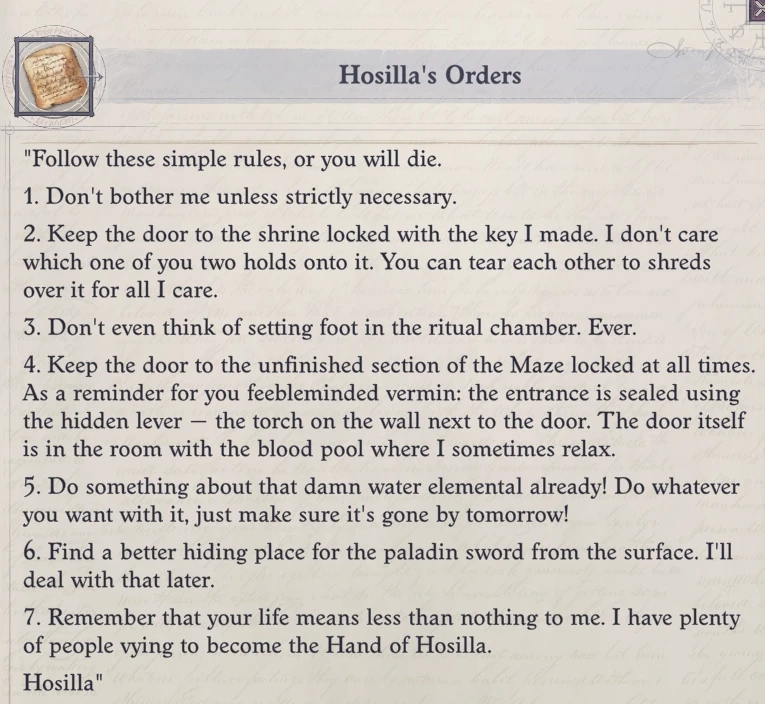
This person, the Hand of Hosilla, is our target.
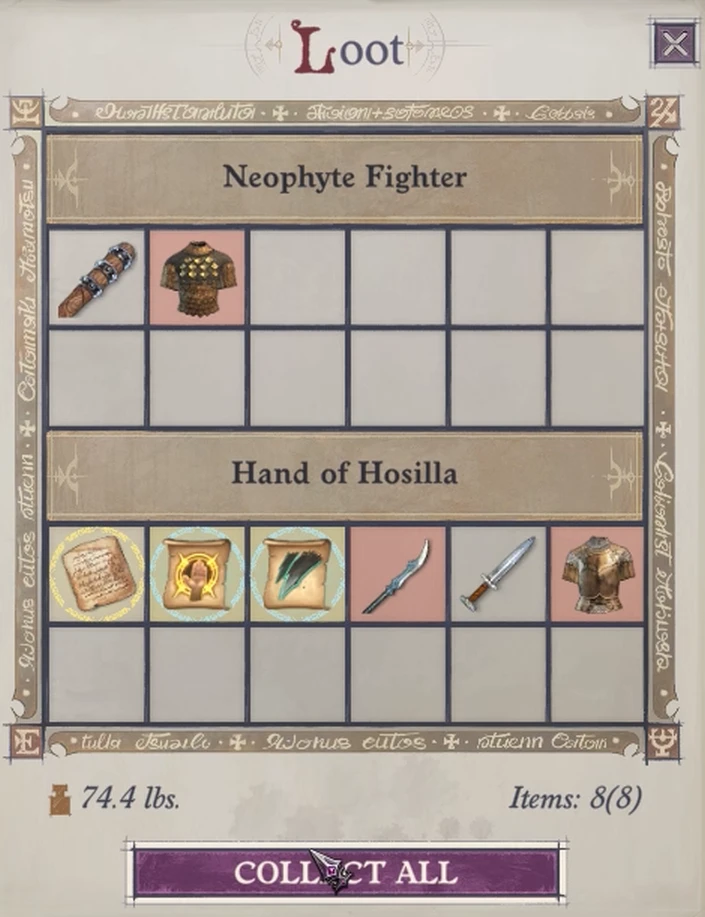
The note he's holding is what we're after!
What a nice lady.

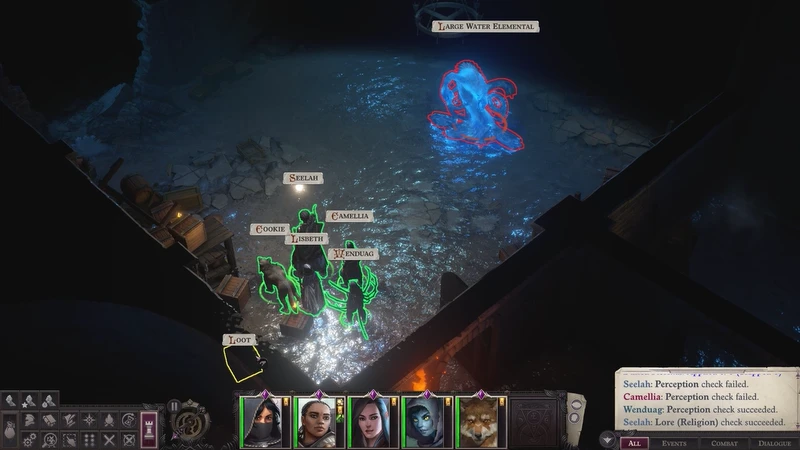
There are two fights remaining in the basement - this one and the water elemental mentioned in Hosilla's orders. This fight is pretty dangerous because it's a big group against our own.

Low level Pathfinder combat sucks. It's a million missed rolls and the ones that do hit are deadly as hell. Camellia went down during the fight and Cookie very nearly joined her. It was all thanks to the Brute enemy who hit like a truck and dodged like Ali. Once he went down, the rest folded like a house of cards. Our reward for finishing the fight?

"This door's got a strong lock on it. You'll break every lockpick you have and it still won't budge. Believe me, I've tried."


This is about the only decent reward in the lot. It's a pretty alright early-game scalemail, perfect for Seelah. But we can't identify it yet. So onto the pile it goes for now.

Before we take on the Water Elemental, I'm gonna have the party make camp. The buff spells ran out a while back and we've been feeling their loss ever since. We're gonna need to be at our best for the water elemental, who is an optional super hard boss encounter.

Hitting the 'R' key will bring out a ghost icon of the party's camp. Just stick it somewhere where it's green and...

As you might imagine, you can't rest in the ankle-deep water. That doesn't make for very good sleeping.
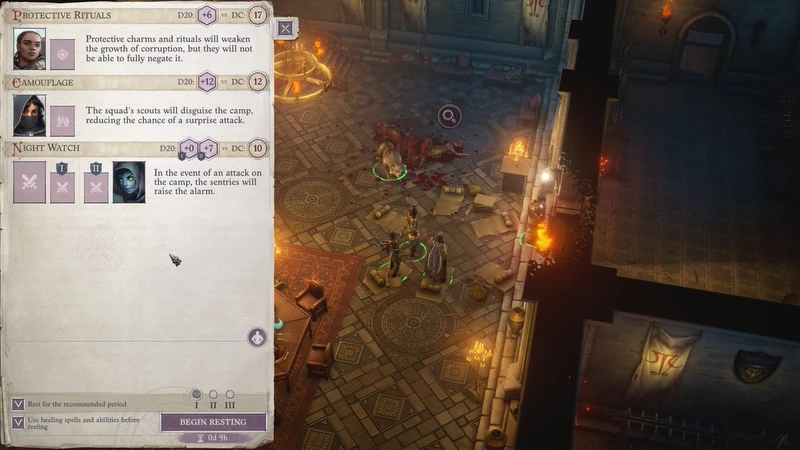
This brings up the camping menu. Seelah will do her best to put down protective rituals, Lisbeth will (somehow) camouflage the camp, while Wendy will take second watch. But wait... we're missing someone.

Against what I'm sure are endless protests, Camellia is not gonna get a free pass because she's "nobility" and "doesn't have to work." Her ass is taking the first night watch shift.
Everyone in the party, pets excluded, can only do one job. So while Lisbeth is better suited to doing night watch than Camellia, Liz is also the better person to do camouflage. Night Watch tends to be where those who can't do anything else wind up.

Time Passed: 1H 0M

Seelah is kinda dumb. Shaman wield nature magics like druids.
 "What does it matter where the power comes from? What matters is it's on our side."
Time Passed: 8H 0M

Corruption is a mechanic that won't pop up too much yet. It plays a bigger role later in the game as a way to mitigate you spending weeks out in the field. The short version is that Lisbeth (in particular) has a bar that fills when she camps out. This bar is how much the corruption of the Abyss is affecting her. The bar can be emptied if she rests in a sanctified location, or if she makes use of rare holy items to purge it. If the bar fills up all the way, we get a game over because, presumably, the corruption takes her over and kills her/transforms her into a demon.

Now that we're rested up, let's hit the buff button and get into a fight. I'll explain this later on when we have more than 3 spells to show off. But this is the Bubble Buffs mod. It automates casting buffs for you by casting them all simultaneously. It still uses daily spell slots to do it, so this is just streamlining what would otherwise be a tedious process.
 Dmitry V. Silantyev - Champions of the Abyss (This is one of my personal favorite tracks in the game!)

I put this in turn based mode too, but it's actually a pretty simple fight. You see, most enemies can be knocked prone. So all we need to do is get Cookie to land a single hit.
Camellia is trying to land Evil Eye (-AC) on the elemental, while Seelah is using this...

On reflection, this water elemental is not evil. So I don't know why I expected Smite Evil to work against it. But it's supposed to make enemies easier to hit. Most enemies in the game are evil, so this is a good tactic in most other situations.

This is why the water elemental is so dangerous. It missed three of its targets and crit two others. So Camellia and Cookie both immediately dropped to critical HP from a single attack.

Cookie doesn't successfully land a trip attack until turn 3, when most of the elemental's HP has been depleted. It dies before its next turn comes up.
During the fight, Lisbeth used her "Summon Nature's Ally" ability, which summoned a shade named "Woljif". Okay then?

More evidence this was a well-entrenched cultist base. Wendy's gonna have a lot of 'splainin' to do.

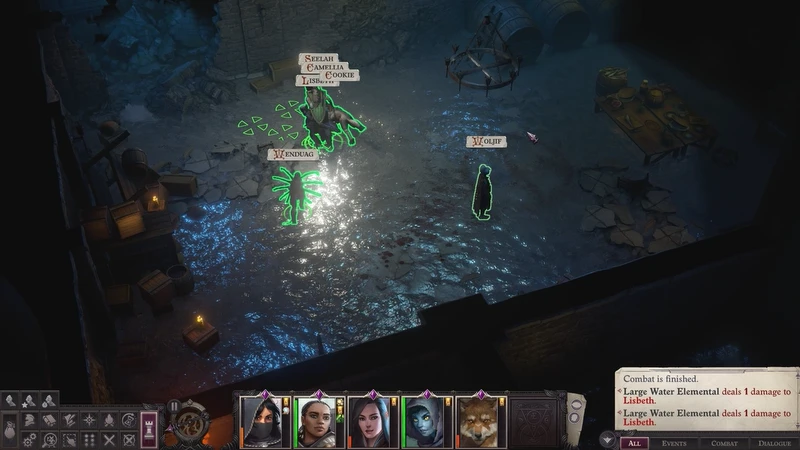
This ring is our prize for taking on the water elemental and living. It adds minor resistance to frost. I have never used it. This entire encounter is the definition of "absolutely not worth it."

Believe it or not, we're more than halfway through the "maze" now. All that remains is one smaller side branch and that's it. I originally wanted to cut the update here, because we've covered a lot of ground. Then I looked at the length. This update, right now, is half the size of the previous one despite covering 10x as much gameplay. So let's keep going.
This is the bunk room I mentioned earlier. Bear in mind that we're only two rooms away from the start of the dungeon. Most of what we've covered so far has been a gigantic technically-not-optional branch.
Take a look! We fought the elemental in the room on the far right. We entered in the middle bottom, above the winding cave passage.

Another cultist champion shows up in this small storeroom. He goes down like a chump thanks to Cookie.


A usable torch on the wall opens up a secret passage full of goodies junk. Seriously, this is the tutorial dungeon. We're not getting almost anything worthwhile out of the experience. We will find a weapon that, if I make Lisbeth Chaotic Good, will be best in slot for her.

This is the second half of the chapel we walked into at the start of the update. So all the progress we've made thus far has been closing the loop. There's no shortcut back, but running back, if we had to for some reason, wouldn't add much more than 30 seconds.

This is the blood pool that Hosilla mentioned. Lizzy decided to donate some of the cultists' blood to it.

And this is the torch Hosilla mentioned in her orders. We'll need to go in here to get a key to open the inner sanctum.

Straight across the hall. Business first, then exploring!

The second Hand of Hosilla is hanging out in here.

Wendy and Lann both said, as I recall, that this was an ancient maze. And yet these bodies look pretty fresh. I have no idea what's going on anymore.

This is an identical copy of Hosilla's Orders. Unless I'm mistaken, you can't get in here without finding the first copy. The key's what we're after anyway - it opens the way to the exit. And we could head straight there! But there's loot to be found first.

We find a wrecked cage in a nearby room full of monitor lizards.

Smashing a few jerks...

More junk in a hidden room...

And top top things off, a couple of earth elementals in this chamber. These are presumably the same ones that killed the maze builders.

If there's one thing the maze is good for, it's giving you a bunch of Cure Light Wounds potions.
This looks like progress, but it's not. This leads the way to a pretty hidden side chamber, and the whole reason we even came this way in the first place.

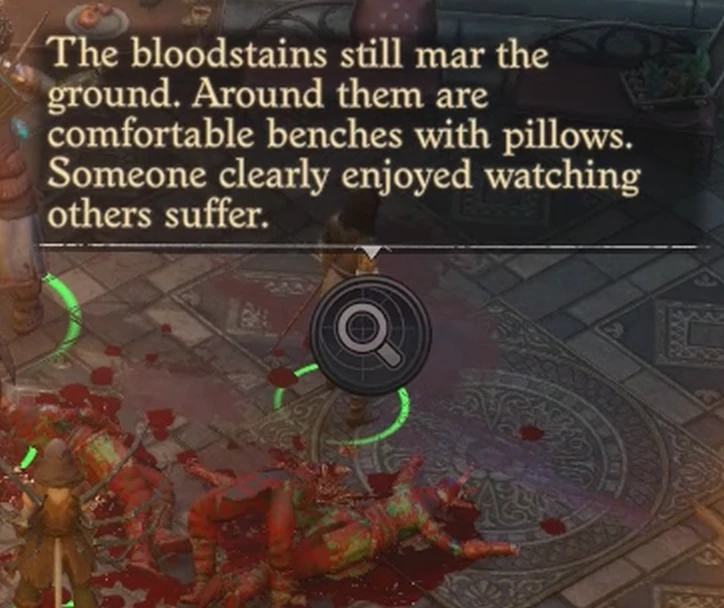
This nasty torture chamber has some trash enemies, sure.

But it also has a little puzzle in it. If I were a better LPer, I would have secretly shown the answer to this earlier. The answer was just out of sight in a screenshot much earlier in the update. Let's go take a look!

This was in that big meeting chamber... the one we camped in. Yellow-Blue-Red-Yellow. Easy enough!


Inside, a cutscene takes over.

Liz and Seelah walk up to this altar, and Seelah touches it.
Dmitry V. Silantyev - Crusade Victory Theme
 Seelah peers closely at the sword, which seems utterly unexceptional to you. "Wait, this is... No, it can't be!" Her eyes light up. "I know that hilt! Radiance, the sword of the great Yaniel, that's what this is. But... it's meant to be in the Tower of Estrod with all the other relics... That's what I heard, at least."
"Well, of course this rusted piece of metal must be that very same sword!" Camellia rolls her eyes. "I think you merely wish that this were the illustrious sword of legend."
"You don't get it — I've seen this sword a hundred times, in paintings and in the hands of the Yaniel statue. I've even thought of going to the Estrod museum to see the real thing in person... How did it get here?"
Items Received: Radiance
"What's so special about it?"
Seelah frowns. "Now... nothing, I guess. But this sword was legendary in its day! People say that when Yaniel held it, the blade would glow, striking demons left and right. Soldiers would see Radiance's light from afar and take heart, rushing into the fray and winning. But I don't know what's wrong with it now, or how to restore its power. All I can sense is that they made a mockery of it."
"You're empathizing with an object? Extraordinary. Are all paladins so tender-hearted and sensitive?"",
"Sensitive in a way, yes. We're highly attuned to evil and everything wrought by demons. Radiance was in evil hands, and, as a paladin, I can tell you they did nothing good to it."
"Who's Yaniel?"
"No! You've never heard of Yaniel? She's famous all over Golarion! She was a great woman. She was born in Mendev, and when the crusade started, she couldn't just sit idly by. She dedicated her life to the crusade. People say she was audacious and spirited: she was always the first into battle and she never sacrificed other peoples' lives for a tactical advantage."
"That's how she's been remembered: as an incredible warrior who seemed to blaze with righteous fury. In all the images of her, she looks capable of driving all the demons back to the Abyss single-handedly! But then something happened between her and her commanders. Maybe they envied her, maybe there was more to it than that, I don't know. But anyway, she went into the Worldwound without her fellow soldiers... and she didn't just survive the mission, she even brought back crusaders she rescued in there! Can you imagine?"
"She died as she lived — proudly. She was covering the escape of the refugees fleeing Drezen — that's where she perished. She wasn't even forty, very young for a half-elf. But I guess I don't have to explain that to you! You half-elves live twice as long as we do. If you think about it, the crusades aren't even a hundred years old. That's how little time separates us from the heroes of legend. Yaniel could still have been alive today... But fate decided otherwise."
"You know a lot about Yaniel. Are you a fan of hers or something?"
"I suppose you could say that." Seelah chuckles. "I've always felt an affinity with Yaniel. I know what it's like to not be what your commanders want you to be. Whenever I used to feel under pressure, I always thought of Yaniel: maybe some people didn't like how she was, but to the people she pulled out of the Worldwound, she was perfect. And to the people she saved on the battlefield, she was incredible. And to those who keep her memory alive, she is a hero. That's what counts."
"How could a priceless relic end up down here?"
"Yaniel disappeared, but by some miracle Radiance was recovered from the battle. No one else has ever wielded it — it is Yaniel's blade and always will be. That's why it was put in the Tower of Estrod with the other crusade relics. But now it turns out that somebody stole it..." Seelah laughs. "I have this weird feeling, like I'm rescuing a fellow warrior from a dungeon. We can't just abandon it, even if it's no use to us. It's no use to anyone down here. But what if it could be repaired?"
"Let's keep going."

Right now Radiance is still a scythe because of the nature of the GreatRadiance mod. But we can easily change that, and I'm aiming to do so! But I'm also going to work on getting Lisbeth up to Chaotic Good so she can use it in her main hand. As we progress through the game, Radiance will occasionally upgrade. And when it does, it's always spectacular. In the hands of a good-aligned hero, it becomes a best in slot demon murdering implement.

Alright, all the way back out we go. We're going clear across the hall in that large chapel, to the door opposite where we just left. In here are some Dretches and a demon summoning ritual circle. Dretches are super low level demons, but they're priority targets all the way up through the end of the game. You see, Dretches are one of the few demons that are likely to cast crowd control spells that shut down a large chunk of your party.


For the sake of keeping these short, I'm gonna call the update here. The end of the dungeon is just through that door, but there is a lot of talking coming up. I saved before and after the upcoming bits and there's more than 25 minutes of difference between the two saves!
So join me next time when we confront whatever evil lurks at the end of this maze, and then hopefully escape up into Kenabres.
Encyclopedia Golarionnica
Tome of the Minotaur - Sermons from the Labyrinth
Hosilla's Orders
Almost New Diary
Drezen