Toggle Background Color

Okay, off to City of Haze! Rather improbable that the first portrait in vanilla turned out to be the first portrait I go to in a portrait shuffle randomizer...

I run into a Sand Worm first thing; it's nothing noteworthy, but there is a Wight (upgraded Zombie) in the same room to hassle me. Least that Wight makes this a decent room for skill grinding, though I know from my test run that there's a better room here so I'll hold off.

I remember when Mummies dropped these. Too bad nothing drops them in this seed...

Yes, I can enter that portrait down there from here; no, I'm not going in there yet. I just got here!

MP boost in the butcher to the top-left of that portrait. It's full of Mummies; it's annoying when they spawn behind me since homing spells seem to prioritize them even though they can't hit them.

That's a cheap trick. Yes, getting hit by that thing immediately after exiting the portrait is unavoidable.


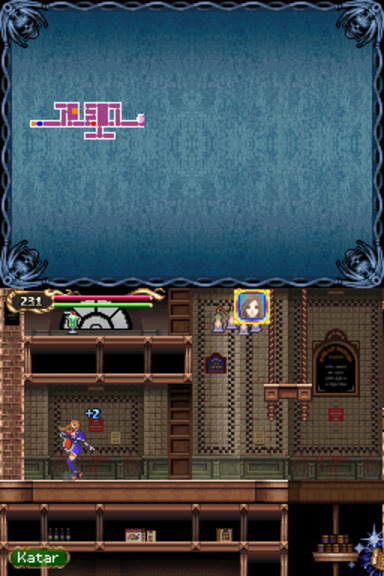
It takes a bit of convincing (I'm using Jonathan here because he actually has Luck to boost drop rates), but I get some shoes from a Skeleton below that pest. They're... better than nothing, at least?


Well, they certainly do something, so the meme does not apply. Doesn't make them good, though.
Also, I just remembered that I meant to check the shop first thing; oh well, it can wait.

The important thing is that it isn't moldy.


This secret room's Negligee isn't particularly useful, but it is usable by both characters.

Note to self: This doesn't actually unlock anything without the other pushing relic. That tripped me up in my test run; I had to look it up to find out why it wasn't working.

Secret rooms within secret rooms. This is a ground-only subweapon, but it's still less awkward than the Grenade and Holy Water.
The room also has various consumables in the back, obtained by smashing a chandelier into the bakery's cash register. I get a Wheat Roll, a Mille-feuille, a Sachertorte, and an NY Cheesecake here (in 4 trips, conveniently enough), though there're no screenshots because they aren't randomized.


There's also a Frozen Shade outside the initial secret room, which drops this unimpressive hat...


...and, after a false alarm involving the drop getting stuck in a wall, Cure Curse. Which is unhelpful because if you're cursed you won't have enough MP to cast this.
Speaking of spells, though, Thor's Bellow is sitting in the top-right corner of the room.
On a tangentially-related note: It feels weird that Spirit of Light actually kept its Holy element, and weirder that it didn't pick any others up with it. Richter Grand Cross and Byakko are Whip/Slash/Fire/Holy and Ice/Elec, respectively, but I doubt I'll have any cause to use either of them.


Pick up a Co-Op move to the bottom-right real quick before progressing.
To the top-right, there's another spell behind an Invisible Man; it's pretty good, but I still prefer Gale Force.


Respectively dropped by a Flying Skull and a Slime.


The Skull also has this, which... is bad.


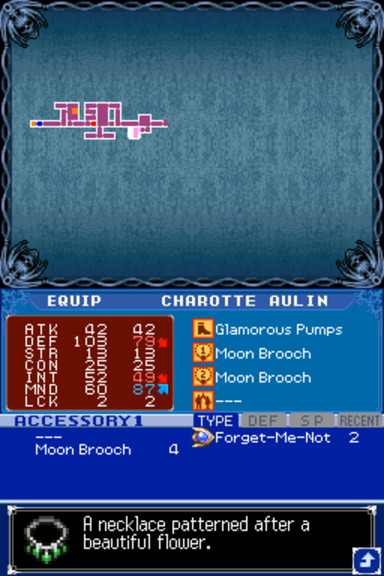
The Slime's second drop, on the other hand, is a pretty good accessory. I'll farm a few more up, since both characters can use them.

I'd be a lot more excited about this thing if it actually had range...
Oh, and that consumable up there is a Mint Sundae.


Andras's drop is crap.

Had two Death Masks drop these at the same time; they're not worthwhile, though.
...That room's a bit of a pain to get into because of the Coppelia's knives knocking me back out, even if they don't really do any damage.


They also have Tridents, for all the nothing they're worth.

HP boost in the next room down.


Crossbow Armor drops this. It's good enough that I'm pretty sure I finished my test run wearing it (I deleted the save so I can't go back to check).
And no, the "see breakable walls" thing doesn't matter, because I'm using the "breakable walls always visible" setting.


It's stubborn about it, but I eventually convince it to give its second drop too. Not worth.
Side note: Stone Circle is great for dealing with the Larva-infested rooms. Doesn't matter where they spawn if they die just by getting too close to you.

Found the checkpoint; back to the shop to save (and hopefully remember to check it next time).

Didn't really accomplish much this update; managed basically nothing but half a portrait.