Toggle Background Color
THE SCREENSHOT LP HANDBOOK
Table of Contents
Table of Contents
Introduction
Limitations
General Advice
Philosophy
Preparations
Formatting, BBCode, and Word Processors
Thread Name and Icon
The OP
Storage
Transcripts and In-Game Text
Image Hosting
Portraits and Banners
Screenshots
Screenshot Size
Screenshot Frequency
Text In Screenshots
Using the Test Poster
Extra: Switch .mp4s
Workflow: Update Construction
Update Structuring
Templates
Recording Gameplay
Old Style
New Style
Image Conversion and Irfanview
Writing
General
Portrait-based Dialogue
Workflow: Draft Editing and Finalization
Manual Draft Editing
Screenshots
Music, Portraits
Automatic Draft Editing
Screenshots (Preparation)
Automation Setup
Music Links
Portraits
Banners
Screenshots (Formatting)
Preparing to Post
Editing
Post Prettification and BBCode
Fixing Mistakes
Conclusion
Introduction
Screenshot LPs on Something Awful can be overwhelming to people looking to try one out for themselves – image capture, good commentary, BBCode, there’s a lot to handle. Worse, while the Tech Support Fort’s OP has a lot to draw on, it only covers a few of the more technical aspects of screenshot LPs. I made this creature to help guide newbies through the whole process, from thread concept to proper use of italics, and make the process significantly smoother. I wrote the guide on the assumption that the reader is brand-new to screenshot LPing, so if it comes across as condescending or handholdy, that’s not my intention: this guide is basically what I wish I knew when I started from nothing years ago. That doesn’t mean more experienced LPers won’t get anything from it, just remember I’m being as thorough as I can bear for a reason. I know it looks colossal, but feel free to skim or ignore parts you already have under control (except the General Advice bit, you should always read that).
I also don’t claim to be the best LPer ever. I’m reasonably confident I know what I’m doing by now: I’ve been LPing on and off for 3 ½ years at this point and I have two LPs in the archives, both of which went gold in their time. But that’s nothing compared to the many far more experienced LPers out there with significantly better approaches, and I don’t want to pretend I know better than anyone else. I’ll bring this up over and over, but if any part of this walkthrough doesn’t sit right with you, feel free to ignore it and do your own thing. It’s a guide, not an order.
Feel free to use anything and everything you find here however you like. Let me know if you think I’m missing something or you have ideas or improvements; I can’t promise I’ll have the time to rehaul everything, I do work a full-time job on top of LPing, but I’ll happily include anything you have to add and credit you directly (which you’ll see in the guide already).
Limitations
Before we get digging, I do want to lay out a couple factors that shaped how I constructed this guide and where it might fall short:
- Obviously, this guide is targeted at screenshot LPs. Video LPs are far beyond my experience, at least when it comes around them. The General Advice section should still apply, but the rest might not. Hybrid LPs might want to mix and match what they find here as best fits their workflow.
- I mostly LP visual novels and JRPGs on the PC, with occasional forays into other consoles that usually don’t end well. I tried to make my advice as universal as possible, but I wrote this on the assumption whoever uses it is working on a PC because I have no idea how well that translates to other platforms. Most things should hold solid, but I can’t help with capture cards or other technical issues outside my wheelhouse. Feel free to contact me if you’re willing to write something to fill that gap, though! I’d love to throw that in and credit you for it.
- I use Word in this guide for two reasons: my automation techniques only work there, and I am a grunting caveman with a superstitious fear of advanced technology. There’s no reason you can’t translate at least 75% of this guide over to OpenOffice, Googledocs, working straight in the test poster, or however you make updates; all you’re missing out on are ways to speed up the process, most of which can be replicated elsewhere with a little work.
- Relatedly, the Internet overflows with tools and techniques that blow what I have to offer out of the water in efficiency, speed, and flexibility. Likewise, Mac and Linux have abilities and programs I have no familiarity with and can’t tell you how to use. However, most of the tools and techniques you’ll find elsewhere require specialist systems, programming knowledge, and downloading and installing executables off websites you’ve never heard of before. I wrote this guide assuming the reader has no experience with any of that and feels the same religious terror at getting involved with it that I do. The only programs I recommend that you can’t find on an average consumer computer are two very well established tools I tell you how to use for your purposes without getting lost in the weeds of other functions, and the only programming we touch on is literally taking the find and replace function and making it run itself over and over again, no further knowledge needed. All of that can be ignored if you want. However, if you want to learn more about more sophisticated techniques, while I can’t help you, I can say the Tech Support Fort OP can at least get you started.
- I have been (correctly) informed I get over-invested in holding your hand through some processes, especially those scary technical procedures. I’ll be hunting them down and trying to summarize them make it easier for those who need a little less guidance, but no guarantees how long that will take. As you can tell from the size of this guide, being concise doesn’t come naturally to me
 .
.
General Advice
You might expect me to spend this first section telling you how to get the most content out of your game when you play it, how different genres translate into text form, what to screenshot and when, whatever. That comes later. While I will give you plenty of precise advice through this guide, I frequently and deliberately restate you can ignore what you want because demanding otherwise is really dangerous. People talk about technical difficulties killing LPs, but that’s only half-true; the real killer of LPs is frustration. It isn’t pure technical issues: unless you’ve completely wiped your progress or bricked your machine somehow, you can always just tell your thread “yeah, shit got fucked” and rewind to an earlier point to general approval. It isn’t game difficulty; most people can handle games they’ve decided to take on, and even if you can’t, taking advice from the thread drives participation and recording your failures can be even more entertaining than recording your successes. It isn’t even exhaustion; there are always workflow improvements to be implemented, new approaches to take, or, if all else fails, you can take a break to do something else and come back. What ACTUALLY kills LPs is when any of those issues – or anything else – pushes someone to the point that whatever hurdle they have to cross next just seems too big and they decide not to jump it. LPing is a lot of work, but once you get your feet under you and really get a habit that matches your stamina going you can do it almost indefinitely. It’s stamina that matters most. As long as you keep yourself away from a breaking point, you can keep posting and keep updating.
You keep burnout away best by basing your updates on your writing process – not how you play games when you aren’t LPing, not how you played the game in the past, not what you think other goons want to read, but what you find easier or harder to write. Are you a huge fan of something? Think about what you like talking about the most and what you find easiest to explain, then focus on those in your updates. Do you wish you could throttle the devs through your screen? Find what makes you angriest and delve into that. Are you doing narrative? Figure out what you like best about writing prose and see if you can use that. You shouldn’t lean into these things just because you enjoy them (though if you don’t enjoy anything about your LP then why are you doing it?); you should lean into them because they’re probably the stuff you’re most motivated to write about, and that motivation fends off frustration. Take shortcuts, take your time, do whatever it takes to keep yourself from burning out. And in case you think that might affect the quality of your LP, I’ll tell you a secret: nobody fucking cares how bad your first LP is. If people have an issue, they’ll tell you. Otherwise, they WILL cut you some slack. Customize your writing process.
Philosophy
That said, I do have a few pieces of advice to keep in mind when you start out:
- Some people can LP without any positive reinforcement, posting indefinitely out of sheer love of the craft. If that’s you, then Godspeed you fucking bastard, enjoy having self-esteem. For the rest of us, it might be tempting to watch view rates or number of responses or whatever to tell how much interest your LP is drawing. If that’s you, 1: don’t be ashamed, it’s pretty normal and 2: none of the metrics you can see actually reflect how well the thread is doing. The prominence of the game, its genre, the time of year, the state of the forum, what other LPs are going on, and all kinds of other factors beyond your control can alter the size of your potential audience. If you feel compelled to measure how you’re doing, use your thread and only your thread as a benchmark. If you can, it’s probably safer to ignore those things entirely, but if you can’t try to keep a light touch.
-
 is a thing for a reason. Are you worried your game is to obscure for anyone to care? You’ll get rubberneckers coming through to take a gander anyway. Worried your game is too popular and mainstream? It’ll attract people who like it and/or hate it and they will argue in the thread for your amusement. Another LP of the game just ended or is still ongoing? I’ve noticed some people will actually hop between dueling LPs to get different perspectives. If you’re really worried about it you may want to CONSIDER a gimmick if you don’t have one already: turning it into a narrative LP, asking for thread participation, analyzing it in a specific way, whatever. But if you sit there for more than five minutes thinking about potential gimmicks and you can’t think of one that both makes you more excited than you already are AND doesn’t sound like much of an extra burden (it really should be both, otherwise it’ll just add frustration), then don’t bother.
- One of the best ways to keep your LP going is to realize that your muse is a gimp and you keep it in its box is by getting used to writing regularly. Not just writing for your LP, I mean just writing in general: keep a journal, do writing exercises if you’re into that, start posting more (no seriously, as long as you’re putting some effort into your posts it’s as good as any other method). The goal is not to get BETTER at writing, the goal is to make your writing output greater by turning it into a habit. Better quality comes naturally with time as long as you listen to advice and try to improve, you just have to get enough momentum going by putting down whatever bullshit comes naturally and transferring that momentum to your LP. People don’t mind reading intermittent updates, but regular updates do help you get and keep readers, and you can definitely get out more updates that way.
- On the other hand, you can make an LP, a good LP, while just writing when you feel like it. Getting into a writing habit is harder than it sounds and not everybody has that kind of time or energy. As long as your thread hasn’t entered the archives, you can post every few weeks or something and people will still read it, and you can always just use the test poster (I’ll talk about what that is later) to easily recreate your old updates for a new thread. Do what you can and .
- And finally, if you get too frustrated to continue, don’t force yourself to continue. If you aren’t enjoying doing your LP, then you’ve missed the point of doing an LP. Same goes if you don’t have the time or energy anymore or if something completely fucks up on the technical end. If you want to keep going but you just can’t, put your thread on hiatus and come back later; even if it’s fallen into the archives, you can just use the test poster to repost old updates (go to the Using the Test Poster section to see how). If you just don’t want to bother anymore, say so in the thread and stop. My first LP lasted three updates before I burned out. My second one wrapped and got archived at 75. The one after that barely made it to 10 before I gave up, and the one I ran after it broke 125 before it finished. Most successful LPers, the ones you like best, have more failed LPs than successful ones. Some LPs work and some don’t, there’s no shame in backing off if you need to.
Thread Management
Not everyone has experience running any group effort, let alone a thread. It isn’t necessarily intuitive, but it doesn’t have to be hard as long as you keep a few guidelines in mind.
- You get to decide what is and isn’t constructive criticism. People here usually aren’t malicious (and those that are tend to get probed), but they can be blunt and uncaring. Still, even if they’re being dicks they might have a point anyway. Try and look at criticism objectively and filter out the asshole whenever you have to to get an idea of what is and isn’t landing. If the post includes good advice, try to implement it. If it includes stuff that would improve the LP but you can’t implement for whatever reason, say so; the thread will probably give you advice on how useful or practical it actually is. And if asshole is all that’s there, ignore it or report it and move on.
- Ask your thread to help you spot editing errors. Trust me, you want to know if you missed anything, and while going back and correcting things can be kind of a grind, it’ll make your LP a hell of a lot better. Keep editing past updates to a sane level to prevent (you guessed it) frustration, but it can help.
- Enforce any thread rules you lay out. If someone breaks them, tell them (if possible through PM if it’s minor, in the thread if you can’t use PMs or if everyone needs to hear it). If they don’t listen and push back, report them. Shitheads drive more people away from threads then not rocking the boat keeps around.
Cythereal posted:
Preparations
Once you start your LP, you’ll likely feel pressured to keep posting whether that pressure really exists or not. As such, you want your workflow and first pieces of content ready to go the moment you post the thread. You’ll want these things located and/or prepared beforehand:
- Your image hosting service
- A rough storage scheme (have folders to save your Word documents and screenshots in)
- The OP
- Any game transcripts you can find
- The first update, a poll, or some other introductory content to get people reading (optional but recommended)
You can find info on image hosting in the tech support fort, and I’ll be covering all of these in due time anyway.
Formatting, BBCode, and Word Processors
Make sure you know how to properly format a post before you begin. I can’t emphasize this enough: you are writing posts for a forum that uses BBCode, not rich text (check the SA BBCode Index to learn what BBCode is). That means inbuilt text formatting functions in any word processing software – italics, links, images, whatever – will not show up in the update no matter what you do. That goes double for images, since you have to put them on a hosting service first for them to show up anywhere online. If you have an elaborately formatted document already, look for a rich text to BBCode conversion system online and that should help, but it’s best not to get caught in the first place.
That said, I recommend writing your updates in a word processor for the features it offers: spellcheck (just remember to ignore errors that are actually just BBCode), search functions (checking to make sure you have the same amount of opening and closing tags then scrolling through to see where the gap is makes editing much easier), and find-replace (ctrl+H, you can use it for things like inserting preformatted portraits in dialogue without doing it manually or messing with automation). Add relatively simple tags (bolds, italics, etc.) manually as you write and use ctrl+H or the automation I show you later for links and images. Any word processor will offer you the same features (though maybe with different shortcuts). I use Word because the automation setup I have only works within Word’s framework, but you don’t have to use it if you don’t want to, and if you have some technical knowledge, the automation I include later is simple enough it shouldn’t be too hard to convert into the programming language of your choice.
Thread Name and Icon
These are the first things any reader will see your LP, and first impressions are always important. In my experience, few thread titles are so atrocious they actively drive people away. Just, you know, don’t break forum rules. That said, the better the thread title, the more likely it catches someone’s attention, so you may as well put a little thought into it. Just make sure if there’s something very important you want communicated (the gimmick, no spoilers, even that it’s a SSLP) that it shows up in the title. Keep in mind there’s a character limit, IIRC 50. As for approaches that tend to work:
- Famous quotes from the game slightly tweaked to reference LPs: this immediately catches the attention of fans and memedwellers. For a classic example, I’d reference “Try Jumping (back into Let’s Play Dark Souls 2)”; a good one active as of posting would be “LP, got a minute? Let's continue MARVEL'S SPIDER-MAN: MILES MORALES!”. You can also include a funny quote from the game straight, but unless that quote has some kind of meme or pop-culture gravitas behind it probably won’t stick as well.
- Famous references to something else twisted to refer to the game. It’s a little cheesy, but it tends to be memorable and inoffensive, so unless you have something else lined up it makes a good backup. If the quote in question has something directly to do with the game – similar themes, from a different part of the franchise, etc. – it will probably land even better. Just looking at active LPs I see “Whose Legal System Is It Anyway? Let's Play Phoenix Wright: Ace Attorney” and “In space no one can hear your drama - Lets Play I Was A Teenage Exocolonist”.
- Something important to playing or experiencing your game that sounds strange out of context. It communicates there’s something a little odd about the LP, and that can draw people in rather efficiently – especially if the observation isn’t overdone and memed to death. One of my best thread titles was “4chan Disability Sensitivity Training: Let’s Play Katawa Shoujo”; looks absolutely bizarre from the outside but accurately describes the contents. On the current page I see “Effort Is Anathema - The Casual LP Thread” and “You take some Adderall. x60 - Let's Play Cataclysm: Dark Days Ahead! NO SPOILER ZONE”.
- An iconic quote from your game that stands alone, or a serious description of what the game is about. This works very well with more serious or mechanics-focused LPs, and it can draw in the kind of viewers a more serious LP is looking for. In the archives I think of “Let's Play Alpha Centauri: The Future of Mankind” and “What is a Man? Let's Play Bioshock.”
- A reference to your gimmick. Makes it clear exactly what the reader’s in for and draws people willing to participate in. Can also be combined with other parts of this list, just keep in mind the character limit. I think of “Long Live Comrade Posadas! You Play Aurora 4x” and “Let's Play A Whole Bunch of FMV Games!” on the active forum. Being a little indirect about the gimmick is just fine; “Let's Play Detroit: Become Human with my little sister” in the archives didn’t have to reveal the little sister in question voiced the game’s female protagonist.
- If all else fails, you can absolutely just put “Let’s Play (x)” in your title. It won’t stand out quite so much, but it also won’t hurt you.
The only thing I’d avoid (other than slurs or whatever) is not saying your game’s name in the title; it’s confusing, misleading, and makes it harder to find the thread again. Remember you can PM the mods asking them to change your thread name and they’ll almost always oblige.
As for icons, unless you have something clever in mind, I’d advise you use whichever icon describes your LP’s intended content most accurately: the franchise icon if the franchise has a dedicated icon, a forum-standard icon it that icon accurately describes what you’re shooting for, or a genre icon otherwise. People don’t look as closely at icons but still take them into account, so I find that here it’s usually best to go for informative instead of entertaining. However, if another icon really describes your thread, go ahead and slap it on; any game about a long journey from beginning to end (Resistance games, Final Fantasy X), for instance, might benefit from the trip report icon.
The OP
When people open your thread, they want to see SOMETHING that tells them what they’re in for. The OP doesn’t just introduce the game: it introduces your writing style and lets readers know how the thread will work. While you can cold open on your first update if you want, I strongly recommend you have an OP with these elements in this rough order, but free to leave out any of these that don’t apply, or excise any if you have a particular creative vision. This is your show.
- The name and description of the game. It doesn’t matter if you think everybody knows this game already, I guarantee you somebody is stumbling across it for the first time. If you can’t be assed, just copy the first few lines of the Wikipedia article, nobody’s judging.
- A summary of your approach: how friendly you are to the game, if it’s narrative, informative, or completionist, whether or not you’ve played it before. If you like or hate a game way more than most people seem to, include why here since it’ll shape your commentary.
- If you’re using a gimmick, details on how it works.
- Any thread rules. Remind people to keep it civil if the game’s at all controversial, even if it takes like one sentence. Make sure you enforce the rules and update them if new stuff comes up; trolls are not worth tolerating.
- A spoiler policy. Sometimes spoilers don’t matter, sometimes you want nothing discussed that you haven’t already seen. If you really want, you can set up separate spoiler policies for story and mechanics, especially in games that need advanced planning to go anywhere but where you don’t want to know what happens next in the plot. Disallow spoiler tags for actual spoilers; they just make people click on them.
- Notes on formatting. You want to make a clear visual distinction between at least A) game text, B) your commentary, and C) character dialogue, possibly more (if, say, you’re changing dialogue and want to make it clear that you’re deviating from the game). You can usually cover A and B by using italics on one and see with portraits, but you should at least say what you’re doing so people don’t get mixed up.
- A table of contents (links to each update in order). It helps people catch up and helps Baldurk archive your LP. Remember: you can get the link to a post directly by clicking the little # on the lower left of the post.
- A cast list, attaching names to various portraits with brief descriptions so readers can keep all the characters straight. Only important for games with a large cast that the game revolves around, but extremely useful as a way to store portraits if you aren’t automating your formatting.
- A reserved second post for storage. You can include a cast list, useful links, or thread content like links to supplementary updates, links to outstanding posts, and fanart, but you want it reserved no matter what in case something comes up.
Traditionally, LPers use a Q&A format with each section under bolded questions to divide the OP into readable chunks, but do what you want. Try to keep it concise while covering everything you need to say; I’m a big fan of long-winded OPs, but people usually get sick of reading them and skip to the content.
Storage
Always, always know where you’re saving stuff to. If you don’t mind getting disorganized, you can just save everything into one big folder somewhere, but I highly recommend against that; it makes sorting through everything as you assemble posts an interminable slog. I recommend one of two storage schemes, depending on how much you trust your image host service. Whatever your image host, it can pay to keep screenshots on your computer after you upload your updates; hosts go down or screw up pictures, so having a backup can save you from the fate of several LPs which lost all their images and/or videos when the host went up in smoke. If you don’t trust yours to keep your images up and/or want to keep backups, I recommend making a folder for your LP that contains the following:
- A folder for all your Word documents
- A folder for banners and portraits
- A folder for your screenshots
- One folder in the screenshot folder for each update’s finalized screenshots
- At least one folder in your screenshot folder where you store images before editing, if applicable
- A folder for record-keeping, if applicable – I’m talking worldbuilding or characterization notes, plans for future updates, information you haven’t made available to readers, whatever (go read ZorbaTHut’s Dominions 3 LP to see how this can help you develop yours).
All of this is subject to your approval, of course. If you trust your image host, you can get by with a folder you keep all your updates in and another you put screenshots in before uploading them and call it a day. Any lengthy LP will generate at least a gigabyte or two of images, so if you’re really hurting for hard drive space, you may as well throw caution to the wind and delete images once you’ve uploaded them.
Transcripts and In-Game Text
If you’re using a game that has any kind of serious dialogue, I HIGHLY recommend looking for script dumps or transcripts, then copying the text out of there into your Word document. Otherwise, you have to retype everything you see/hear, which is a literal pain after a while and especially treacherous if you can’t pause cutscenes or pull up subtitles – not to say it’s impossible to type out everything in a full JRPG or whatever, it’ll just take a while.
If you’re going in blind, you may want to avoid scripts in order to avoid spoilers – especially if your script contains spoilers about what decisions lead where. Or you may not be able to find a script at all (very likely). The few centralized archives out there usually only have the scripts of the most prominent games on them and there’s no clearinghouse for finding them. Try looking for transcript or individual work wikis, or Google a few lines you’re completely certain you got right after wrapping it in double quotes (that helps it look for exact matches); that’ll sometimes turn up transcripts in odd places. If you don’t find any, a lot of smaller devs are actually happy to send along full scripts if you email them and lay out your plans for the LP. Free exposure, after all.
Failing transcripts, there are ways to either rip the text out of the game yourself or use various services to read stuff off the screen. A lot of games store their scripts in either plaintext or some text form that you can copy and paste out into your document for edits; the text you get will usually be disorganized and work more off machine logic then anything you could use in an LP, but you could just edit that until it makes sense. For those that don’t, many games have dedicated communities you can make use of; look for script-mining communities, especially, or Google “script dump [your game name]” or “transcript [your game name]” and see what comes up. I’ve had bad luck finding actual script dumps that way, but you’ll often find some forum thread where somebody asks how to do it and somebody else tells them the process in extremely vague terms. If you have programming chops, you can probably work from there. Or you can just make an account and ask. Failing THAT, you can use OCR software, which can read text right off the screen and transcribe it for you. And if you’re willing to pay a lot of money for a good program, that’ll probably do the trick! You probably won’t be, though, and the free stuff is hit or miss. The only good free OCR I’ve found is in ShareX (see New Style under Recording Gameplay for more information); the Tech Support Fort also has guides for gOCR and ImageMagick and another for Capture2Text which probably get you better quality, but ShareX is simpler to use for the cavemen among us. Give it a shot, especially if the text displays very clearly in game. Just don’t be surprised if you have to go back and do extensive edits to get things right.
And really, no matter how you get that text, you ARE going to have to do extensive edits – not just copyediting, but converting it into BBCode and making it reader-friendly. In my experience, working with text is the most time-consuming part of making a screenshot LP after managing screenshots. It isn’t necessarily DIFFICULT, it just takes a while. It’s part of why I recommend gimpifying your muse; getting into the habit makes it easier to just sit down and hit buttons while thinking about something else.
Image Hosting
This is one of like three places the Tech Support Fort has extensive documentation on screenshot LPs (we already covered OCR). Check the image hosting section of the OP here, it should have everything you need. I recommend LPix for reasons I’ll get into later, but really feel free to do what you want. Just have it squared away BEFORE you start taking screenshots. Trust me.
Portraits and Banners
Character portraits clearly mark dialogue and set it apart from the rest of the text while familiarizing you with the character; they’re industry standard here for a reason. So it’s kind of surprising they’re so counterintuitive to make.
While you can definitely extract portraits from screenshots, you’re probably best off starting from concept art. You can usually find it by googling your game and the words “concept art”. If your game has in-game portraits already, while you might be able to extract them from your game’s files, you STILL probably should work off a website or wiki; it’s usually easier to nab a bunch of images from one place and work on them all than going digging in your game files.
You have two options on how and when to implement your portraits: do them all at once or do them as they come up. You CAN just locate, edit, and upload portraits for the characters as they show up; it’s a simple enough process that unless your game has like 20 characters all show up at once you can do it update by update. I actually recommend this method if you aren’t automating portraits because you can use your cast list in the OP as impromptu storage (read that section in this guide for more info) instead of digging through your files. If you are automating things, you might want to do them either all at once or in batches. Much more efficient then going into your code to add things one by one later on.
When it comes to actually assembling your portraits, you need to keep a few things in mind:
- All your portraits should be the same size: anything else is visually distracting, even if you’re using it to make a point (like to emphasize how big some character is). I recommend 60x60 pixel squares. Going larger gives you an awkward amount of white space between lines, while going smaller makes them less distinct and harder to see. Same with different kinds of rectangles. Feel free to deviate if you’ve got some artistic vision in mind, though.
- You want each portrait to be instantly recognizable as your character. If your readers can’t make them out or tell the difference between characters, you’ll get confusion in the thread as people try and fail to figure out who’s saying what. Too zoomed out and characters become indistinguishable shapes; too zoomed in and you won’t have everything you need to tell characters apart. If you have to break the 60x60 rule to make the portraits both attractive and distinctive, do it without looking back, just make sure all portraits are the same size.
- Adjust how much of a character goes into a portrait based on the art style. If the art is simplified enough, you may be able to pack a top half or full-body portrait into 60 pixels; I recommend this for older sprite-based games. More photorealistic games may give you all you need with just a person’s face. In my experience, a middle ground works best: the character’s face, any distinctive hairstyling or ornaments, and the top bit of their outfit. You want the most important details captured; don’t worry about cutting off the edges of somebody’s elaborate anime hair as long as what you include still makes sense.
- Whether you settle on using face, shoulder-up, top half, or full-body portraits, keep that perspective as consistent as possible through all your portraits. Different levels of focus within those rough categories doesn’t matter much, but mixing them up tends not to turn out well. However, if there’s a strong division between different classes of characters (like party members and main villains versus NPCs), making more important characters portraits zoomed in on can emphasize that distinction.
- Some LPs use different character portraits to represent different moods or facial expressions. I strongly recommend against this if you’re starting out, it adds an astonishing amount of extra work. I don’t see people doing it much anymore, and I’m pretty sure that’s exactly why. If you have the time, though, it can greatly increase immersion; just don’t commit to it if you aren’t sure you can pull it off.
- On the flipside, many LPs change character portraits when something about that character changes permanently, whether physically (i.e. they get a new haircut) or narratively (i.e. they start eating their friends). You don’t have to, but switching portraits out at dramatically appropriate moments can really add to the impact, so I recommend considering it.
- Backgrounds are tricky; reusing in-game .pngs with transparent backgrounds are the strongest argument to find and extract portraits from a game’s files. You can certainly just cut a portrait straight out of concept or official art and put it in the thread, but unless it also has transparency (which it probably won’t) you’ll end up with your character’s face in the middle of a white square that looks off if someone’s reading your thread in dark mode. Converting concept art into usable pngs is one of those things that’s hard to learn and easy to master, unless you already know Photoshop (if you do, you probably already know how to take the portrait and remove the background). If you don’t, I have you covered. You probably have a program called Paint 3D preinstalled somewhere if you’re using Windows (if you’re using Linux you probably don’t need this advice and if you’re using Mac then I can’t help you, try Gimp). It’s MS Paint with more features and less usability, but we can ignore almost all of its extra functionality for now; all you need for this is basic familiarity with regular Paint and the program in question.
When you’re ready to go, you can follow these steps:
- Open Paint 3D and open a new project. In the top left, under the program name and a bunch of mysterious symbols, you should see options saying Select, Crop, and Magic Select. We’ll make extensive use of that last one.
- If you have the concept art saved to your computer, open it here. If there’s some issue downloading it, try opening the image in a different tab or window and copy-pasting it in.
- Select Crop and drag the box down to a square area that includes both what you want to show up in the portrait plus a little bit of extra space around it, especially above. That extra space will come in handy later.
- Look back to the row above the one with a dozen or so icons that should have a paintbrush on the left end. Go find the icon that looks kind of like a #, probably the second one from the right; click that. It should open a bar on the right labeled Canvas. You should see two switches; “show canvas” and “transparent canvas”. Make sure both of those are active. If you’re really lucky, your image will now have a transparent background and you can skip to the end; otherwise, just go to the next step.
- In the top left where you clicked Crop, there should be a little portrait icon next to the words Magic Select. Click that. A “magic select” bar will open on the right prompting you to select an area; just click next.
- That magic select sidebar should now have options labeled add and remove. This is where we pick out the portrait we’re going to use from the rest of the image. The program should have already selected parts of your portrait, but it usually isn’t smart enough to figure out you what you want by itself. Click “add” and click on parts of the image that you want in the final product, and click “remove” and click any whitespace or unnecessary background elements. You’ll have to flip between these options as you go; again, the program’s not that smart and it has a habit of adding things you don’t want in when you select something else nearby. Don’t worry about getting it 100% perfect, the finished icon will be small enough that little visual flaws won’t show up.
- When you’re done, go to the option in the lower right of the sidebar that says “done”. It should pop out what you selected and let you move it around. Drag that object off into the gray space around the original image.
- Go back to the top bar where you saw the paintbrush and # symbol and click the paintbrush; you should see a sidebar on the right with a bunch of icons that look like paintbrushes and pencil tips. Click the one that looks like an eraser. Go back to the main image and erase everything. If you already made the canvas transparent, everything you erase should turn the same gray as the background around the image. If you didn’t, go back to step 4 now and come back when you’re done.
- Click the object you moved away from the image back in step 7 and drag it back into the frame. You’ll notice it’s a little bigger than it was when you pulled it out; that’s a natural process, don’t worry about it. The extra space you included when you resized the image should give you some wiggle room, but again, don’t worry if it doesn’t fit the frame quite right because no one’s going to notice or care about any awkwardness on that small a scale. Just center it as best you can, with the bottom of the portrait just about touching the bottom of the image.
- Go to the menu button in the upper left (the manila folder above the select icon) and click that. You should be in familiar territory here; click “save as”, then click “image” to the right of it. You’ll see the image in the center with a sidebar on the right that starts with “save as type”. Make sure the drop-down list below that reads “PNG”, then make sure the options “lock aspect ratio” and “transparency” are selected. With “PNG” and “transparency” active and the white space in your image removed beforehand, your finished portrait will display the face/body of your character on whichever background a reader’s using instead of a white or black or whatever field. Go to the width and height fields above the lock aspect ratio option and change them to 60 pixels. Press save.
- Save your finished portrait wherever you want your finished portraits to go. Paint 3D will tell you you haven’t saved your file when you go to close it; that’s because Paint 3D saves projects and usable images separately, and you just saved a usable image before closing your project. Go ahead and save it again if you get paranoid, then either delete the magic select icon and paste your next image in or close it. I’ll cover uploading portraits later; as of now, your work is done.
You may also decide you want banners, visual elements that set the following information apart from whatever proceeded it as something important, especially if they’re skimming through posts in the thread looking for LP content. I see them used in three ways here:
- In tables of contents, they divide update links by part of the game to make the list more readable.
- In supplementary posts, they help the reader know you’re speaking in your capacity as an LPer on a specific topic instead of just posting something. If there are multiple kinds of supplementary posts (say, information on the development process and links to relevant videos), different banners set them apart.
- In updates with multiple consistent parts (like turns and phases in a board game), they clearly indicate which part of the post covers what.
The content and size of your banners is up to you, though I recommend you use strong colors taken from a dramatically appropriate screenshot or piece of concept art and include no more than four words, preferably two. For example, some of my table of contents banners from past LPs:


Try to keep the overall format of your banners (size, text font, color, and style, what the image focuses on) relatively consistent within categories, but no one will notice little errors as long as your banners aren’t showing up together in a screen.
Banners are optional, and you can always opt to use bolding or underlining or whatever to make any subheadings. I recommend you do both at the same time: use the banner to clearly mark a break, then repeat the subsection’s name and a relevant description involved underneath it. It’s easier to read and catch if you do that.
Screenshots
You want to decide BEFORE you start playing roughly what you plan on capturing. You don’t have to follow this plan like a blueprint while you’re actually recording, but just laying out the basics of what you want to catch will make a difference whether you’re aware of it or not. Unfortunately, deciding how you want to use screenshots is… Complex. In all honesty, this is where my caveman nature comes to the fore; I break out in hives when forced to contemplate unnatural things like json databases or FRAPS or zone improvement plans. I have a screenshot button and it works for me, even though working with it is highly inefficient. Fortunately, this is the other place where the Tech Support Fort OP has you covered. A lot of the guides there are old and outdated, but they’re still very useful to get you started.
That said, those guides only cover the technical end of taking screenshots, and even then they mostly cover how to use software – which is what they’re supposed to do, to be fair, but they don’t tell you much about screenshot selection or technique. While as always I recommend you develop your own technique, you may want to keep these elements in mind:
Screenshot Size
These days most forum users browse Something Awful on mobile devices, and the LP Subforum is no different. Say what you want about higher resolution and better clarity, but you can’t beat convenience. Keep in mind that every picture you take will look a lot smaller and fine visual elements might just vanish. Likewise, keep your screen resolution and GUI size under control. You might assume you want to play your game widescreen with the teeniest interface possible so you can maximize how much of the game itself you’re showing off. You do not. Your readers will lose track of what’s going on and struggle to make sense of the images. As much as I love TDI, I gave up reading his Nier Automata LP because his screenshots showed up indistinct on my phone screen. There’s no good rule for striking a balance between showing off the good stuff and making things that people screens; ask your thread and don’t be afraid to experiment.
I will say that the Archive has a size limit of 900 pixels per side on non-timg’d images (Baldurk will auto-convert any larger images), so you may want to keep that in mind. It’s worth noting different LPers and threads have different preferences:
Cythereal posted:
My two cents:
On discussing image resolution/screenshot size, the size I use as a default is 1024x576. Example:

Cythereal posted:
In my first solo LP, Civilization: Beyond Earth, I started with 1018x572 as a result of some % resizing of the original screenshots (I forget the original size and how much I reduced it by), and after the first proper update a goon said they thought the screenshots were too small:
So I tried bumping it up a bit and people seemed happy with 1024x576.
The process is simply that I started off using regular MS Paint for basic editing, and when I went to mill down the screenshots by pixel size, I went to 1024 and let the vertical size auto-generate proportionally in Paint. Ifranview has kept it, and it's been my standard ever since. I haven't gotten any complaints.
There are also techniques you can use aside from just rescaling screenshots:
Quackles posted:
900px is the maximum the Archive will accept, so I've tried really hard to keep my images to that. When I did the Shenzhen I/O LP, I did separate images that were close-ups so you could read the code programmed into each chip. That might be a good idea to follow if you need to screenshot tiny text for any reason.
You could do the same for zoom-ins on relevant provinces in Paradox games, for instance. You don’t have to stick by that 900 pixel limit if you don’t want to, just keep in mind your images will be resized and not everyone enjoys huge screenshots:
PurpleXVI posted:
Personally I also feel like too big screenshots are hard on the eyes when you're browsing through a big column of them. I find 900-wide or thereabouts to be much more readable.
I strongly recommend starting out limiting your screenshots to 900p on the longest side and asking your thread how the images look, but it’s up to your discretion.
Sometimes, though, you really do need big images – full maps for strategy games, say. Wrap those in timgs, or link to them elsewhere if you REALLY need people to read them in detail. SA no longer lets you break tables and automatically resizes images wider than however big a post is on somebody’s screen. If you do end up putting colossal images directly for whatever reason, the forum will shrink them down automatically.
Screenshot Frequency
Figuring out how many screenshots you need is complicated, a lot more so than it looks. But keep this in mind: balance text and screenshots, and especially at first don’t be afraid to let the text pull its own weight. Different genres need different text-to-screenshot ratios; a flashy, setpiece-laden action-adventure hot off the presses would probably benefit from a lot of images, while an old-school adventure game could best use a few deployed strategically. As you’re probably sick of hearing, you really need to figure out what works for you through experience, but if you need a model, I like to divide screenshots into two types: changing shots and establishing shots. These are rough categories that I don’t apply directly, but they help me frame what I’m looking for moment to moment during gameplay.
Changing shots tell your readers where something important happens they couldn’t have expected or inferred; if this was all text, these would be lines that’d leave them confused if they managed to skip over them accidentally. I tend to take these in batches (when one screenshot won’t do):
- Scene changes. Try to visually capture both the environment and all characters involved. If your game is strongly mission based or involves frequent timeskips (FPSs, visual novels) or has lots of loading screens with tips or flavor text (FPSs again, Bethesda games), you may want to use loading screens to mark places where lots of time passes, even if those screens don’t necessarily show up (like when you’re grinding).
- Introductions of new gameplay elements, with follow-up screenshots laying out each set of procedures in sequence (compress similar actions into a screenshot of one of them with explanatory text, it saves room). For example, for a new command in in a grand strategy game, have one for which kinds of units it applies to, one for the menus, one for the command in action, and one for the results; for a new weapon in an action game, have one for the weapon at rest, one for the standard attack, one for any alternate attacks you’re going to see more than once, and one showing it in a combo if you can use it in combos.
- Character introductions. Try to get the character’s face, body, and demeanor, plus their first important actions.
- Story beats. If the mood changes in a cutscene, if an important event pops up, if a character’s model changes, if units come in from off the edge of the map, if the interface suddenly goes blurry; basically, anything that alters the dynamics of whatever you’re doing.
- Anything visually impressive you haven’t seen before: wild combos, new scenery, elaborate animations, whatever grabs your attention.
Next, establishing shots – not panning shots, I’m talking about screenshots that establish what’s going on and break up your text. While too many screenshots can be an issue, you really don’t want massive walls of text unless you’re explaining something that can only really be explained in text or you’re just transcribing a shitton of dialogue. How often you insert these screenshots will vary, but you should have one, maybe two in a pinch, for every:
- Turn kickoff in games with large and elaborate turn structures (boardgames, grand strategy);
- Fight you bring to your reader’s attention;
- Conversation that isn’t a simple NPC response;
- Time you move to a different area;
- Major event in a scene that doesn’t change its course (a big attack from an enemy, someone making a declarative statement, etc.);
- Time you screw things up (use it for comedy value).
Like I said at the start of the screenshot section, I don’t try to reference these categories during play; I just know roughly what I’m looking for because I’ve worked all this out and make my decisions appropriately. I’m also in the habit of taking multiple screenshots of anything the first category; it gives me a chance to pick the best possible shot.
Text In Screenshots
Conventional wisdom has it that you don’t have to repeat any dialogue that’s in a screenshot, but you should summarize any mechanics. The last one’s good practice, but I actually strongly recommend against the first one. Constantly refocusing your eyes between screenshot text and forum text can cause eyestrain and make your LP harder to read (and eventually give people headaches). When I experimented with repeating text in and out of screenshots, the response was overwhelmingly positive; after a while, your eyes just skip over the screenshot text and the overall experience improves. But if you don’t have access to the script, don’t have the energy to transcribe everything and use on-screen text as a shortcut, or both, that’s fine. Manage your frustration.
Using the Test Poster
If your updates are particularly long and image-heavy, consider using the LP test poster instead of throwing them all in the thread. You can find more information on it in the Sandcastle, but that description doesn’t cover how people use it in LPs already underway. If your updates are image-heavy, particularly long, or go up frequently, you’ll end up with pages that take forever to load on older computers and take even longer to scroll through. That’s exhausting, and while many users don’t care, some will look at that and decide to move on. Every time you upload a test post on the site, it saves that post permanently; just link to the URL it creates in the thread as an update. It’s not as visually impressive as updates in the thread but it saves a lot of bandwidth. If each update has hundreds of images, you’ll want to use the test poster consistently.
You can also use the test poster to reconstitute old posts if you’re restarting an LP, since not everyone has archives access and you don’t want to repost a bunch of updates in the first couple pages. You just upload the BBCode for each update to the test poster and link it just like you would in ordinary update in the table of contents. Save your drafts!
Extra: Switch .mp4s
I’ve done LPs on my Switch and on my PC, and using my Switch had some real upsides. It has a dedicated screenshot button that sends every screenshot you take into a dedicated folder for that game, so you just have to be agile enough to hit a button whenever something important shows up. I’ll talk more about this process and what you do with those screenshots later when we talk about workflow. You can ALSO record up to 30 seconds of gameplay by holding down the screenshot button – it’s there for short clips you can throw up on social media. While definitely useful for LPs, you should keep a few things in mind:
- It records those videos as mp4s – specifically really, really large mp4s that don’t compress to gifs very well. While there are services out there that claim they can do that conversion, I’ve never seen them shave off more than a couple percent of a Switch mp4’s filesize, and at that point you may as well just keep it with sound.
- The 30-second time limit is a bit misleading; if you recorded another clip less than 30 seconds before, it records up to the point where it stopped. EXACTLY where it stopped. This means it’s entirely possible to take the mp4s, open them in Windows Movie Maker or whatever, and just put them side by side to make a longer clip; usually it will naturally and seamlessly fit together. Be careful about doing this for longer clips because you do get blips once in a while and they add up over time, but that shouldn’t matter if you’re only building something that lasts a few minutes. Just remember to hold that button down once every 20 to 25 seconds instead of every 30 seconds so you don’t get any gaps.
- While you can’t splice them together without a separate program, you can trim your clips right in your Switch’s photo library. Just keep in mind shortening the video doesn’t actually change the original when you save it, it just makes a new one. You may want to keep the old one in case you need to recut it, or delete it to save space because those things are enormous; it’s up to you.
- You can host mp4s in a bunch of locations, and I bet other LP guides have plenty of advice on making videos and uploading them. I do know you can upload mp4s (and other Switch screenshots) directly out of the console with a USB-C connector, hat isn’t my area of expertise. I can say, however, that while I’ve never successfully embedded a YouTube video, I HAVE managed to embed mp4s into my posts directly. I do this by uploading the mp4 in a private post on Tumblr, of all places, then opening up the video in a separate tab from wherever the post that stores it is, taking that URL, and placing it in the thread directly. The videos should just embed themselves. You do run the risk of losing your video if that site goes down, but that’s the nature of Internet storage; either it goes up in smoke one day or it lets the algorithm in. Feel free to let me know if you have better solutions.
Workflow: Update Construction
All of that was prep work, whether familiarizing yourself with important ideas or actually doing preparation work. This section covers the process of putting together the updates themselves, and I structured it kind of like I’m walking you through the various workflows I’ve used to assemble updates. As always, you really need to customize this to fit your needs, but unlike the general advice you got in the last section you can work directly off what I wrote here.
Update Structuring
Sometimes you don’t have to think too hard about how each post will be structured. Many elaborate boardgames, for example, have turn structures that demand each turn be its own update. But sometimes the boundaries aren’t so clear, you don’t know how long to make each update or how they should flow. If so, you have a few ways to think about it:
- Make sure your updates consist of coherent thoughts. By “coherent thoughts”, I mean anything with a defined beginning and ending: a turn, a fight, a conversation, a breakdown of a mechanic, etc. How you define that is up to you as coherent thoughts can be of wildly different lengths and flow into each other, but if you don’t begin and end your post with coherent thoughts it makes for a jarring reading experience. If you can’t neatly divide your post into coherent thoughts (say, you’re dealing with an extremely long cutscene that can’t fit in one update), I strongly recommend ending the update on a cliffhanger, important event, major emotional beat, or change of scenery, then repeating it in the next update; that makes it easier for readers to keep track of the story between updates. A post can contain as many coherent thoughts as you want, just as long as they remain coherent.
- Consider shooting for a standard update length. How long your updates should be really depends on your situation and the game in question, but there are points where updates feel too small to care about or too large to bother reading. The average adult reads for fun at about 250 words per minute, so it might be worth thinking about things in those terms. I’d say 500 words (not counting BBCode) makes for a good minimum; you can’t really get immersed in something that takes only a couple minutes to read (plus any shorter makes it hard to fit coherent thoughts). 5000 words would make a good maximum; it’s enough for a quick reading session on the bus without overstaying its welcome (plus any bigger get hard to edit). Those are not hard limits and should be ignored for certain kinds of LPs. Participation-heavy, frequently-updated LPs where an update is basically just a movement report may be able to express everything the reader needs to know in a couple hundred words, in which case there’s no point stretching things out. On the other hand, readers of choice-light visual novel LPs are there because they want to read and may not mind something even longer. I usually shoot for about 1500 as is about as much as I can turn out in a limited amount of time and it has enough heft to be worth reading. Just keep in mind whatever limits you set are just there for your reference and you can change or ignore them if you want; solid updates will be read no matter how long they are.
- Make sure you know how your post formatting will work before you start playing. Basically everything else in this guide will help you with the details here, but I strongly advise you fully understand the uploading procedures and BBCode you plan to use before you start playing. If thinking about that stresses you out, go ahead and wing it, but a little work now makes for less work later.
- Visually vary your post. Screenshots naturally break up huge walls of text or dialogue, but sometimes you want to talk about something that doesn’t have convenient screenshots and needs to be laid out in depth. If so, use the quote and list functions in BBCode every couple paragraphs if possible to make things easier on the eyes. You can also use images from elsewhere or even strategically-chosen smilies if you like, though unless that’s the point of your LP it may get grating after a while. I remember once I was staring at endless words in an update of mine discussing in-game romances and realized I could get at what I was talking about AND break up the paragraphs by putting

 on a separate line in the middle. On the other hand, too many screenshots gets visually overwhelming and drowns out text; I’d say you should shoot for between one and three screenshots at a time unless you need to express some complicated action.
- Remember to take frustration into account during planning. Large, attractive, well-formatted posts look nice, but smaller and sloppier posts are easier to put together. A complete LP with slapdash updates is better than a ravishingly beautiful LP that lasts three updates before the LPer burns out. Try to keep effort you spend on posts in line with the effort you have to spare, even if that leaves your inner perfectionist seething. Remember, frustration is what kills LPs.
Templates
Some people just don’t know where to start when slapping something together, while others are just forgetful and might not remember to get everything they need into an update before it goes out. If so, you may benefit from a template, a standard post structure you can reference whenever you need it. If you follow your template too closely, your readers will eventually pick up on it, but that’s better than giving up because you just can’t get things right. Sometimes what you need in your template is obvious, but if it isn’t, you might benefit from going into the LPArchive, finding an LP you like that vaguely resembles whatever you’re doing, and trying to suss out how that LPer structured their updates. If you use a template, make sure it’s composed of coherent thoughts and try to keep it from being too detailed, otherwise it gets restricting and hard to work with when you inevitably run into something that will make you break the pattern.
If you need an example of what a template might look like, here’s a couple I pulled together:
Participation-heavy wargame LP posted:
Player Turns:
- Description of first token to move’s actions and their results
- Image if actions changed something important about the encounter
- Repeat until all token moves made
Enemy Turns:
- Description of first token to move’s actions and their results
- Image if actions changed something important about the encounter
- Repeat until all token moves made
Turn Transition: - Description of new map-wide events
- Image of current map
- List of friendly tokens (with tokens that died last turn noted)
- Solicitation for moves from participating posters
- Reminder of potential actions and important action restraints
Humor-focused LP of shitty adventure game posted:
If puzzle:
- Establishing shot of puzzle
- Obvious solutions that don’t work if relevant
- Failures that give unique results other than deaths
- Failures that result in deaths
- Description of solution
- Image of reward if relevant
If conversation:
- Establishing shot of conversation participants
- Initial dialogue
- Discussion of undesirable conversation options
- ”Correct” choices and resulting dialogue
- Image of reward or major change if relevant
If location change:
- Track change if relevant
- Establishing shot of area
- Description of area if not previously explored
- Images and descriptions of important sub-areas if relevant and not previously explored
- Description of differences from last visit if relevant
- Discussion of possible next steps
- Description of next step chosen
Switch between above as appropriate until update is between 2500 and 3000 words
Remember templates like this are guides, not hard rules, and feel free to edit yours or dump it as feels appropriate.
Recording Gameplay
I mostly LP games on PC, so I can’t tell you much on console LPs, unfortunately. Still, even if only some of the following information applies to you, it’s probably worth reading through the next couple sections to see what you can convert.
Old Style
I can’t tell you how to play the game you’re LPing; I can’t predict your personal playstyle, your game, and how you want to run your LP. As per usual, take everything I say with a grain of salt. I can, however, tell you how I played the games in my most successful LPS. I followed a simple sequence, one that repeated endlessly as I played and that I broke from every time I needed to show off something unusual – a primary gameplay loop, if you will:
- Start playing from where I left off
- Play until I hit a track change or something that needs to get screenshotted
- Take the screenshots (if applicable)
- If I can’t pause, make a mental note and play until I can (taking shots or noting track changes as necessary)
- Pause and switch over to a word document
- Paste any dialogue from the transcript in
- Write any commentary
- Mark the specific music cue or the presence of screenshots
- Switch back to the game
- Start playing from where I left off
I just did that until I have enough text to make up a post;
And now I’m finished! For me, playing through a screenshot-light game with multiple LPs under my belt, an update’s worth of content and doing basic formatting took me maybe 1-2 hours to generate, a little longer if I needed to go back and redo something or it contained a bunch of images, music cues, and scene transitions. When I started my first LP, playing a grinding-light JRPG I was writing plenty of dialogue for, it took me 2-3 hours to scrounge up enough gameplay for an update; for games that include lots of downtime, grinding, or repetition, it will take you significantly longer. Just keep in mind you want to preserve your energy and it’s better to have a short update then no update.
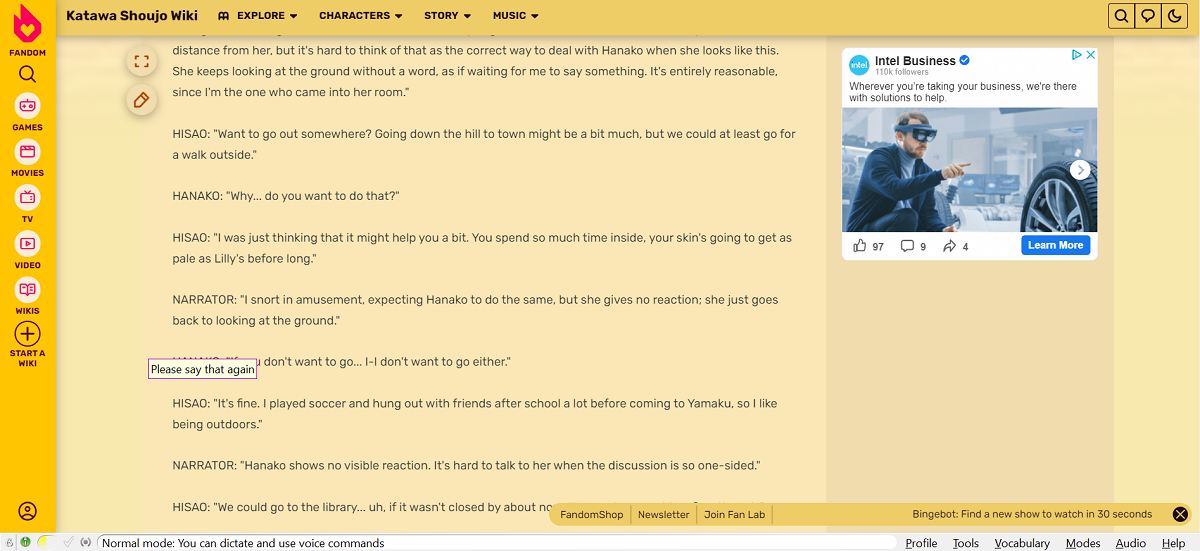
Anyway, when I wrote the first draft of this guide some time ago, I took screenshots of an update in progress for ease of reference. Here’s what my update looked after I wrapped up gameplay, with labels for the first time any important features popped up:
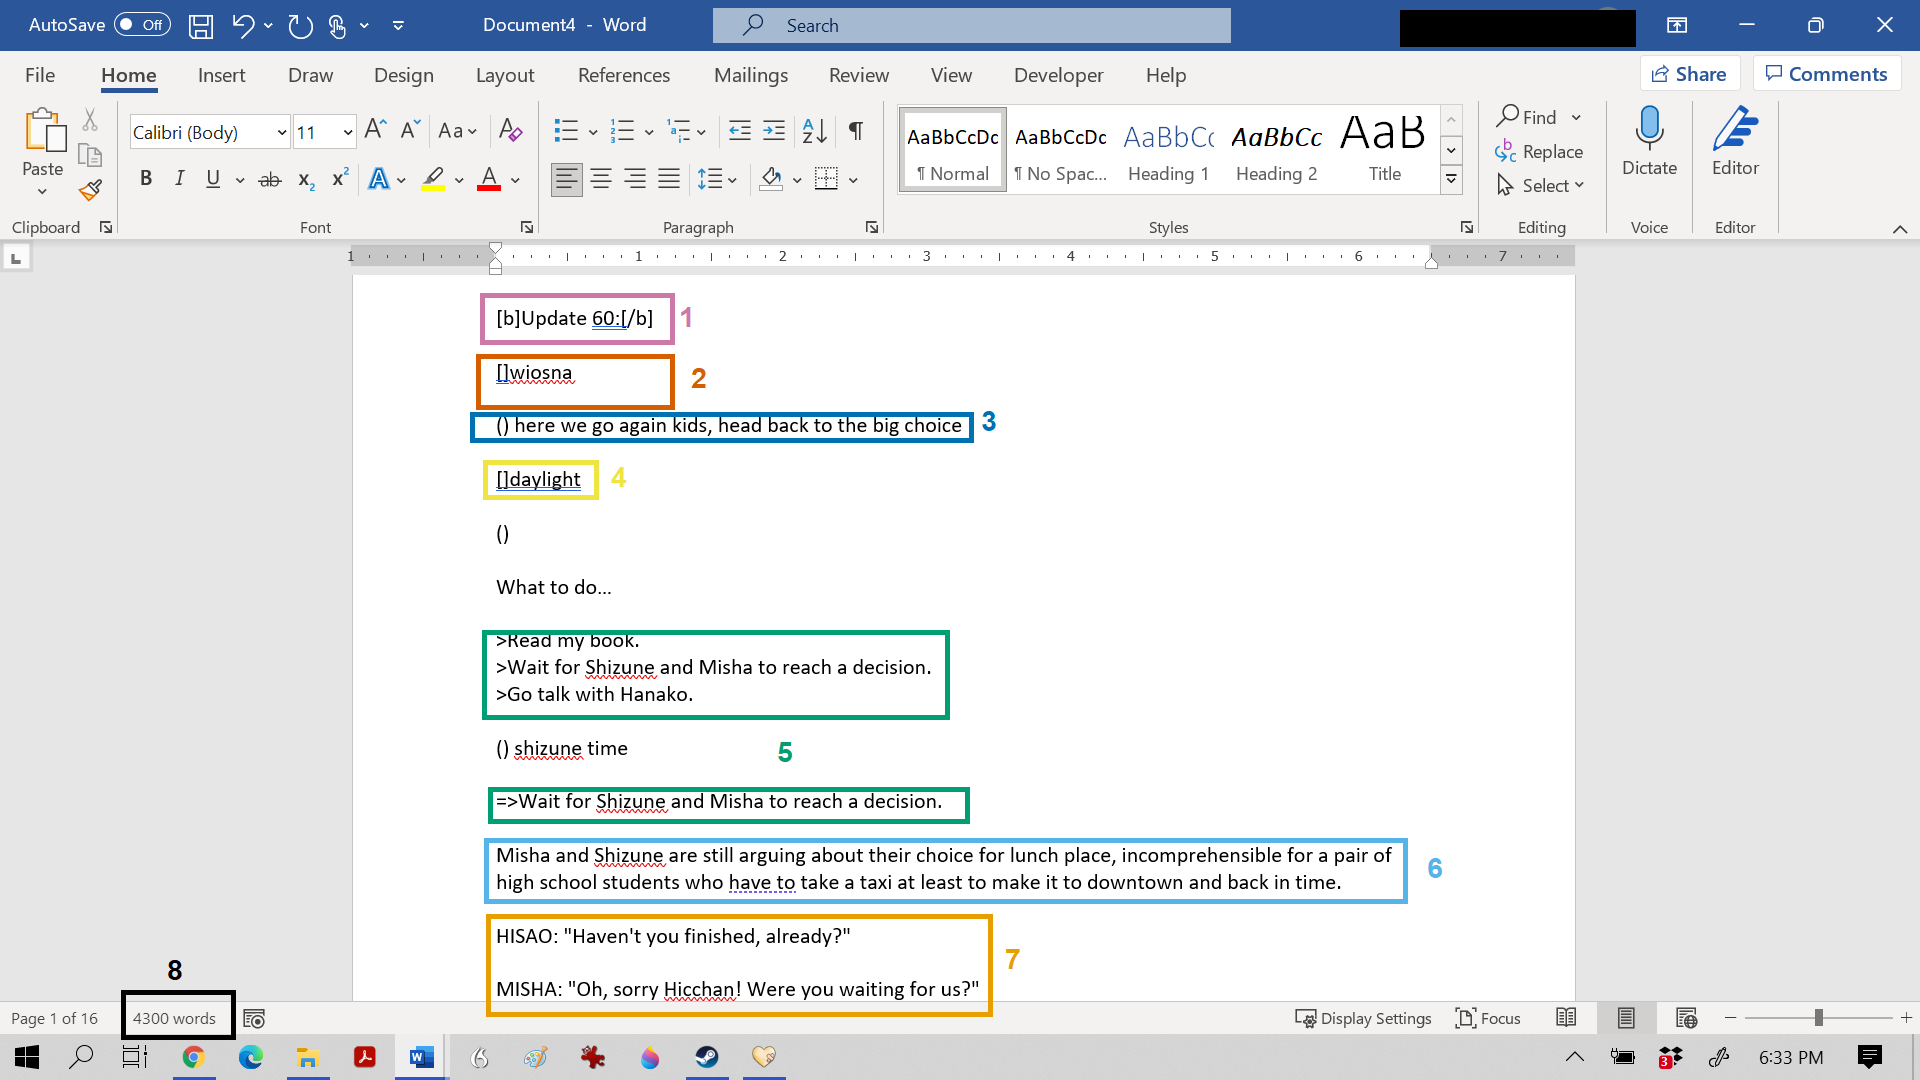
- (pink): ”Update:” (with bold tags) indicates where the update title goes. I usually don’t actually title my updates until shortly before I upload them.
- (dark orange): ”[]wiosna” marks the presence of a music track change. I’ll explain why I use the two-bracket thing in a bit.
- (light blue) ”() here we go again kids, head back to the big choice” tells me I have to go back and write in some commentary on this section later; I keep these notes short and easy to write so I can keep moving through gameplay.
- (yellow): ”()” without text tells me I have to put a screenshot in there. I used to keep track of which screenshot went where by adding a note after each pair of parens (I used [] to mark commentary and just entered in music links manually), but I abandoned that after discovering a technique I’ll show you all in bit. You may want to label those parens if you’re uploading a shitton of images and need to keep track of what goes where, or if you’re just starting out and aren’t confident you’ll remember how you want your screenshot order to work.
- (green): ”>Read my book.” and its equivalents indicate dialogue options the game presents the player. I took the > demarcations for choices from something I did in an LP that never made it to the archive; I took the => demarcations that indicate whatever choice we took, regrettably, from Homestuck. > and => serve to make those options pop and are both visually clearer and easier on screenreaders then stuff like bulleted lists with bolded answers.
- (light blue): Plaintext is just straight narration. You could probably guess this.
- (light orange): ”HISAO:” and its ilk mark lines of dialogue. I’m very careful that every line of dialogue starts with the all-caps name of the speaker, a colon, and a space for reasons I’ll go into later.
- (black): ”4300 words” was a little on the long side for one of my updates but well within acceptable parameters. I usually shot for 4000 words an update, which works out to about 20 minutes of reading since IIRC the average English reading speed is about 250 words a minute, and I think 15 minutes for an update in a visual novel LP is about respectable. For more narrative LPs, I usually go much smaller, maybe 1500 words, to make the writing load easier. This update looks like it’s longer than it actually is, since much of that word count is coding that doesn’t show up in the update.
- (not pictured): Commentary. Most LPs just separate commentary from game text by using italics or bold for one or the other, but I recommend against that. Text effects, even multiple combined text effects, may not be as visually distinctive as you think, especially on smaller devices. I use
 s to mark the start and end of commentary sections on top of italics to make sure the difference pops, but experiment to find a format that looks good to you.
(Fun fact: the colors I used in that image are (the closest Paint can come to approximating) the Color Universal Design palette, a set of colors specifically designed to be distinguishable for people with just about every flavor of colorblindness or low vision, or even just bad monitors. Feel free to use it in your own work !)
Once I’d run through a full update’s worth of text, I hit save and started writing.
New Style
Recently I stumbled across a different way to put together LPs, one that takes a little more time and technical knowledge but produces much higher quality screenshots and makes transcription a lot easier. You need to use ShareX, which I discuss in more detail later on in this guide, so I’ll copy the installation instructions here. You’ll need to go through them all for this method anyway. Take a look at the Image Hosting and Screenshots (Preparation) sections if you need more info.
Explopyro posted:
I'll do my best, for better or worse. Here's the way I've been doing it with ShareX.
To set up ShareX to upload things to LPix (you only need to do this once):
1. Go to this page and copy all of the text in the white box to your clipboard.
2. Open ShareX.
3. Go to Destinations -> Image Uploader and pick Custom Image Uploader.
4. Go to Destinations -> Custom Uploader Settings.
5. Click Import -> From Clipboard. (On the left panel, partway down.) This should add lpix as a custom uploader.
6. On the right side, you should see the username, password, gallery fields. Fill these in with your credentials appropriately (for your LPix account, not your forums account). I usually make a new gallery for each update (and change the setting here before I upload), but organise things how you like; if you're just using the default gallery, leave Default here.
7. Close the window. You should now be ready to upload images.
To upload images:
Upload -> Upload File (to upload a single image)
Upload -> Upload Folder (batch upload an entire directory at once). It will ask you to confirm ("do you want to upload 100 images?") before starting.
Once the images are uploaded, they'll show up in the main window, you can right-click them there and pick "copy URL" to get the link to the image. Although what I usually do is just open the LPix gallery in my browser and copy the URLs from there, I name them sequentially so I can just go down the list and paste them into the appropriate location in my post.
I hope that broke it down enough to be helpful, maybe?
The program is more powerful and does other things than this, but this is all I need from it, so I haven't really experimented with other features. When my average update is 150-200 images, it isn't really practical to do them individually.
If you're only doing 15ish images per post and your current methodology is working for you, you might not want to go through the hassle, but IMO it's worth it at any point beyond single-digit numbers of images.
This is a long ‘un, so if you have some technical aptitude, the process has already been summed up:
PurpleXVI posted:
Record your gameplay with OBS, ShareX or the utility of your choice while playing, being mindful of lingering over things you'll want to screenshot. Afterwards, fire up the recorded video in the player of your choice and screenshot as needed, then trim the screenshots as you plan out the update, going back to snap more screenshots if you notice a poor frame or something missing.
If that’s not enough for you, the procedure from here goes like this:
- Boot up your game.
- Open ShareX. You should see a list of options on the left of the screen, and “Capture” should be at the top that list. Select that option. About halfway down the sublist that opens should be a “Screen recording” option. Click that.
- You should now be able to select what you want to record. Tab over to the game and select it. ShareX is now recording the game, but it doesn’t display any icons telling you that, so keep track of when and how many times you clicked that button.
- Play the game. Make sure your mouse cursor isn’t on the screen any time you would conceivably want to take a screenshot. How long you want to play really varies depending on the game and your LP style, I recommend recording in bursts of half an hour, an hour at most; any more than that and it’s a headache to edit. Side note: you won’t be using everything you record, so you don’t have to worry too much about, say, what the start and end of the video look like.
- End the recording. Once you’re done, tab back to ShareX and go through step 2 again; clicking that option will now end the recording and pop up an icon in the ShareX window that lets you navigate to your video. Feel free to take multiple videos, just remember to keep your cursor out of the picture and confirm you started and ended recordings appropriately.
- Open the video by clicking it in ShareX and resize it to fit whatever window you played the game in. If you don’t, your screenshots will have bars you need to remove during editing. Also, be careful to note where track changes were during play, because ShareX may not capture sound when it records (not sure what I’m doing wrong there).
- Go through the video, taking screenshots whenever you feel necessary. Remember that whatever media player your computer uses will have a pause bar and your screenshots will capture your cursor, so make sure the pause bar and cursor aren’t visible every time you take a screenshot. Go through however long you figure your update will be; you don’t have to worry about being precise here.
- Open wherever your computer stores your screenshots (you already figured that out, right?) and make sure that your word document, and the video are all open.
- Go through steps 10-13 and decide which of the two methods to use.
- Tab to your word document and construct your post; you can use the draft structure I provided for the old style as a guide for how to format it. Start by playing your video, and use that to track where in the update you are, inserting screenshots, track changes, and/or new dialogue as they line up with the video.
- To capture text from the game, you can either retype it manually, fill things in from the transcript, or use ShareX’s inbuilt OCR. To get there, pop ShareX back open, go to Tools a few options under Capture, and go a little more than halfway down the list that opens to OCR, between “Video thumbnailer” and “QR code”. Clicking that opens up a select tool you can drag over the relevant text (or anything, if you aren’t in position yet). Once you’ve selected something, it pops up a window that’s relatively common sense; use it to select the text you want to record, make sure single line is checked on the left so the service doesn’t insert unnecessary linebreaks, copy-paste the results to your word doc, and edit any issues you see.
- If you notice you need more screenshots, make sure the video lines up with what you needed for step 7 and go ahead and take them. Don’t worry about them being out of order, you’ll fix that in draft editing.
- Instead of doing steps 10-12 separately, you can combine them, taking screenshots as you go through your word doc. I recommend against this because you get a lot more opportunities to screw up your screenshots, but is an option.
- Do a very basic editing pass to make sure your screenshots are lined up, and move on to writing.
This method is significantly more complicated than the last one, but it doesn’t take much longer in practice and you have a way easier time harvesting screenshots and texts. Both work, whatever you decide.
Image Conversion and Irfanview
Of course, once you have your screenshots, you may notice you don’t like how they look; they have black bars along the sides, you can see your toolbar, your screenshots caught multiple monitors, they’re all too big and the archives and you don’t know what they’d look like compressed, whatever. If your issue lies with one screenshot, you can edit it in Paint or whatever, but changing a bunch of images at once is a different matter. For that I recommend Irfanview, an immensely powerful image editing tool with all kinds of functions we will ignore. Instead, I’ve advise you just follow these batch conversion procedures, which should take you at least most of the way. Let me know if that link goes down and I’ll try to re-create it. Just a few extra notes to provide context:
- Try to use a naming scheme for your converted screenshots, makes it easier to track which images go where later. There’s a field on the right of the conversion screen where you can make that happen. I recommend a standard scheme you adjust for each update; mine goes “[3 letters representing the LP] [2 digits representing update number] ###”. That will tell you where your converted screenshots belong at a glance and make the program track the numbers for you. For instance, the ninth image of the second update of my WitchSpring R LP would come out labeled “wst 02 009”.
- Like I talk about elsewhere, you probably want to make sure your screenshots are have at most 900 pixels to a side for archival purposes. You can make sure that happens with the resize options in advanced options (upper-middle left).
- If you want to regularly crop out parts of the screen (i.e. UI stuff), use the crop option in the upper left of advanced options; the X and Y coords tells the program where to start from the image, the options just to the right talent how to reckon from that point, and the height and width options tell it how big you want the corrected image. Experiment a few times before posting to see what looks right to you, but remember the resize option below will immediately adjust the results.
- Be very wary of the automatically-selected resampling option (middle left). Resampling will take your image during conversion and try to guess how to make it look better in its new size, as opposed to just expanding or removing pixels to make it fit. Unfortunately, resampling doesn’t always actually make a new look better, and it absolutely screws over any pixel-art you put through it (so no retro games or games using retro aesthetics). Experiment with how resampling looks before you decide to leave it on.
Writing
This section covers how to write for your LP and I want to start it off by shooting myself in the foot: of all the different parts of this guide, you should take this one the least seriously. Writing is highly relative and very personal, and while I stand by the advice I give here, you should feel even freer than usual to ignore parts you don’t like. That said, I suggest you at least read the general advice since it applies so universally.
Writing is never as easy and straightforward as people who don’t write think it is, but that doesn’t mean it has to be a trial. Like I mentioned in the philosophy section, to reduce frustration you should probably focus writing things you find easy to write, whatever that happens to mean for you, you don’t know that off the top of your head there’s no reason not to experiment and figure it out. There’s plenty of writing advice out there on the Internet, but I find, while outright bad advice is relatively rare, you don’t find good universal advice because everyone approaches writing differently. Do some research, do the drills I laid out in the philosophy section, and get a grip on how your writing works.
That said, LPing does have several unique constraints and qualities you can’t find in other media, so let’s go over some common concerns by category. I’ll cover stuff like post formatting in depth in a later section; for now I want to focus on the writing process itself.
General
First off, let’s hit a few concepts that apply no matter what kind of LP you’re running:
- Figure out in what order you like to write things early – commentary, narrative, dialogue, descriptions, whatever, figure out which ones take the most time and energy for you to put together and find out whether you like doing the hard things first or last. Once you have a game plan on writing order, stick to it as best you can; the routine will greatly streamline your process.
- If your game features dialogue and you’re using character portraits, when a character says a bunch of lines over multiple text boxes, combine them into one paragraph instead of having each sentence or two stand alone. It just looks better than spreading it out across a bunch of lines. You can break this rule for dramatic effect or if you feel there’s good reason, but I recommend against it.
- Don’t bother trying to develop a style. I don’t see this problem in LPs as much as among serious “artists”, but people do still sometimes try to consciously develop some kind of unified style or set of techniques as a trademark. That rarely works, you just end up making stuff that feels clunky and derivative. You will develop a style naturally over time, but that style will emerge organically from the tricks you fall back on and the tropes you like to use or avoid. Let your writing breathe.
- Be wary of line-image-line-image. Sometimes you can sum up a screenshot or group of screenshots in one sentence, and if so, you probably should. But screenshots and lines of text take up very different amounts of space on a screen. If the amount of space text and images take up in your post don’t line up at all, it can look jarring and offputting. There is no ideal ratio here, I’m just advising you against updates that consist of screenshots with one-line captions.
- Don’t force humor. It can be tempting to try to cram as many jokes in as possible, but that usually comes across as fake or distracting. If a joke occurs to you while you’re writing something, throw it in if it works; otherwise, just keep writing. Worst comes to worst, badly-thought-out humor can actively drive readers away. I remember an otherwise solid and inoffensive RTS LP that used the word “rape” to describe every major loss of units or objectives for the first few updates. The thread brought the LPer to task on this and he apologized and stopped doing that, but by that time he’d already driven a bunch of potential readers away.
- Kill your darlings. That’s standard writing advice, I know, but in an effort-heavy medium like LPing that goes double. While I feel you can definitely go too far streamlining your writing and make it boring and sparse, you should always be on the lookout for stuff that doesn’t add anything for you to cut. If you’re looking at a joke, observation, or even gameplay sequence and you realize you really don’t want to remove it, that usually means you know, deep down, it doesn’t really contribute anything and it needs to go. You may want to ctrl+x that stuff and tuck it in a separate word doc for later use, however.
Most of that advice is generic, and in general, you can probably find better writing advice from better writers elsewhere. How you run your LP is up to you, and the way your writing style naturally flows probably how you should instruct your LP. However, there IS one writing style you probably won’t find advice about elsewhere, one nearly unique to screenshot LPs.
Portrait-based Dialogue
I’m talking about the way this subforum represents dialogue added by the LPer with portraits attached. I’m not talking about representations of in-game dialogue here, but the sort of rewritten dialogue a narrative screenshot LP is built off; other LPs rarely use it outside of maybe a gag or two. It works very differently from conventional prose, but that just means it plays into the unique strengths of an LP.
- The dialogue has to do all the heavy lifting. Portrait-based dialogue doesn’t usually play well with stage directions or character descriptions (unless you do the *takes an action* thing, which works but is clunky and gets grating if used too often), so you have to use the dialogue itself to communicate everything that happens in the scene. You can and should use screenshots to illustrate your points, but you always run the risk of missing a screenshot, lacking the source material to construct an appropriate screenshot, or deviating from the source material enough a screenshot wouldn’t help. Try to make sure your scenes focus on character interactions or actions that can be easily expressed through character interactions and switch to more conventional prose if you need to communicate something complicated.
- If you decided to mix in-game and your own dialogue, put thought into how you want to represent the distinction. You can probably get away with not distinguishing between the two if you want, but if you want to make it clear what is and isn’t original (say, if there’s something about the games writing you want to touch on), you can use BBCode formatting. Plaintext and italics tend to work best. If you do this, think hard about which you think will show up more often, note what you decide in the OP, and use plaintext for whatever will be MORE frequent; italics can get hard on the eyes.
- Use smilies to simulate facial expressions or simple actions. This one is kind of obvious, but most people don’t make full use of the sheer size of the smilie library, so you can get some real mileage out of strategic smilie use. Don’t feel constrained by how a given smilie works in other subforums (unless you’re consciously using that meaning) either, your readers will look past that. Just be careful not to overload your dialogue with smilies, it can look jarring and tacky. Focus on using them to express body language and maybe use them at most a couple times every conversation.
- Remember you don’t have to cover everything through portrait-based dialogue, especially if complicated events happen in the game. Find a balance that works for you.
Workflow: Draft Editing and Finalization
After getting the update down, I tackle formatting, converting it from a draft to something properly BBCoded to look nice on the forums. If you aren’t familiar with BBCode, read the SA BBCode guide; you’ll need img and url tags at the very least when putting updates together. Quote, timg, and list will probably also come in handy depending on what you’re LPing, but we only really need img and url for what comes next.
In my experience, the vast majority of formatting that goes into an update falls under four categories: screenshots, music links, portraits and banners, and thread interaction. That last one belongs in a separate section, so I’ll cover it elsewhere. The other three can be done manually or automated; I’ll cover both approaches for each.
Manual Draft Editing
After I complete the first draft, I usually go for putting in screenshots using one of two methods: manual for really small updates, auto for everything else. Manual is a lot more work and a lot more complicated, but you can do it without any other equipment, programs, or technical knowledge than navigating Windows Explorer, so we’ll cover that first. Make sure you read the section on screenshot preparation earlier first, though.
Screenshots
There are plenty ways to get screenshots prepared; here’s one I used for my Katawa Shoujo LP, where none of the images needed editing before uploading. It’s very inefficient compared to what most people use, forget the automated method later; ignore the next paragraph if you have a better way.
First, open up wherever you’re storing screenshots. Clicking on the screenshots in the directory opens them up in Paint, which I put up with for a while, but, see the button next to the palette and word “open”? If you select an image, click the arrow, and pick “Photos”, it opens it up in an app that lets you just navigate between images using the left and right arrows. Press control-S and it’ll open up a window that shows you where it’s going to be saved with the filename selected and ready to be overwritten; go through the menu on the left to find the folder where you want to save your screenshots, give it whatever name you want, hit enter, and it will take you back to the image, that screenshot now safely in the folder you picked and the process set up to save the next image to the same place. I used to have to make notes in the word document to help me remember where to put images, but these days I can usually tell where every image has to go, especially since I name and upload screenshots in batches of nine.
Every nine images I had ready for uploading, I headed to LPix to upload them. LPix is free for everyone with an SA account, has no image limits, and spits out everything you upload with both a full-size image for reference (SA auto-resizes it if it’s too big to fit on a screen) and the BBCode you need to just copy and paste it into the document. Going through the document like this gave me the chance to do spot edits, too, making that phase much easier.
Music, Portraits
I put these together because they work the same: either you add them all in one by one, like a masochist, or you make copious use of Find-Replace (ctrl+H). Either way, you’ll want to clearly mark where each portrait or music link goes in a consistent way that won’t confuse you and/or the function; I used a couple of capital letters followed by a colon to mark a character and a pair of square brackets followed by a short version of the song’s name for each track.
For portraits, well, using Find-Replace to insert portraits is why some people include cast lists in their OP: it gives them a reason to put all their portraits in one place for easy reference. During editing, you can just hit ctrl+H in the doc, enter whatever markup you use for a given character in the “find” section, tab over to the post with the cast list (open the edit post screen to see the BBCode first), copy the relevant BBCode, go back to the doc, paste that code into the “replace” section, and let it run. Keep in mind that the function should remember the last half-dozen or so times you used it, so if your LP only features a couple characters you may not need to tab over at all.
Things work much the same for music links, though nobody puts soundtracks in the OP unless that’s a key part of the LP for some reason. You’ll want to find a YouTube playlist that has everything; most games these days have their full soundtracks uploaded on YouTube somewhere. If not, you may be able to upload it yourself, but don’t break yourself on the cliffs of perfection trying to figure out an answer if you can’t find the music. Once you’ve located tracks, the process works much the same as it does for portraits, just with more labor to make sure each track link works right. Fortunately, most LPs don’t feature as many music cues as portraits, so you may be better off just manually inserting links whenever the music changes.
Automatic Draft Editing
So, you can do an entire LP formatting things manually. I did. But that’s highly inefficient. You can only upload images one at the time. That drags things out. One time I had to do 120 images for a Shield update. That was… An endeavor. These days, I use a different method:
Screenshots (Preparation)
A friend of mine explained it to me.
Explopyro posted:
I'll do my best, for better or worse. Here's the way I've been doing it with ShareX.
To set up ShareX to upload things to LPix (you only need to do this once):
1. Go to this page and copy all of the text in the white box to your clipboard.
2. Open ShareX.
3. Go to Destinations -> Image Uploader and pick Custom Image Uploader.
4. Go to Destinations -> Custom Uploader Settings.
5. Click Import -> From Clipboard. (On the left panel, partway down.) This should add lpix as a custom uploader.
6. On the right side, you should see the username, password, gallery fields. Fill these in with your credentials appropriately (for your LPix account, not your forums account). I usually make a new gallery for each update (and change the setting here before I upload), but organise things how you like; if you're just using the default gallery, leave Default here.
7. Close the window. You should now be ready to upload images.
To upload images:
Upload -> Upload File (to upload a single image)
Upload -> Upload Folder (batch upload an entire directory at once). It will ask you to confirm ("do you want to upload 100 images?") before starting.
Once the images are uploaded, they'll show up in the main window, you can right-click them there and pick "copy URL" to get the link to the image. Although what I usually do is just open the LPix gallery in my browser and copy the URLs from there, I name them sequentially so I can just go down the list and paste them into the appropriate location in my post.
I hope that broke it down enough to be helpful, maybe?
The program is more powerful and does other things than this, but this is all I need from it, so I haven't really experimented with other features. When my average update is 150-200 images, it isn't really practical to do them individually.
If you're only doing 15ish images per post and your current methodology is working for you, you might not want to go through the hassle, but IMO it's worth it at any point beyond single-digit numbers of images.
So yeah, a lot easier. I’ve also developed a quick-and-dirty method of quickly transferring image links out of ShareX into a word document once you’ve gotten them all uploaded:
- Use ctrl+F to find the first pair of parens (this is why use them).
- Tab over to ShareX, click the first screenshot you want to add, click outside the picture that opens to close that window, and press ctrl+C to get the link. You can also find the link by right clicking and digging through menus, but I find this method faster.
- Tab back to the word document and press ctrl+V, which will replace the parentheses with the link. This only works right if you switch to another window and switch back, otherwise ctrl+V will just put the link in the search box.
- In the Find sidebar, press down to go to the next set of parens. Repeat until you’ve filled in everyscreenshot.
That should do you. Note that these screenshots won’t show up right if you upload them as-is; you’re going to want to make sure all of those links have img tags added before your update goes up. I cover that in the next section.
Automation Setup
Anyway, next I handle music links and portraits by using programming – wait no no don’t go away, I promise this isn’t as bad as you’re thinking. Let me walk you through what I did bit by bit. It requires zero programming knowledge and as long as you don’t let your eyes glaze over in fear you can do it too. I put this together and it works despite having zero programming knowledge myself.
First off, go to word and right-click anywhere that isn’t a button on that banner of options that includes the name of the font you’re using and such. Click “customize ribbon”.
You see that box that says “developer”? Make sure it’s checked and head back to the main screen.

In the banner you clicked earlier, there should be a line of options on the top that say home, insert, etc. One of them should now read “developer” (I circled it in orange). Click that. You see that “record macro” button, the one in green? Click that. Enter an indicative name (without spaces) where it tells you to name the macro, a description of what it does in the description section (in this case, it adds in portraits and music links), and click okay. Then take your hands off the keyboard, this next part is by far the most delicate.

Press control H; that will open the find and replace function. Enter text in both spaces; it doesn’t actually matter for this part what you put in there as long as it’s different, so just put a couple letters in there. Click “replace all”, click “okay”, enter a few different letters in each space, click “replace all”, click “okay”, and finally click “close”. Then go to the upper left and click on the red square that says “stop recording”. And you’re done with this step! Now click the button labeled “Visual Basic” a couple buttons to the left and try not to be overwhelmed.
There’s a bunch of options in this page and it might look different from what I have, but you can ignore all of that. It doesn’t matter. Just look at the text you have there. You should only have one block of text, and it should look something like this:
code:
Sub lpExampleFindReplace()
'
' lpExampleFindReplace Macro
'
'
    Selection.Find.ClearFormatting
    Selection.Find.Replacement.ClearFormatting
    With Selection.Find
        .Text = "dksfj;aldjsg"
        .Replacement.Text = "asdfadsfas"
        .Forward = True
        .Wrap = wdFindContinue
        .Format = False
        .MatchCase = False
        .MatchWholeWord = False
        .MatchWildcards = False
        .MatchSoundsLike = False
        .MatchAllWordForms = False
    End With
    Selection.Find.Execute Replace:=wdReplaceAll
    With Selection.Find
        .Text = "pospjpjpjppjp"
        .Replacement.Text = "opkpojpojpjpojpo"
        .Forward = True
        .Wrap = wdFindContinue
        .Format = False
        .MatchCase = False
        .MatchWholeWord = False
        .MatchWildcards = False
        .MatchSoundsLike = False
        .MatchAllWordForms = False
    End With
    Selection.Find.Execute Replace:=wdReplaceAll
End Sub
Now don’t panic, I’ll go and break down each section of this mess exactly far enough for you to understand how to use it without overwhelming you. I know I’m laying this “do not be afraid” stuff on a bit thick, but I know I would’ve needed this much reassurance if I’d tried to do this before getting used to LPing. For now, ignore everything above the first time it says With Selection.Find, and let’s tackle each subsection together:
code:
    Selection.Find.ClearFormatting
    Selection.Find.Replacement.ClearFormatting
    With Selection.Find
        .Text = "dksfj;aldjsg"
        .Replacement.Text = "asdfadsfas"
        .Forward = True
        .Wrap = wdFindContinue
        .Format = False
        .MatchCase = False
        .MatchWholeWord = False
        .MatchWildcards = False
        .MatchSoundsLike = False
        .MatchAllWordForms = False
    End With
    Selection.Find.Execute Replace:=wdReplaceAll
You see those two lines near the top that start with .Text and .Replacement.Text? That’s all we care about, ignore everything else. The line that starts with .Text contains the text we want to replace, and the line that starts with .Replacement.Text contains the text would want to replace.
We can format our entire update just by using slightly different copy-pasted versions of this stacked together. Adding in more links and portraits is easy; click Visual Basic (to the left of Record Macro) to go to what you put together just now, copy a music link or portrait subsection that looks like what I showed you above, paste it between the end of the last subsection and End Sub (make sure you keep everything indented in the same way!), and switch out the words and links as appropriate.
But there’s one last step to go before we’re ready to actually start putting in the things we need to find and replace. Go all the way up to the part at the top of the text where it says Sub (whatever you named it). Type Public in front of it. That way, every document on your computer can use what you just put together; otherwise you’d have to copy and paste the whole damn thing every time you open the new document, which is not ideal. Make sure to save it by pressing ctrl+s, so it doesn’t go away. And then you’re done with this step!
One last note before we continue: we’ll be dealing with a bunch of categories of find and replace going forward. Within each category you use, I strongly recommend you organize the operations by category, then either alphabetically (for portraits and banners) for by where they fall in whatever YouTube playlist you’re using (for music). This makes double checking for missing links or portraits or whatever far, far easier.
Music Links
Let’s start by showing off how you can add links to YouTube videos:
code:
    Selection.Find.ClearFormatting
    Selection.Find.Replacement.ClearFormatting
    With Selection.Find
        .Text = “[]afternoon”
        .Replacement.Text = "[url=https://www.youtube.com/watch?v=dQw4w9WgXcQ]Katawa Shoujo OST – Afternoon[/url]”
        .Forward = True
        .Wrap = wdFindContinue
        .Format = False
        .MatchCase = False
        .MatchWholeWord = False
        .MatchWildcards = False
        .MatchSoundsLike = False
        .MatchAllWordForms = False
    End With
    Selection.Find.Execute Replace:=wdReplaceAll
In the above mess of code, “[]afternoon” tells you what it looks for when it starts replacement things; give it a name you’ll remember and make sure you enter that exact name every time you want the song to show up. The content after .Replacement.Text in the next line contains the link to the music itself, already formatted for Something Awful; just replace the address with the address of whatever video you want to use and the name after it with the name of that video.
Portraits
Now let’s look at how you do portraits:
code:
    Selection.Find.ClearFormatting
    Selection.Find.Replacement.ClearFormatting
    With Selection.Find
        .Text = vbCr & vbCr & "MISHA:"
        .Replacement.Text = vbCr & vbCr & "[img]https://lpix.org/4021107/misha head.png[/img]" & vbCr & "MISHA:"
        .Forward = True
        .Wrap = wdFindContinue
        .Format = False
        .MatchCase = False
        .MatchWholeWord = False
        .MatchWildcards = False
        .MatchSoundsLike = False
        .MatchAllWordForms = False
    End With
    Selection.Find.Execute Replace:=wdReplaceAll
This looks complicated. It’s not; all that extra stuff after .Text and .Replacement.Text just makes sure your portraits don’t overwrite themselves or show up in the middle of sentences. Ignore it. Just replace the first MISHA: with whatever shorthand you’ll be using for a person’s portrait as you draft up a post, that image link with whatever image you’re using for the portrait, and the second MISHA: with the name that you want to show up under the portrait. So let’s reassemble this:
code:
Sub lpExampleFindReplace()
'
' lpExampleFindReplace Macro
'
'
    Selection.Find.ClearFormatting
    Selection.Find.Replacement.ClearFormatting
    With Selection.Find
        .Text = “[]afternoon”
        .Replacement.Text = "[url=https://www.youtube.com/watch?v=dQw4w9WgXcQ]Katawa Shoujo OST – Afternoon[/url]”
        .Forward = True
        .Wrap = wdFindContinue
        .Format = False
        .MatchCase = False
        .MatchWholeWord = False
        .MatchWildcards = False
        .MatchSoundsLike = False
        .MatchAllWordForms = False
    End With
    Selection.Find.Execute Replace:=wdReplaceAll
    Selection.Find.ClearFormatting
    Selection.Find.Replacement.ClearFormatting
         With Selection.Find
        .Text = vbCr & vbCr & "MISHA:"
        .Replacement.Text = vbCr & vbCr & "[img]https://lpix.org/4021107/misha head.png[/img]" & vbCr & "MISHA:"
        .Forward = True
        .Wrap = wdFindContinue
        .Format = False
        .MatchCase = False
        .MatchWholeWord = False
        .MatchWildcards = False
        .MatchSoundsLike = False
        .MatchAllWordForms = False
    End With
    Selection.Find.Execute Replace:=wdReplaceAll
End Sub
It should look something like this. Now press control S to save your work and tab back to the word document itself. See the icon in the upper left that reads “macros”? Click that, select the name of the thing you just put together, click “run”, and it will go through your document and tweak it just right. So if I had this…
quote:
[]afternoon
MISHA: “Wahaha~! Fooled you~!”
… I could run it through what we just put together…
quote:
Katawa Shoujo OST - Afternoon

MISHA: “Wahaha~! Fooled you~!”
… And get this. Go ahead and click the link; it’s usually worth verifying your links go to the right place. Plus, due to how I formatted it, you can run what we put together multiple times in the same document without worrying about anything getting overwritten, easier to add or move around portions that way.
Banners
This one is pretty simple compared to the rest; just throw in a version of this code:
code:
    Selection.Find.ClearFormatting
    Selection.Find.Replacement.ClearFormatting
         With Selection.Find
        .Text = vbCr & []banner
        .Replacement.Text = vbCr & "[img](the url of your banner)[/img]" & vbCr & "(name of banner in text)"
        .Forward = True
        .Wrap = wdFindContinue
        .Format = False
        .MatchCase = False
        .MatchWholeWord = False
        .MatchWildcards = False
        .MatchSoundsLike = False
        .MatchAllWordForms = False
    End With
    Selection.Find.Execute Replace:=wdReplaceAll
Adjust the contents to match whichever banner you want to represent and that will throw in the banner you want.
Screenshots (Formatting)
Finally, you can use the same process to add the appropriate BBCode to your screenshots:
code:
    With Selection.Find
        .Text = vbCr & vbCr & "https://lpix.org"
        .Replacement.Text = vbCr & vbCr & "[img]https://lpix.org"
        .Forward = True
        .Wrap = wdFindContinue
        .Format = False
        .MatchCase = False
        .MatchWholeWord = False
        .MatchWildcards = False
        .MatchSoundsLike = False
        .MatchAllWordForms = False
    End With
    Selection.Find.Execute Replace:=wdReplaceAll
    With Selection.Find
        .Text = ".png" & vbCr & vbCr
        .Replacement.Text = ".png[/img]" & vbCr & vbCr
        .Forward = True
        .Wrap = wdFindContinue
        .Format = False
        .MatchCase = False
        .MatchWholeWord = False
        .MatchWildcards = False
        .MatchSoundsLike = False
        .MatchAllWordForms = False
    End With
    Selection.Find.Execute Replace:=wdReplaceAll
These identify the first and last parts of any LPix image link and slap the appropriate code on there. If you use a different image source, you’ll have to tweak the first part to match whatever website you’re pulling your images from and the last part to match what kind of image you’re using (.png, .jpg, .gif, whatever). Don’t worry too much about how much of the address you put in either part; the important thing is making sure you start and end each image link in the same way. Add this to the stuff we already put together earlier, and you should be ready to go. You can sub in timg links using this method if you want, though I suggest either using entirely one or the other or limiting timgs to specific huge images.
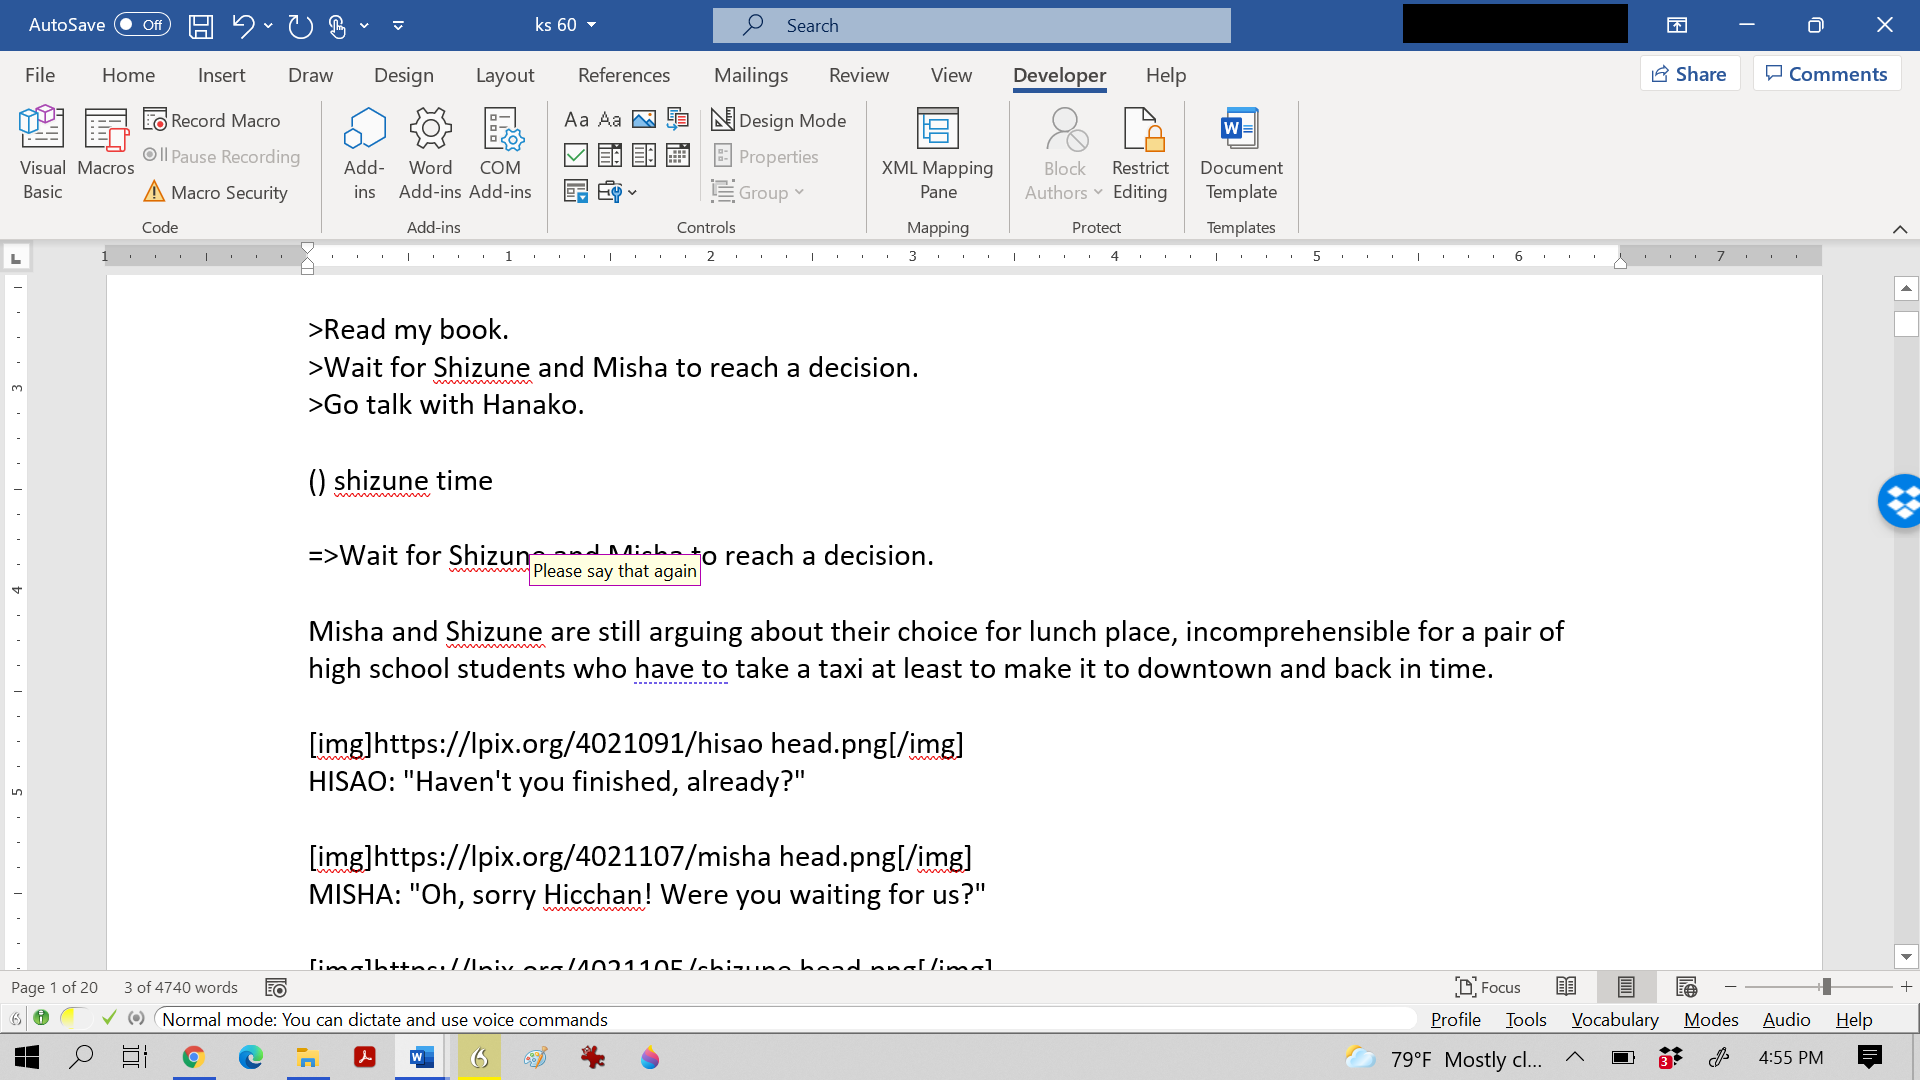
Here’s what it all looks like once we’ve run everything through.
Preparing to Post
This section covers the final touches: prettifying, editing, and actually posting updates. Much of this stuff isn’t necessary strictly speaking, you can just post what you got whenever you got it, but a little bit of time can massively improve how your LP looks and reads. At the very least, you should be putting some time and thought into editing.
Editing
Editing can be grinding. It takes forever, isn’t creatively rewarding like writing is, and sometimes you just want to post what you have. And to be fair, it’s not like posts on Something Awful have professional standards, you don’t have to worry about needing some arbitrary level of polish. But I strongly, strongly recommend giving a post at least two lookovers, preferably with a time gap between them, before it goes up. You may have noticed the various workflows I’ve provided you usually have you build updates in layers (screenshots, writing, formatting, etc.) instead of going line by line. While that is usually the most efficient way to go about it, it also gives you a chance to work those editing passes into the post construction process, letting you get that out of the way. Aside from that, you can find better editing device from better writers, most of it should translate directly, just make sure to preview your updates on SA or the test poster before you upload them to make sure all the BBCode looks right.
Post Prettification and BBCode
While you should already have basic formatting done for your post, there are plenty of ways you can use Something Awful’s inbuilt BBCode to zazz up your updates. There are almost as many ways to misuse it. Take a moment to look over your post and see which of these, if any, apply – though, as always, you can absolutely break these rules if they just don’t work for you.
- Use BBCode for emphasis sparingly. A lot of people overuse bolding and italics; they’re trying to bring attention to the most important parts of their writing, but if they do it too much, it looks strange and gets hard to read. This goes double for LPs using bolding or italics in their formatting somehow. If that’s you, I’d advise keeping it to once per paragraph on average, making whatever it is really stands out without diluting the effect.
- Most people won’t click on links, but the few who do really appreciate it. A good link (or targeted rickroll) adds a lot of texture to your update, but unless your links serve a structural purpose (i.e. soundtrack links), you probably want to limit how often you add them, maybe once every few updates.
- Manage element spacing. You don’t want everything to visually run together or feel too spread out, and appropriate use of line breaks really elevates posts’ readability. I’d say a good rule of thumb is one line of blank space between every element: screenshot, music link, paragraph, speaker in a dialogue, banner, or anything else you use. A lot of people don’t leave breaks between screenshots or lines of dialogue in the same conversation, but I find that visually confusing and I know others do too.
- Think over your smilie usage. Something Awful smilies can be a very powerful tool to communicate emotion or punctuate a punchline, but overuse looks tacky and can make the content feel forced. Try not to abuse them, maybe once every couple hundred words at most unless the smilie serves some structural purpose. However, there’s a nice trick you can do with smilies, especially in longer LPs: if you use the same smilie in the same situation repeatedly, your readers may start subconsciously associating the two, and you can use that association to prompt certain reactions from your audience. You don’t want to go too hard into this trick until it gets obvious. Like with smilies in general, use it strategically.
Fixing Mistakes
Sometimes shit gets fucked. You forget vital screenshots, you forget to save something, you get the wrong image, the whole update gets deleted before you upload it. It’s inevitable and nothing is more frustrating. When it happens, sometimes your gut might tell you you need to go back and get everything back in place just as it should be. Your gut is wrong. Going back and replaying the whole update or elaborately re-creating everything will burn you out like a candle if you aren’t careful, and while sometimes opening the game and snapping a new image or whatever can be feasible, you should never take it to extremes. Make note of what happened in the update and keep moving. If a screenshot is missing, say so, use the  emote or something, and say what it contained. If your screenshot didn’t cover something it needed to cover, make that clear and bridge the gap with text. If part of your update vanished, you can say so and summarize what was there. If you just changed something major about your formatting, make a note of it in the updates where that change text in and don’t worry about redacting the last 40 updates. If a whole ready-to-go update got deleted, consider just telling the thread that, summarize what you lost, and start back from where you were. If you have the time and energy to fix things up, then more power to you. But an LP missing things where the LPer’s explained what happened is a lot better than an abandoned LP. Remember: nobody fucking cares how bad your first LP is.
Conclusion
That’s all I have to say, at least for now. Please feel free to use everything I’ve laid out here in your own efforts, it’s not like there isn’t more room for screenshot LPs out there. If you have any problems using it, send me a PM and wait 48 hours. If I’m around, I’ll reach back out to help walk you through your issue (or tell you to go to the tech support fort if I can’t handle it).